rockbrain
Cave Dweller 
Member since January 2022
Posts: 2,502
|
Post by rockbrain on Aug 12, 2023 9:31:42 GMT -5
I can't clearly see it in the picture. Is your water connection a barbed fitting? I couldn't tell if it was a barb or some kind of quick disconnect. As others have said many ways to do water feed. The easiest is a bucket higher than the machine. For quite a while I was using a bucket that I hung on a screw that was on the back of the facia board on my roof. (working outdoors). Later I repurposed a stand and hung the bucket on that. Used a 3/8" poly tube. Drilled a hole that was smaller than the tubing in the bucket. Cut the tube at an angle, pushed it into the hole then pulled from the other side with pliers. It didn't leak at all. Used this on 2 different machines. They both had a fitting with a male thread that the tubing fit right over. Red neck engineering is often quite effective! A cheap pump will work to. Bucket at ground level with a pump and length of tubing back up to the machine. You can even drain the machine into the bucket. Suspend your pump somehow (lots of ways to do this) so the solids settle to the bottom of the bucket and your pump is recirculating the cleaner water. I did this with the pump from my tile saw and used it on 3 different machines. Of course you could buy spitters and an aquarium pump but I'm not sure what the advantage of the extra time and money spent would be.
I would jump on that generous offer from Stardiamond for the used wheels. I did a lot of cabs with what looked like completely worn out wheels on the machine I got. Worn diamond wheels are still likely much better than brand new sic wheels!
|
|
pebblesky
fully equipped rock polisher
 Purchased another UV mini bowl for tumbling
Member since September 2022
Posts: 1,401
|
Post by pebblesky on Aug 12, 2023 12:50:10 GMT -5
Thanks all! The plumbing system is having a big problem  and I will have to postpone messing with my new toy. |
|
pebblesky
fully equipped rock polisher
Purchased another UV mini bowl for tumbling
Member since September 2022
Posts: 1,401
|
Post by pebblesky on Aug 19, 2023 19:04:49 GMT -5
Thanks to all the info and I eventually set it up:  The sic wheels and water system (aquarium pump to transmit water from ground) seems to work, and since there is some leakage I am waiting for the tubes of proper dimension to arrive. While I was trying to replace the wheels with the diamond wheels that stardiamond generously gifted me, I realized it is more complicated than I imagined. First both wheels are of the same diameters of the sic wheels but they are much thicker:   Which means some of current setup of the machine won't work, for example these pointed by the red arrows:  I don't know what they are called, but they don't seem to be used in modern models. Wondering if it is okay for me to simply remove them, with the new thicker wheels installed? Also, this:  Is it called shaft and shaft bearing? I think this also need to be replaced with a shorter one to fit the thicker wheels. Is my understanding correct? Don't even know where to find the right length and diameter of it though... |
|
pebblesky
fully equipped rock polisher
Purchased another UV mini bowl for tumbling
Member since September 2022
Posts: 1,401
|
Post by pebblesky on Aug 19, 2023 19:08:59 GMT -5
One more (stupid) question, when I replace the wheels, am I suppose to dissemble the wheels from the top side (by taking off the sander wheel first)?  Which means the first step is to loosen the hex nut here, then take one wheel off after another? 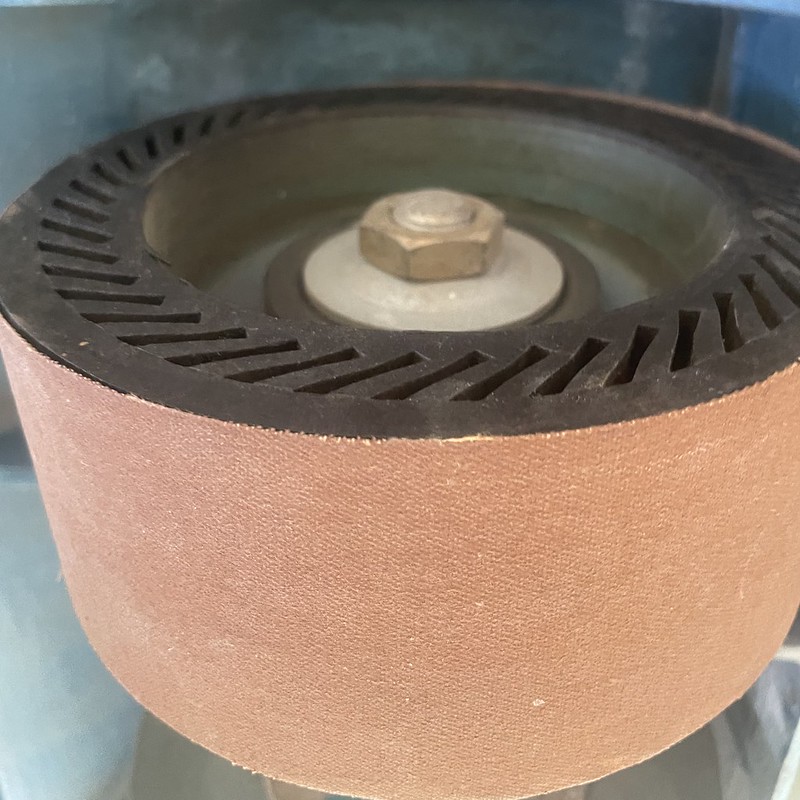 |
|
gunsil
spending too much on rocks

Member since January 2023
Posts: 325
|
Post by gunsil on Aug 19, 2023 19:28:25 GMT -5
I think the machine will work fine without those pieces you have arrows going to. The bearings are the pillow blocks with two bolts holding them down, they should be replaced. Regarding the thicker wheels that should just be a piece of aluminum tubing with separate flanges on the ends. it should be easy enough to shorten the tube as needed. If you can't any machine shop can shorten it easily. On the left wheel you should also slightly shorten the aluminum tube between the left pillow block and the wheel to keep wheel centered under the water outlet. If you wish to use the plates pointed to with arrows you can simply widen the slots for the wheels with a hacksaw.
|
|
pebblesky
fully equipped rock polisher
Purchased another UV mini bowl for tumbling
Member since September 2022
Posts: 1,401
|
Post by pebblesky on Aug 19, 2023 19:37:18 GMT -5
I think the machine will work fine without those pieces you have arrows going to. The bearings are the pillow blocks with two bolts holding them down, they should be replaced. Regarding the thicker wheels that should just be a piece of aluminum tubing with separate flanges on the ends. it should be easy enough to shorten the tube as needed. If you can't any machine shop can shorten it easily. On the left wheel you should also slightly shorten the aluminum tube between the left pillow block and the wheel to keep wheel centered under the water outlet. If you wish to use the plates pointed to with arrows you can simply widen the slots for the wheels with a hacksaw. Thanks gunsil ! Hacksaws and shortening the tube are definitely beyond me  What are the "pillow blocks with two blots holding them down"? Even with your description I am not able to recognize these parts... I would hope everything could be purchased somewhere... |
|
|
|
Post by stardiamond on Aug 19, 2023 19:58:05 GMT -5
On my 8 inch stardiamond console I remove the arbor and then the set screw that hold the polishing pad and then slide all the wheels off the arbor, replace the old wheel with the new wheels. To make sure everything lines up I lay the pieces on the ground in the sequence they were removed, put the new wheel where the old was and put everything back on the shaft. put the set screw back in the polishing pad and the entire arbor assembly back where it was.
|
|
gunsil
spending too much on rocks
Member since January 2023
Posts: 325
|
Post by gunsil on Aug 19, 2023 21:31:02 GMT -5
I think the machine will work fine without those pieces you have arrows going to. The bearings are the pillow blocks with two bolts holding them down, they should be replaced. Regarding the thicker wheels that should just be a piece of aluminum tubing with separate flanges on the ends. it should be easy enough to shorten the tube as needed. If you can't any machine shop can shorten it easily. On the left wheel you should also slightly shorten the aluminum tube between the left pillow block and the wheel to keep wheel centered under the water outlet. If you wish to use the plates pointed to with arrows you can simply widen the slots for the wheels with a hacksaw. Thanks gunsil ! Hacksaws and shortening the tube are definitely beyond me What are the "pillow blocks with two blots holding them down"? Even with your description I am not able to recognize these parts... I would hope everything could be purchased somewhere... Well, to replace those wheels you will have to remove all items from one end of the shaft. Looks like there is a locking ring to the right of the right side wheel which will have to be adjusted for the width of the new wheel. The pillow blocks are the only things I see that are bolted down on the shaft, two bolts each. These are the ball bearings that are most likely dried and/or worn out and should be replaced while removing wheels. At least one has to be removed to change wheels anyways. Looking down on your photo with the top off the machine you see the pillow blocks. When you have them off you can measure them and new ones can be ordered from Grainger. If you have a Grainger nearby you can just bring them the bearing and they will match it up. If you can't shorten the spacer tubes any machine shop can do it or anybody with a lathe. Another alternative is you can order generic plastic spacers from Kingsley-North. Either way you will need to use some minor math and determine what thickness you need. If the diamond wheels are 1&1/2" and the old wheels are 1" you will need to make each wheel's spacer 1/4" narrower on each side of the wheel. The thin outside spacer on the right side appears to be adjustable so that doesn't need modification. Restoring and updating these older machines takes a little work for sure but they are worth the effort. I think you can do without the metal plates or you could just to make the needed measurements and have a machinist modify them, shouldn't cost much. Ask away as you go! Do take good photos of the removed complete shaft before you take it apart so you know how it goes back together. You can also mark parts with a sharpie toy know the order of re-installation. |
|


 and I will have to postpone messing with my new toy.
 What are the "pillow blocks with two blots holding them down"? Even with your description I am not able to recognize these parts... I would hope everything could be purchased somewhere...


