Deleted
Deleted Member
Member since January 1970
Posts: 0
|
Post by Deleted on Jul 31, 2013 12:09:58 GMT -5
Tim you gave great advice that seems to have put Mark over the hump to a final repair. Your re-build looks like a new saw!
Mark, if you follows Tim's advice about grit blast and powder coat, then when re-assembled, for all intents and purposes, you WILL have a new saw. Bearings good for another 30 years.
Mark, jim's new tool is "The Rammer".
|
|
|
|
Post by Rockoonz on Aug 1, 2013 21:38:25 GMT -5
I get the green belts at O'Reilly Auto Parts, aka Schucks and who knows what else.
Lee
|
|
Deleted
Deleted Member
Member since January 1970
Posts: 0
|
Post by Deleted on Aug 2, 2013 8:04:51 GMT -5
what? There is really green belts? I thought Tim painted his.
|
|
panamark
fully equipped rock polisher

Member since September 2012
Posts: 1,343
|
Post by panamark on Aug 10, 2013 21:20:23 GMT -5
Okay, I decided to let you all watch my miseries and victories on this saw rebuild. I learned a lot from other people's rebuild threads, so hopefully this will also help someone. I am having to do this in my spare time, so it may take a while. Okay, we started with this: 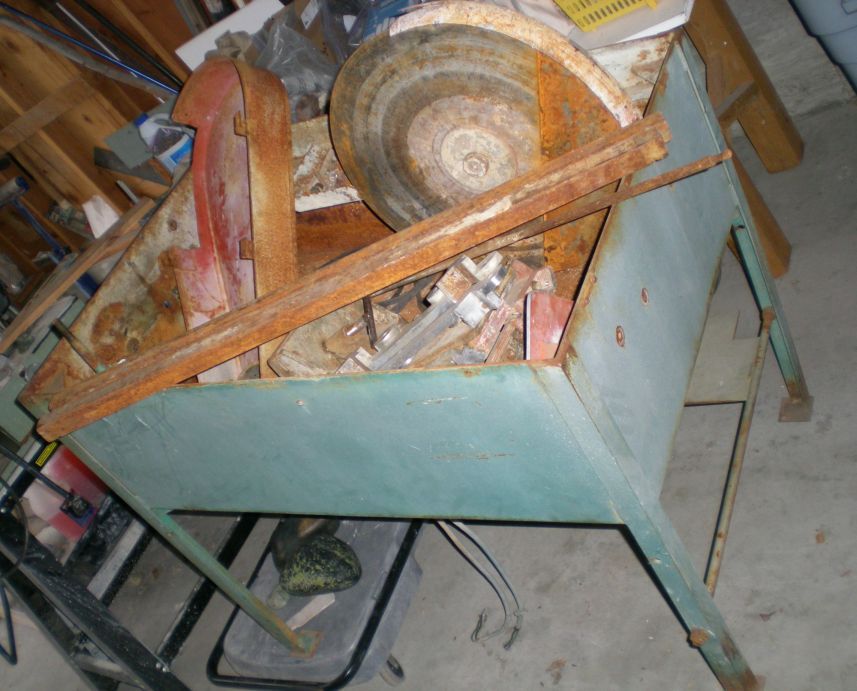 And I was having problems getting down to the bare arbor shaft so I could replace the bearings, sand, paint, etc. 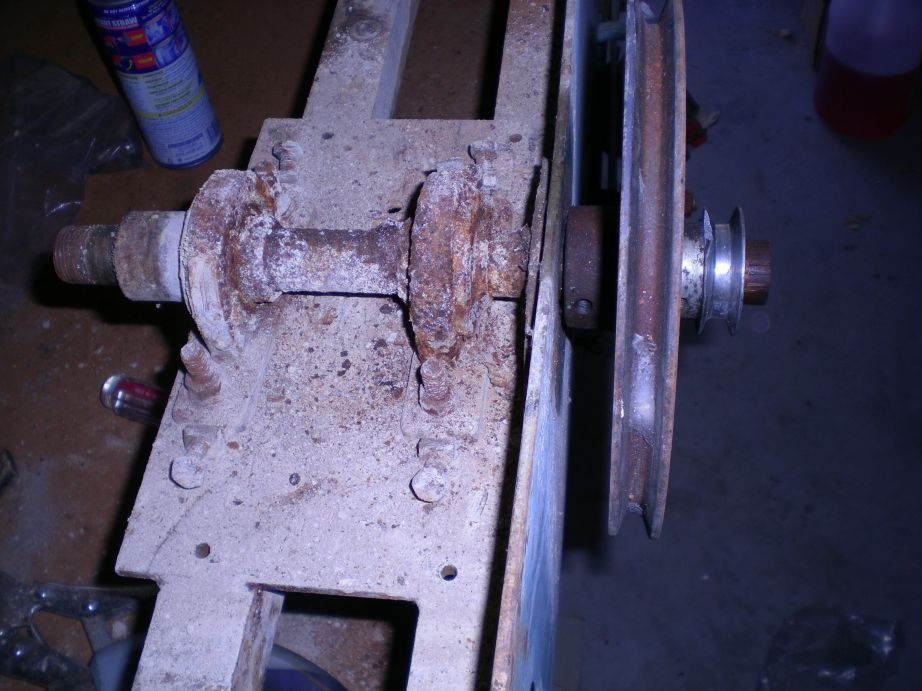 Today I reattacked it with new vigor, LOL. First step, take off the pillow block bearing assembly. Of course there were a few stubborn bolts and no matter what I tried (lube, heat, etc. ) they would not budge. So I got to use the "pursuader" - my hand grinder. Of course my wife wondered what I was ruining with all that noise, LOL. 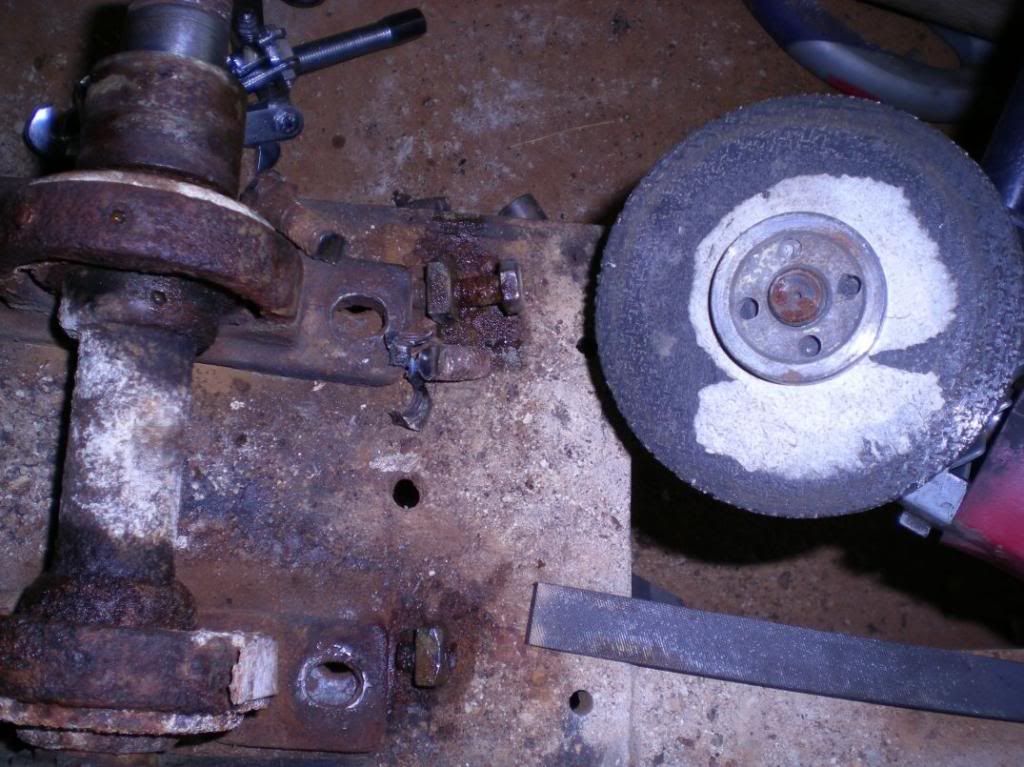 Then it was time to work on the pulleys so I could extract the arbor shaft through the metal tank hole. 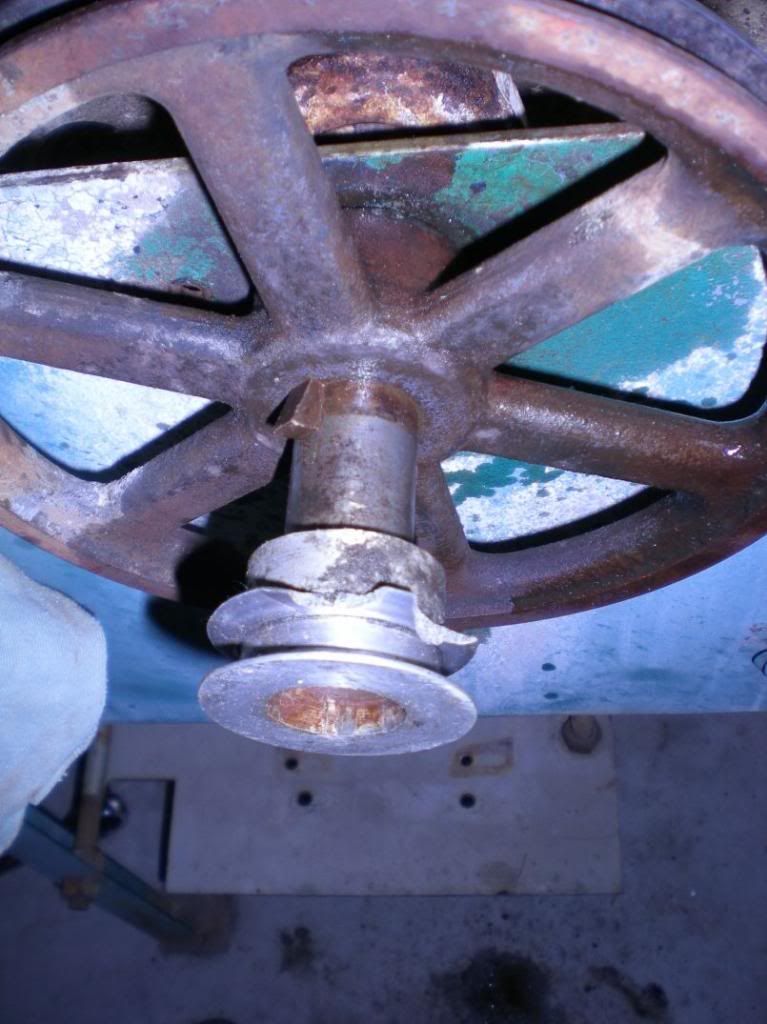 The cheap cast pulley was damaged, but no real loss as they are cheap and easy. The real problem was the main pulley's key that was absolutely stuck in the keyway. It is a Woodruff key and is shown here after an hour of work where it is finally loose and partially removed. I had to tap/push the pulley back towards the tank, then I had barely enough room to use a brass punch to break-free and wiggle the key. I imagine a partially sheared key (heaven forbid!) is an even worse a pain in the rear. Finally success! 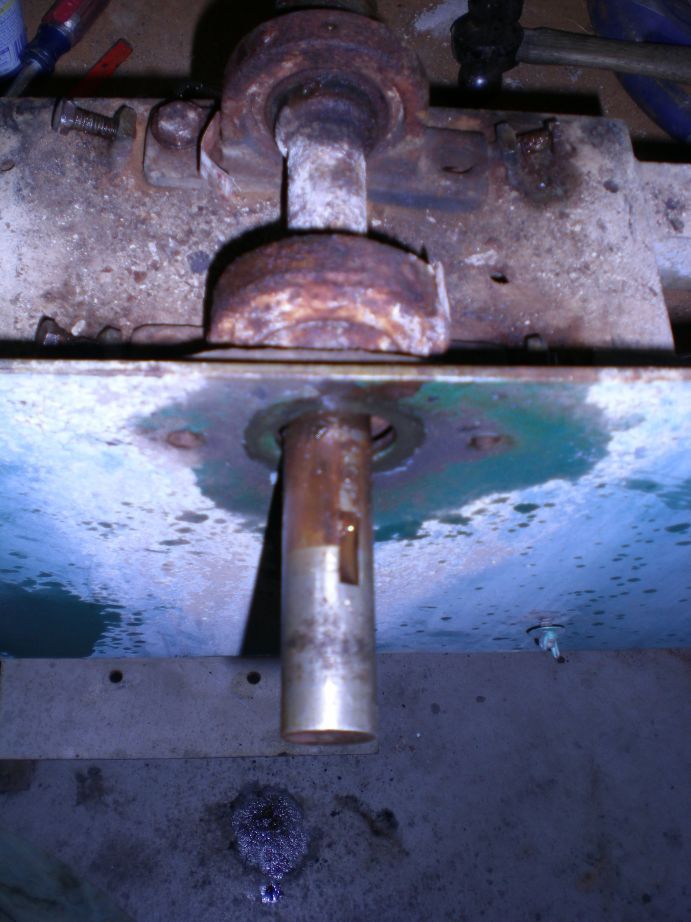 Now the saw is fully stripped and I can start sanding, etc in prep for painting. 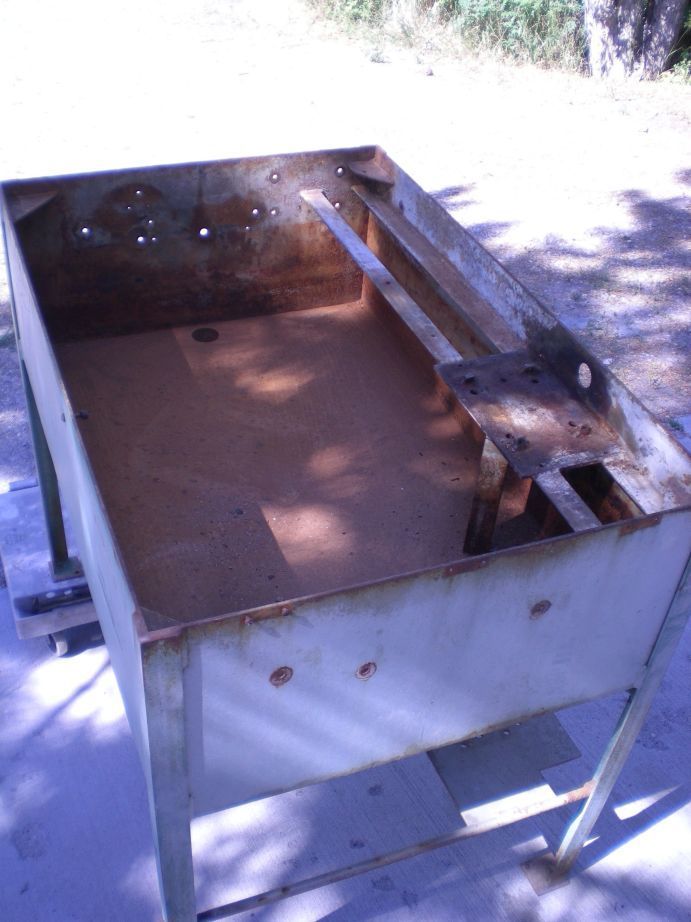 I decided not to powder coat it as my budget is already blown.  (LOL, it was blown the first day! It will only get worse.) 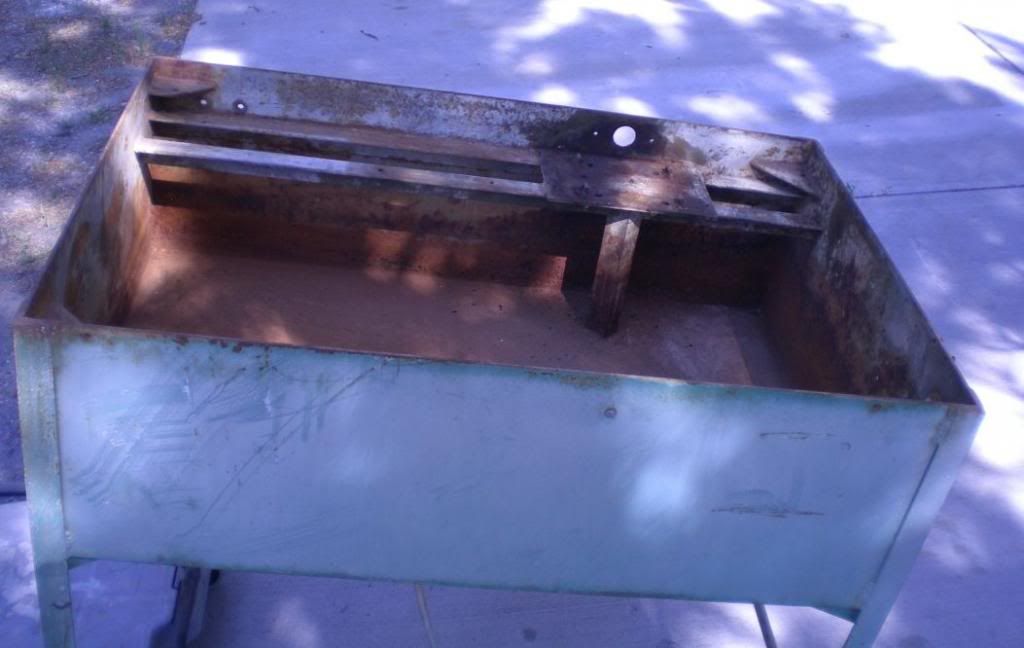 One thing good about this saw is that it was stored without oil (or was already cleaned?) so I didn't have to degrease, etc. Just quite a bit of rust. This old saw has "good bones" and will make a fine machine some day! I will post more pic's when I get it painted. I am thinking of using Hammerite paint. Anybody got experience with it on a saw? |
|
Deleted
Deleted Member
Member since January 1970
Posts: 0
|
Post by Deleted on Aug 10, 2013 22:14:06 GMT -5
You made great progress, the worst is over, except for the finances.  The pic's I posted earlier was painted with Hammerite, it held up great, just give it a few days to cure before you put oil in it. The brush on rustoleum oil base paint at Home Depot works well to, I actually prefer it for inside the tank, gives a thicker finish. I was going to use Hammerite in the last saws I restored but I found a sand blasting place that was just starting to powder coat so he coated them at cost just for the training. Keep the pic's coming. Tim |
|
|
|
Post by catmandewe on Aug 10, 2013 22:15:46 GMT -5
I used automotive paint on the ones I refurbished (just make sure you clear coat it after you spray the color). I use hammerite paint on my slab grabbers, it works good on them but I have not tried it on a complete saw, don't see why it wouldn't work.
You can get a pretty inexpensive sand blaster and sand blast it yourself, it is really pretty easy, one thing I found is as soon as you get it sand blasted then put a coat of primer on it so it doesn't start rusting again.
That saw was started on once before, not sure how far he got though.
Looking good!
Tony
|
|
quartz
Cave Dweller  breakin' rocks in the hot sun
Member since February 2010
Posts: 3,341
|
Post by quartz on Aug 10, 2013 22:31:44 GMT -5
One thing you might think about for derusting the tub: mix molasses 1to8 w/water, enough to cover the rusted areas. Dump it out and hose it after two weeks, most or all the rust will be gone, may need a light scrubbing on really bad places. The stuff works, not toxic, and not expensive. I get it at the local feed store, grocery store stuff is costly. Larry
|
|
|
|
Post by Rockoonz on Aug 11, 2013 10:38:54 GMT -5
Quartz, I will try the molasses trick. I have access to 2 large sandblast cabinets at work with walnut shell and glass beads, but they don't like me contaminating the media with heavily rusted items. If I can easily remove the major scale first and take with me to blast and paint (they also have a spray booth) it would be great.
Mark, the tub looks nice. Did you source your bearings?
Lee
|
|
panamark
fully equipped rock polisher
Member since September 2012
Posts: 1,343
|
Post by panamark on Aug 11, 2013 14:01:58 GMT -5
Thanks all. Yes, I am very thankful someone removed most of the major oil and goo!
I have never heard of the molasses, but it is good to know. I have all the scale off and it is starting to look promising.
Haven't gotten to sourcing the bearings yet. Do you recommend I stick with SealMasters?
|
|
|
|
Post by Rockoonz on Aug 11, 2013 19:27:22 GMT -5
|
|
panamark
fully equipped rock polisher
Member since September 2012
Posts: 1,343
|
Post by panamark on Sept 29, 2013 19:44:02 GMT -5
Haven't updated the saw rebuild in a while as I have been busy on other things. But I have made some good progress. I put about 2 full days of hard work sanding and wire brushing the rusty parts down to either bare metal or good base paint. Then I painted it. Was: Now: 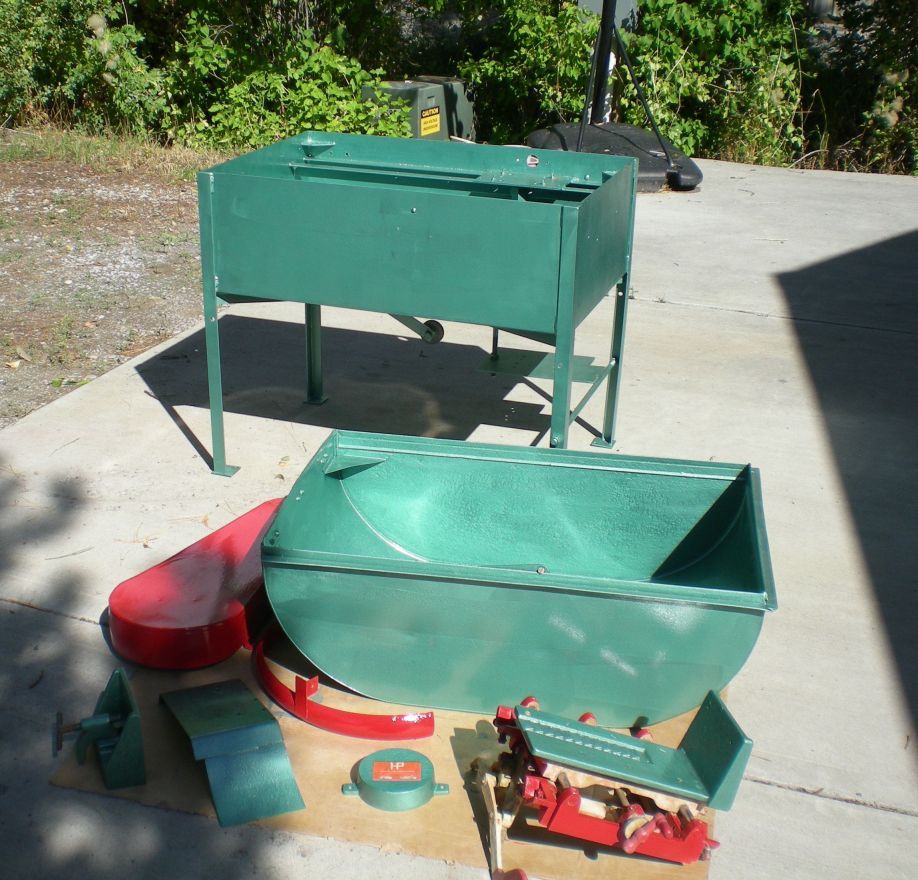 I ended up using Hammerite RustCap in color Mid-Green. It is a very close match to the original color of the HP. It took 2 quarts. I chose this paint because it has great reviews on it's durability, toughness, and ability to apply over any light rust I might have missed. It is a thick paint and requires time (about a week) to dry nice and hard. But it sticks to metal VERY well and should be the end of any rust I missed. For the red areas I used good ole Rustoleum. I don't really like the red with the green, but I did want to remain true to the original HP colors. Hammerite will set up to have a nice "hammered metal" look on the horizontal surfaces. (On vertical surfaces it does not set up quite the same way to give a hammered look, but it is still very attractive.) 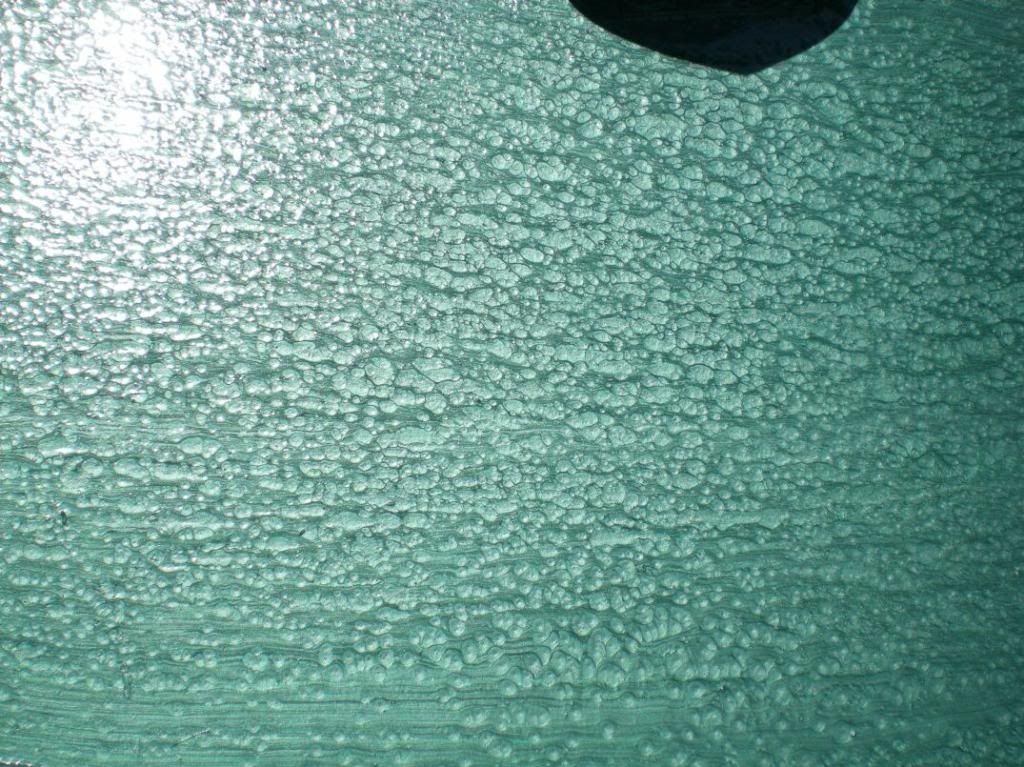 I thinned it just a bit so it would flow better. On the large flats areas I could use a foam paint roller, but all the corners and small stuff needed a brush. 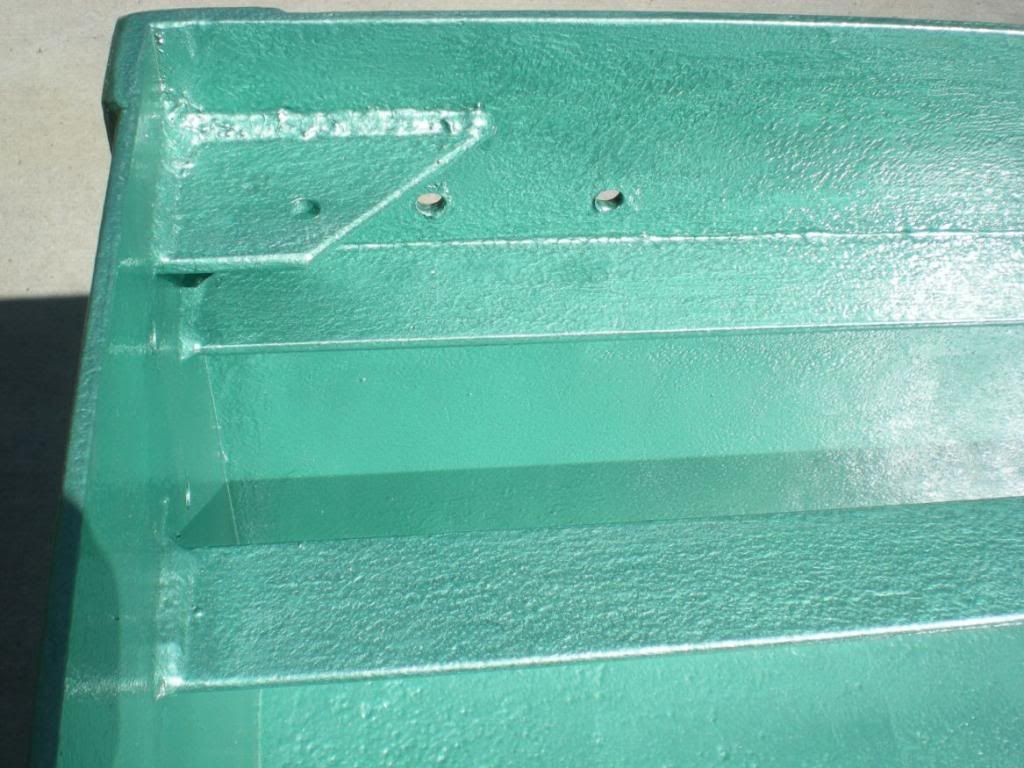 Next task was to tackle the old, rusted pillow block bearings stuck on the saw blade shaft. The shaft amazingly still turned on the bearings, but it wasn't real smooth  . 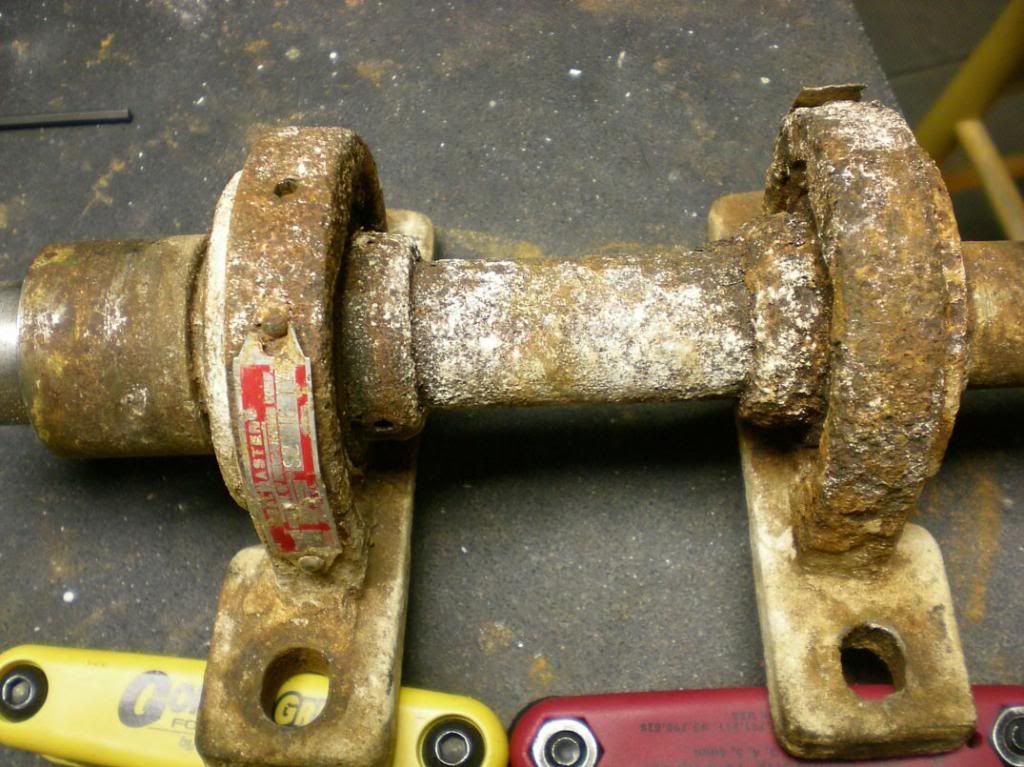 The block's set screws were totally rusted shut and there was no way to simply back them and remove the assembly from the shaft as the manufacturer intended. I could have just bought a new shaft from Highland Park, but they want $53 plus shipping. And as my wife says, "you may not be cheap, but you are trending that way". So I decided to first give it a try with the "persuader", aka angle grinder. I had to work very slowly and carefully as I didn't want to cut or mar the shaft. The sealmasters did their best, and they were still pretty darn good inside even though the outside looked terrible! They are sealed bearings with no zirks, and the lube was all shot. Plus the balls were pitted in spots. Interesting that HP now uses sealed bearing with zirks so you can relube. Good move! 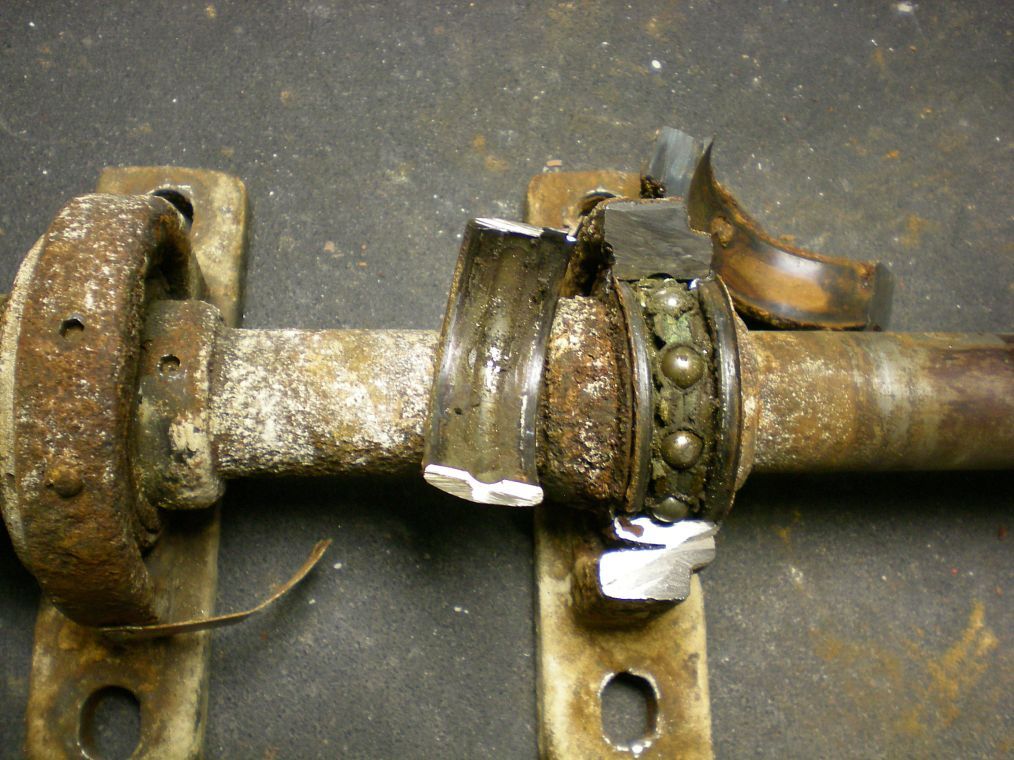 After much careful surgery I finally got the shaft free and clear. The right hand bearing was difficult as the hub was in the way of the grinder. Only made a few shallow nicks in the shaft so that came out great. 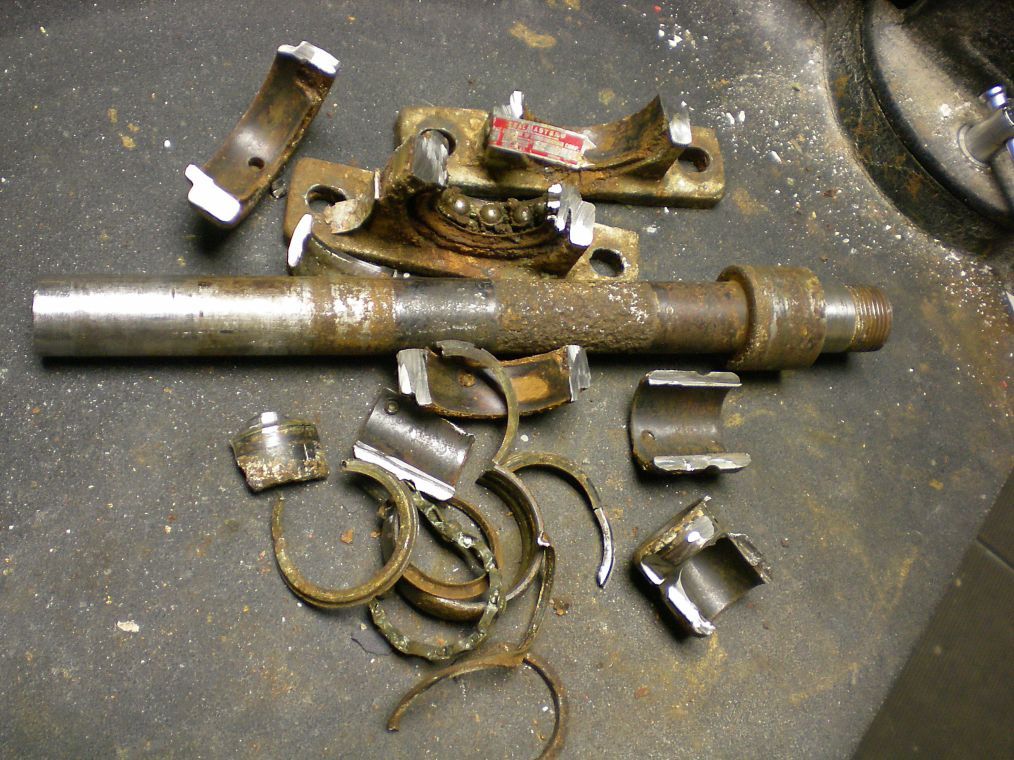 Next I will put the shaft in a drill press and polish it to a shine. From then on it is all forward progress  I have already gotten some new Pillow Block bearings. I went with IPTCI brand. They were about 1/4 the price of Sealmasters and they have a good record. I will plan on periodically hitting the zirks with a bit of grease and hopefully they will last a lifetime. I will post more when I get time. |
|
|
|
Post by jakesrocks on Sept 29, 2013 20:06:31 GMT -5
Don't use too much grease, or you may blow the seals out. Once the seal is displaced, dirt and water can get in.
|
|
panamark
fully equipped rock polisher
Member since September 2012
Posts: 1,343
|
Post by panamark on Sept 29, 2013 20:34:20 GMT -5
Yes, thanks Don. The supplier told me to be careful like you say. He said about 1/3 a pump with the grease gun. I will try to google how much when I refresh, but do have an idea how much? |
|
Deleted
Deleted Member
Member since January 1970
Posts: 0
|
Post by Deleted on Sept 29, 2013 21:13:31 GMT -5
|
|
|
|
Post by jakesrocks on Sept 29, 2013 21:30:49 GMT -5
Those bearing don't hold a whole lot of grease to begin with. I'd guess what supplier told you, if not a little less. If you notice grease coming out of the bearing, you've gone too far.
|
|
robsrockshop
has rocks in the head

Member since August 2012
Posts: 715
|
Post by robsrockshop on Sept 30, 2013 8:35:08 GMT -5
That's a nice looking paint job for roller and brush i'll have to look into that type paint you used thanks for sharing that. I hate spraying paint, esp saw tanks all those fumes start rolling and just is a real pain.
|
|
robsrockshop
has rocks in the head
Member since August 2012
Posts: 715
|
Post by robsrockshop on Sept 30, 2013 9:24:16 GMT -5
|
|
Deleted
Deleted Member
Member since January 1970
Posts: 0
|
Post by Deleted on Sept 30, 2013 9:27:31 GMT -5
Wow, I thought it was sprayed. Awesome job. Good luck with the shaft. Hopefully it is not rusted beyond use.
Jim
|
|
|
|
Post by johnjsgems on Sept 30, 2013 10:55:22 GMT -5
American bearings at least are shipped about 2/3 full of grease. About a short pump of the grease gun will fill the bearing. You should see the seal swell but not leak. I've used a lot of Hammered finish spray cans but never found that shade of green. I'll have to look harder when I do some more HP's.
|
|
robsrockshop
has rocks in the head
Member since August 2012
Posts: 715
|
Post by robsrockshop on Sept 30, 2013 11:07:21 GMT -5
|
|


 (LOL, it was blown the first day! It will only get worse.)


 .
.  I have already gotten some new Pillow Block bearings. I went with IPTCI brand. They were about 1/4 the price of Sealmasters and they have a good record. I will plan on periodically hitting the zirks with a bit of grease and hopefully they will last a lifetime.


 Drifting along with the tumblin' tumbleweeds
