ziggy
spending too much on rocks

Member since June 2016
Posts: 483 
|
Post by ziggy on Jan 3, 2017 17:51:20 GMT -5
He plans on making the pan out of probably 10 to 14 gauge steel (powder coated after fabbing) and it is pretty small with about 8" W x 12" L x 3" H overall dimensions. The motor mounts will most likely be angle steel. Everything will be mig welded with probably a thicker double or triple layer of re-enforcing steel on the back wall of the pan for the motor mounts. He is going to buy this
Motor to run the diamond cutter
which is a ball bearing 1550 rpm 1/12 H.P. little beast. He is thinking about making the motor mounts in two pieces so he can change the bit when needed or maybe just unbolting the motor will work. Latest idea is to use these cam release handles  to facilitate removal and replacement. 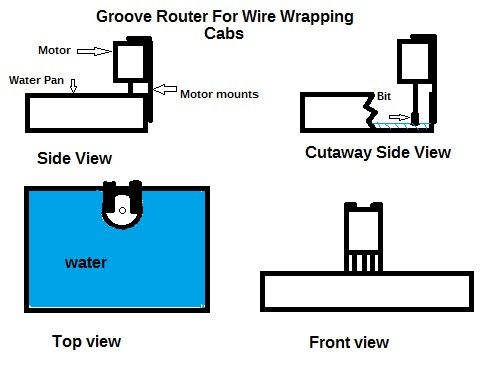 He is going to equip the shaft on that motor with this slot grinding diamond bitwhich will be just submerged in the 1/2" of water in the pan. Bit/cut height can be set by sliding the bit up or down then tightening in place. We'll post updates when/if the project actually gets under way. It's his take on one of these (pic below) but it's purpose built to only make grooves in cabs and not doing glass and stuff like the Wizard.  |
|
|
|
Post by MrMike on Jan 3, 2017 20:38:56 GMT -5
|
|
|
|
Post by rockjunquie on Jan 3, 2017 21:49:58 GMT -5
Is it rude to ask if I can borrow your husband for a few days?  Mine isn't very handy like that. He has his own hobby. Seeing how it's model building, everything he comes up with is on a very small scale. I do have a question about the design- do you think the sides of the water container will be in the way of you working down inside it? |
|
ziggy
spending too much on rocks
Member since June 2016
Posts: 483
|
Post by ziggy on Jan 4, 2017 7:12:23 GMT -5
Funny, hubby used that place to buy the 3 phase motor he made the 230v 3 phase converter he built for his welder. |
|
ziggy
spending too much on rocks
Member since June 2016
Posts: 483
|
Post by ziggy on Jan 4, 2017 7:16:20 GMT -5
Is it rude to ask if I can borrow your husband for a few days? Mine isn't very handy like that. He has his own hobby. Seeing how it's model building, everything he comes up with is on a very small scale. I do have a question about the design- do you think the sides of the water container will be in the way of you working down inside it? Hubby would charge you a fortune prolly  We both were considering the water pan and its depth as something that could be changed. I think you are right. We have decided to make the two sides and the front lower. After all, the water is only going to be 1/2" deep anyways. 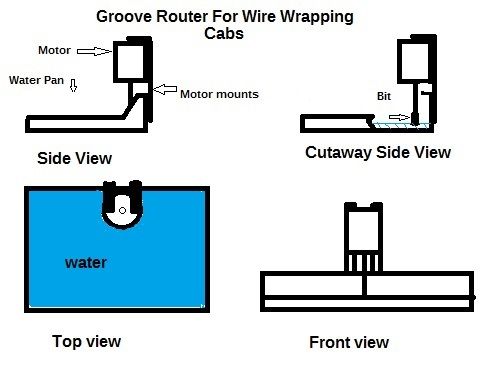 |
|
|
|
Post by Drummond Island Rocks on Jan 4, 2017 7:55:21 GMT -5
Are you trying to come up with something better than the wizard or just cheaper? I have cut hundreds of grooves with the wizard and find it to be a flawless machine for the task. I would not want anything at all sticking up above the cutter. You really need to be able to see good to try to keep a nice even cut depth or your wire will look sloppy in the groove. I am all for home made lapidary tools as long as they are an improvement on what can be purchased.  Chuck |
|
ziggy
spending too much on rocks
Member since June 2016
Posts: 483
|
Post by ziggy on Jan 4, 2017 8:30:31 GMT -5
Are you trying to come up with something better than the wizard or just cheaper? I have cut hundreds of grooves with the wizard and find it to be a flawless machine for the task. I would not want anything at all sticking up above the cutter. Cheaper of course. We are on a fixed income and he likes to build things. Since we will be looking down at what we're doing at an angle, and not looking down from directly overhead, I can't see a problem with the motor up above. It was your pinned entry on this subject (making the grooves) that made hubby decide to build something so we could do it too. I think he has some kind of adjustable depth limiting surround figured out for the bit. Wood router bits use bearings to limit depth of cut. The surround would be mounted to the back of the pan and extend out to the bit or maybe it could be a small one mounted just under the bit attached to the pan bottom forming a raised area under the bit that the stone could not go past. Using the surround as a guide, one could cut grooves with ones eye's closed. He used to design and build glass cutting, drilling, and polishing machines for a living for the last ten years before retiring. I have faith that he can design a machine for this job too. That drawing is not the final rendition. Everybody on here said his cab machine wouldn't work using collars instead of threads and nuts to hold the wheels on. People just couldn't think outside the box. Hubby LIVES outside the box. Well, he had something in mind for that during the design and now guess what. We have an awesome cab machine that uses collars to hold the wheels on. From my point of view, it was an improvement on anything you can purchase as well (it has lots of innovations on it), plus it was less than 1/5 the cost of a store bought one. I'm sure this one won't be a disappointment when it's finished. |
|
ziggy
spending too much on rocks
Member since June 2016
Posts: 483
|
Post by ziggy on Jan 4, 2017 10:08:13 GMT -5
After a couple minutes of consideration and twenty minutes of drawing he came up with the following drawings on the feature he had in mind to control the depth of cut with ones eye's closed. He says he could make several different thicknesses of depth limiting strips that can simply be switched for different cut heights. Simply re-adjust the cutting height on the bit to match. The different height strips he thinks would be overkill as the one height should work no matter where the bit is on the shaft. 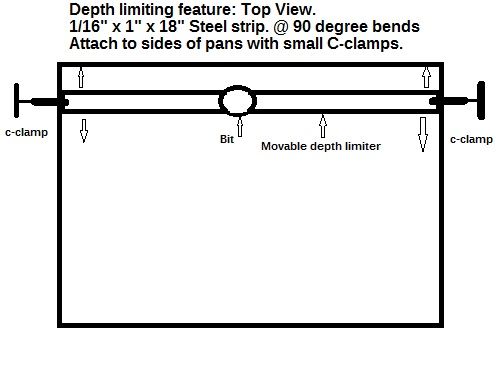 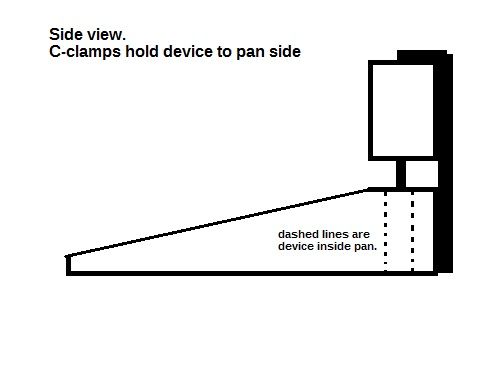 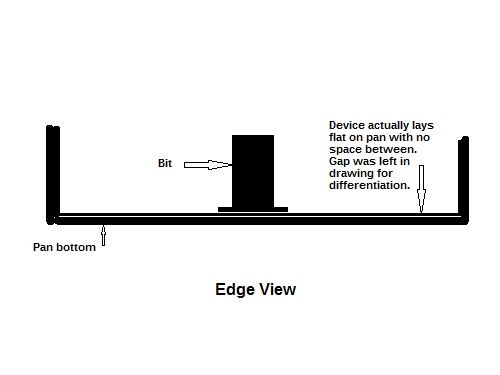 Holding the cab to the bottom of the pan and the edge of the depth strip and moving/turning against the bit should be all it takes to get repeatable and even depth cuts. 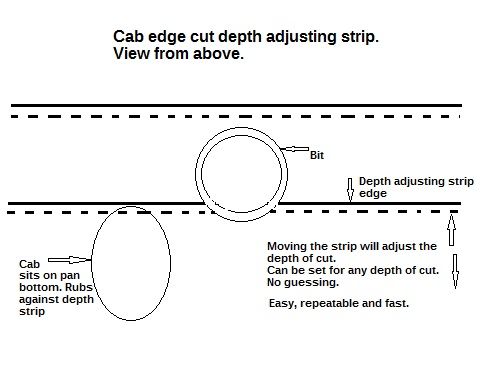 The depth shown set in the drawing above obviously is not the same as the actual depth would be. For illustration purposes only. With a little creative thinking no problem seems too big to overcome. Come to think about it, it might just actually be an improvement over the Wizard too. He has achieved repeat-ability and the bits should last longer because the cut is happening in water and not just made wet with a sponge. Not to mention that with this unit one should be able to do it blindfolded. |
|
|
|
Post by rockjunquie on Jan 4, 2017 10:45:26 GMT -5
Looks good! I haven't done a lot of grooving, but I don't think I ever did more than one depth. Having a few set depths should be nice.
|
|
ziggy
spending too much on rocks
Member since June 2016
Posts: 483
|
Post by ziggy on Jan 4, 2017 11:09:35 GMT -5
Looks good! I haven't done a lot of grooving, but I don't think I ever did more than one depth. Having a few set depths should be nice. He made that strip so by moving it back and forth in the pan the groove can be any depth into the stone and set there, and by moving the bit up and down on the shaft you could get any height you want for the cut from the bottom of the cab to the groove. He doesn't really plan on moving the depth strip after it is adjusted to the correct depth for the wire being used. It is just nice to be able to cut whatever the depth needs to be with repeat-ability and have that as a guide so one can be certain the groove is properly cut instead of carefully judging if things are right or not by trial and error. Hubby thinks the same strip would work no matter the height of the bit on the shaft. Just keep everything square when holding it against the guide strip and pan bottom by being careful and one size (thickness of guide strip) fits all. Or, we could make different heights (thickness) of strip if it turns out we really need to. After all it is only held in with c-clamps and easily switched. He is already talking about switching out the c-clamps for some locking screws, wing nuts and slots to hold things in place. This thing is still a few months down the road according to our budget, but when it's done we will post a video of it in action. |
|
|
|
Post by 1dave on Jan 4, 2017 14:03:42 GMT -5
|
|
ziggy
spending too much on rocks
Member since June 2016
Posts: 483
|
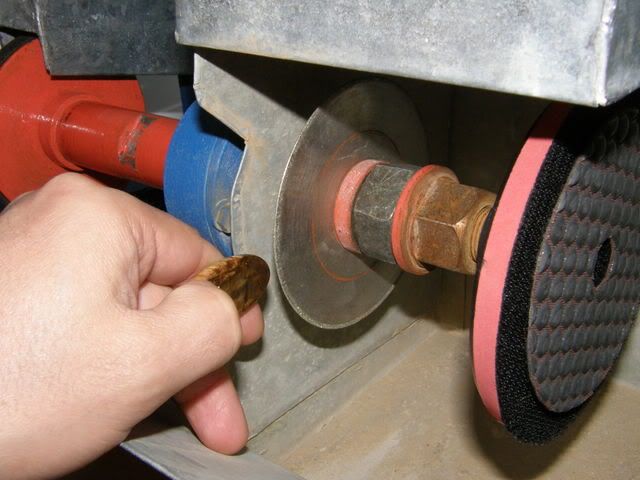
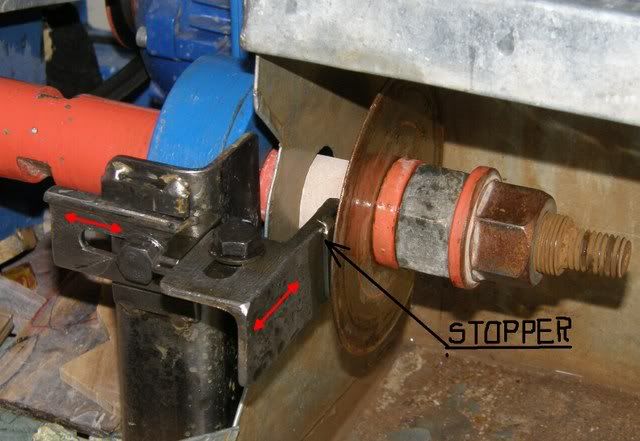
Post by ziggy on Jan 4, 2017 14:37:14 GMT -5
1dave Wow. That is really sweet. The "stopper" is the same basic idea as hubby's "depth strip". Love the way he has two dimensional positioning. I see his setup is radical and out of the box. Love that. We could do something like that on the end of one side of our cabbing machine. Just bolt a blade on the end and make a rock positioning fixture similar to what he has. Maybe hubby will do that design too. He'll have to make sure that the cabber shaft is squarely cut. We might do a study to see how feasible our purpose built one might be to produce and sell to the lapidary world, so we are probably going to go through with that build first. Some of the research will happen here most likely. Opinions, interest in it, price....etc.
|
|
|
|
Post by rockjunquie on Jan 5, 2017 10:55:22 GMT -5
I'd really like to see the finished project. Like I said, though, I don't have a lot of experience to offer.
|
|
vwfence
has rocks in the head

Member since January 2013
Posts: 557
|
Post by vwfence on Jan 10, 2017 0:28:15 GMT -5
couldnt a dremel type tool be used to power the above concept machine and if the drill press were uesed it would be fairly easy to adjust depth
|
|
|
|
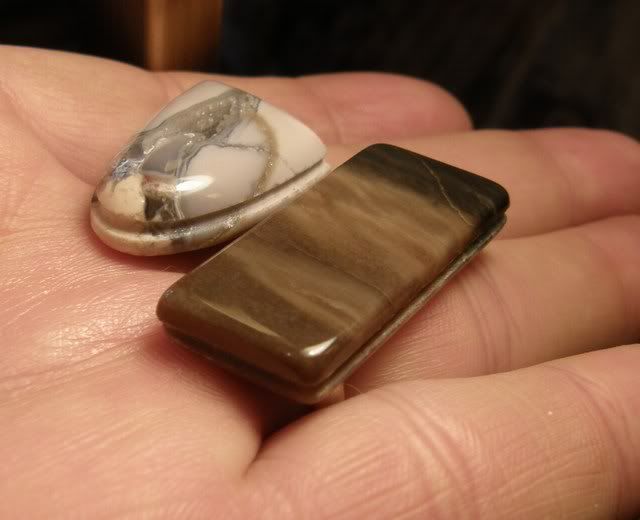
Post by parfive on Jan 10, 2017 3:29:53 GMT -5
couldnt a dremel type tool be used . . . Grooved freehand with a Foredom and wrapped by Jim Fowler. The girdle is under 3mm. 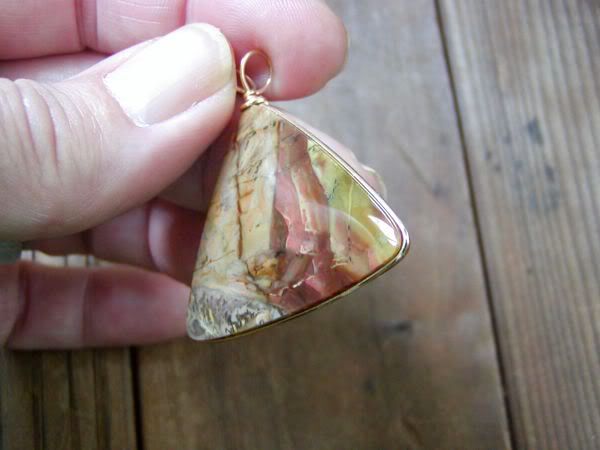 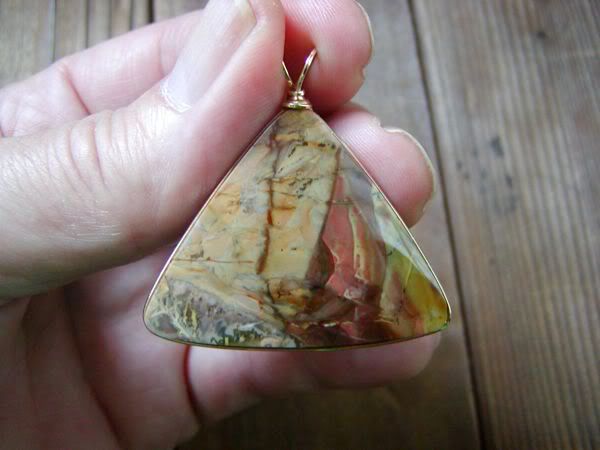 |
|
ziggy
spending too much on rocks
Member since June 2016
Posts: 483
|
Post by ziggy on Jan 10, 2017 7:28:05 GMT -5
couldnt a dremel type tool be used to power the above concept machine and if the drill press were uesed it would be fairly easy to adjust depth The "depth" can be two things with this. Depth of the groove being cut and the depth that the cut happens on the cab from the bottom of the cab. The most important of the two is depth of groove being cut. He has addressed this by adding the adjustable depth of cut stop piece. The height of cut from the bottom of the cab is easily set on hubby's design by simply loosening up the set screw and sliding the bit up or down as needed. Very little change is required for this setting and it won't change too much if ever. Hubby likes to build from scratch. The motor he is buying for his project is designed to keep a steady speed no matter the load. It is 1/12 H.P. The shaft is 5/16" in diameter with a flat milled onto the shaft for set screws. The diamond bit that hubby wants to use is designed for grooving and also has the 5/16" hole through it and is set by using a set screw. His motor runs at a nice steady 1550 rpm. No messing with speed controls and extremely easy to mount by the studs on it for said purpose. The cost of a dremel capable of doing that job is probably more than the $52.00 that the motor costs. is Hubby is not a big Dremel fan because it would mess with his design and he would have to come up with a different way to mount it. Another reason (for him) not to use a Dremel is he wants to maybe build these for sale and the dremel would make it look like something cobbled together instead of something built for the task at hand. Also, he doesn't think dremels are real torquey motors and can be slowed down or stopped with a load. Most importantly, hubby just doesn't want to incorporate someone else's manufactured finished retail product into his. |
|
|
|
Post by 1dave on Jan 10, 2017 9:48:25 GMT -5
Bravo!
|
|
ziggy
spending too much on rocks
Member since June 2016
Posts: 483
|
Post by ziggy on Jan 15, 2017 14:58:40 GMT -5
The build moves forward with some design mods. Hubby is going with a stamped stainless steel pan instead of the powder coated plain steel. Doing it this way saves the pan part fabbing, welding and powder coating cost and effort. The frame that will be holding the pan and the motor is going to be fashioned from the two pieces of steel in the photo below shown with the pan. Hubby decided to not weld the frame assembly also which will instead be bolted together using cap screw bolts. The wide piece of steel will form the sides of the frame. These sides will be bolted together using 2 1/2" pieces of the angle steel as combination corner posts and feet with an additional foot at each front corner of the pan as well. The motor will bolt to a steel motor plate (not yet pictured) that will hinge at the two angle steel pieces that will be bolted on the frame for this purpose in the middle of the pan on one side. The bottom of the hinged steel motor plate will also bolt to the angle steel to keep the motor rigidly in position when being used, but by removing the bottom bolts the motor can be swung up for bit maintenance/changes. It's all kind of hard to comprehend in pieces but things should work out as planned when everything is fitted up. 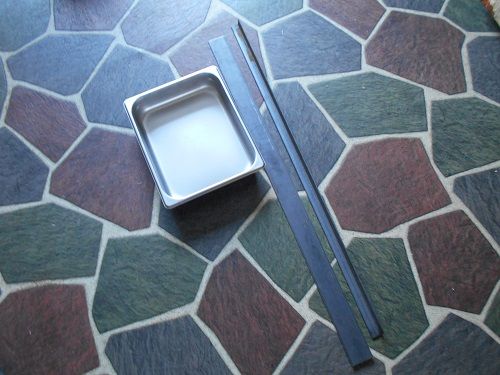 Below are some drawings illustrating how the frame assembly will look finished. 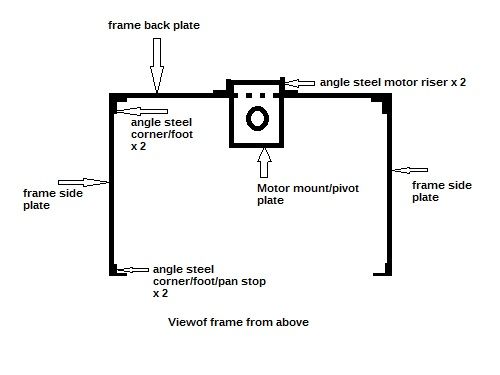 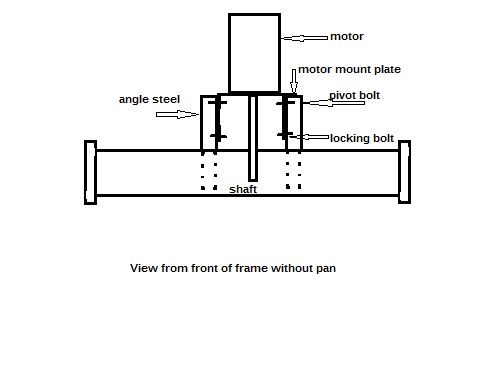 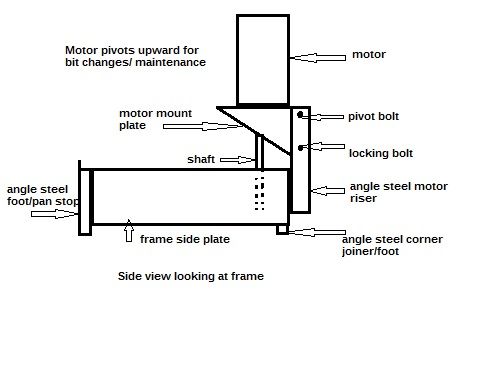 The pan will need to be notched on the rim/pan lip in two places where the motor risers will interfere with the pan lip. Since hubby is all about re-purposing things, he is using a steam table pan. Assembly and fab info coming soon. Total cost of purchased parts so far $31.00. Cost of motor shipping included $59.90. Cost of diamond bit $28.90 Bolts, motor plate steel, tools, labor.....got all that so it won't add to the bill (but if you decide to build one it will add to the cost for you.) Total cost of build for hubby $119.80. Spread out over three months. We could have bought a used one (wizard) on ebay for right around the same price (minus the diamond bit which we would still have to buy, most of them come with a glass grinding bit) but ours will be brand new, purpose built, with features like an adjustable depth stop and water covered bit. It should last the rest of our lives then our daughter gets it. We have decided not to try and market this after all after considering that very few people even know what it's for and the overall market is not large. Feel free to use our designs if you decide you want to build one. Coming next.....Fabbing the frame. |
|
Deleted
Deleted Member
Member since January 1970
Posts: 0
|
Post by Deleted on Jan 15, 2017 18:11:41 GMT -5
ziggyI think the small market size is good for u guys. Sometimes too many orders buries a business. Plus, its a foot in the door to building a reputation in equipment. Lastly, I bet you could sell 100++ a year by doing shows and pnline advertisements. Etsy included. Many groove wrappers there could use this tool.
|
|
ziggy
spending too much on rocks
Member since June 2016
Posts: 483
|
Post by ziggy on Jan 15, 2017 19:19:05 GMT -5
ziggy I think the small market size is good for u guys. Sometimes too many orders buries a business. Plus, its a foot in the door to building a reputation in equipment. Lastly, I bet you could sell 100++ a year by doing shows and pnline advertisements. Etsy included. Many groove wrappers there could use this tool. Encouraging words for sure but, 1. We are old. Both sick a lot. Both of us have COPD and hubby has stage 3 kidney failure (along with a slew of other health issues.) 2. He is getting SSDI until may when he goes on regular S.S. They have rules when on SSDI about working he would be breaking by opening a business. We need that money and can't afford to have it taken away. 3. Neither of us wants the hassles of laws that must be followed, safety certification of the device (ie. UL listing) all the work involved in trying to advertise and market a new product, all the travelling to shows with all the associated expenses of that travel, the returns and possible lawsuits involved. We definitely don't need to be involved with any more lawyers. We just don't have the energy (not to mention money) that it would all take. Hubby is literally living on borrowed time and was looking forward to relaxing in his retirement (read as "picking up rocks") and not trying to start up a new product. I made a mistake when I mentioned we might try and market it. I didn't tell him first. But I appreciate the thoughts you have....even though we are glued in place on this. |
|


 Mine isn't very handy like that. He has his own hobby. Seeing how it's model building, everything he comes up with is on a very small scale.