|
|
Post by cabby on Jul 14, 2024 12:20:58 GMT -5
Looking for advice on photography supplies, mostly for slabs but also cabs. Ideally I would purchase a light box on Amazon since I currently have a lot of credit to use. Any that you have found that work really well or ended up needing a lot of modifications?
Would also like tips on what to look for in a camera (entry to mid range, not high end). I’ve never tried to photograph rocks or minerals so have no clue what is needed to get good results! The pictures would be to list things for sale, not printed art.
|
|
|
|
Post by pebblesky on Jul 14, 2024 14:14:42 GMT -5
Any recent generation smart phone should do a fine job in taking pictures of rocks. The light box I purchased was not satisfactory so I won't recommend.
|
|
|
|
Post by cabby on Jul 14, 2024 14:18:29 GMT -5
Any recent generation smart phone should do a fine job in taking pictures of rocks. The light box I purchased was not satisfactory so I won't recommend. Could you give me a link? Also want to know if what NOT to buy. |
|
|
|
Post by stardiamond on Jul 14, 2024 16:15:57 GMT -5
I had an entry level Olympus digital camera. I purchased a good macro lens and then upgraded to a more expensive camera. I needed high quality images. My previous photographic experience was with film SLR. Digital cameras are not as smart as I would like and are easily fooled. A manual camera is under the control of the user. I don't know how much better my camera is than a good smart phone.
The key to getting a good picture is the lighting. I use natural light and getting it right depends on time of day. Some cabs are easy to photograph than others. I have trouble balancing showing the polish and glare.
|
|
|
|
Post by cabby on Jul 14, 2024 16:35:31 GMT -5
I had an entry level Olympus digital camera. I purchased a good macro lens and then upgraded to a more expensive camera. I needed high quality images. My previous photographic experience was with film SLR. Digital cameras are not as smart as I would like and are easily fooled. A manual camera is under the control of the user. I don't know how much better my camera is than a good smart phone. The key to getting a good picture is the lighting. I use natural light and getting it right depends on time of day. Some cabs are easy to photograph than others. I have trouble balancing showing the polish and glare. I haven’t used film SLR since high school, but not being able to adjust things on my phone drives me crazy when the auto isn’t right! my phone also detests focusing on rocks. I have an old dslr with a fixed lens and digital macro setting, but don't know how well that would work for rocks and minerals. Can't do much camera testing until I get a lightbox, though! |
|
|
|
Post by pebblesky on Jul 14, 2024 16:38:07 GMT -5
Any recent generation smart phone should do a fine job in taking pictures of rocks. The light box I purchased was not satisfactory so I won't recommend. Could you give me a link? Also want to know if what NOT to buy. The Amazon seller is no longer there so you won't need to worry. For me a light box should be of good size and should provide enough luminance and ideally it shall be able to adjust color temperature. |
|
|
|
Post by stardiamond on Jul 14, 2024 16:48:44 GMT -5
Background is very important.
The basic lens on my camera has a manual zoom and is autofocus. The macro doesn't zoom and uses an autofocus. Some of us are able to get beautiful pictures without a light box. Paul and Jason have great photos. Ask them how they do it. I'm still figuring it out.
|
|
rockbrain
Cave Dweller 
Member since January 2022
Posts: 2,992
|
Post by rockbrain on Jul 16, 2024 9:12:43 GMT -5
I just ordered a new lightbox. The one I have works ok but it has one light source at the top front. I hang pendants and the bottom of the pendant definitely has less light. I've used a reflectors and tried to use some secondary lights with mixed results. Now I've lost the diffuser for the light so I get a reflection of multiple LEDs across the front of the stone. The new one I ordered has a light on the top and one one each side. I should have it at the end of the week, I'll try and report back.
|
|
|
|
Post by cabby on Jul 16, 2024 9:34:59 GMT -5
I just ordered a new lightbox. The one I have works ok but it has one light source at the top front. I hang pendants and the bottom of the pendant definitely has less light. I've used a reflectors and tried to use some secondary lights with mixed results. Now I've lost the diffuser for the light so I get a reflection of multiple LEDs across the front of the stone. The new one I ordered has a light on the top and one one each side. I should have it at the end of the week, I'll try and report back. Looking forward to hearing about that! I do own some cheap soft boxes and a Godox light, but it ends up requiring soooo much space to set up! Not to mention that no surface is off limits for junk, so would have to clear space each time I took pics. My idea is to have a light box that is good for slab photography as is, without needing to supplement lights, add diffusers, etc Clear space off a table, throw a camera on a tripod, and be done with it 😆 wouldn’t have to change camera settting much if I had the same lighting each time |
|
rockbrain
Cave Dweller
Member since January 2022
Posts: 2,992
|
Post by rockbrain on Jul 20, 2024 13:33:55 GMT -5
cabby , I received my light box yesterday. Haven't had a chance to play with it much but so far I'm impressed. It solves the issue of my last one that just had the light source on the top front which threw shadows on the bottom of my items. Particularly pendants. I haven't had a chance to play with it too much. I just threw a cabochon and a slab in the bottom of the box and this is what I came up with. 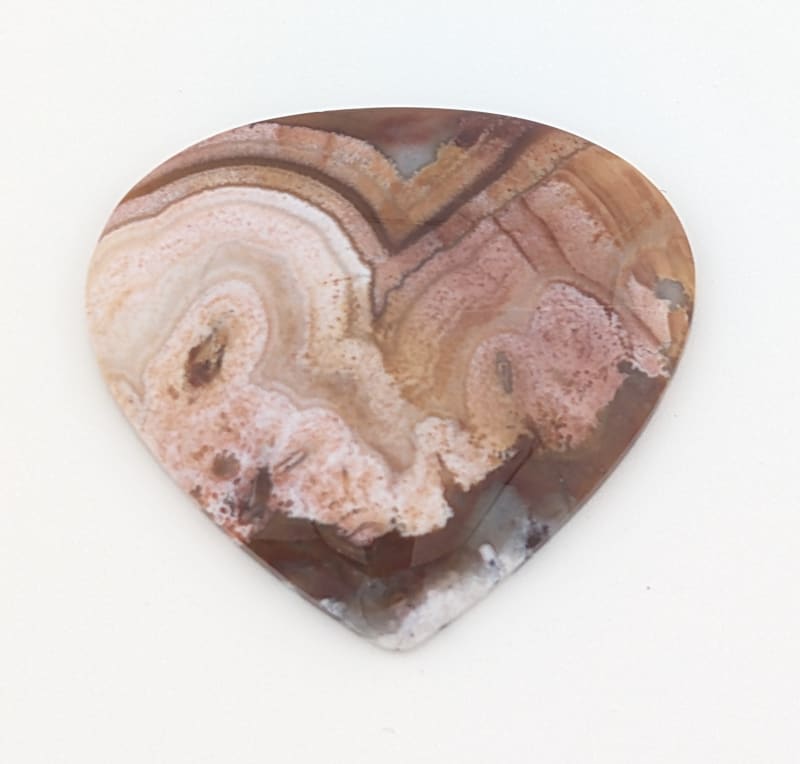 
|
|
|
|
Post by cabby on Jul 20, 2024 13:40:38 GMT -5
rockbrain that looks really good as-is! More than suitable enough for most things, and would take minimal tweaking if I wanted to make it better. I can’t believe how little glare there is on that cab!!! That’s exactly the type of thing I was looking for, something that I can toss on the table and use as-is with minimal glare. Link please?
|
|
rockbrain
Cave Dweller
Member since January 2022
Posts: 2,992
|
Post by rockbrain on Jul 20, 2024 13:46:14 GMT -5
This is the box without the front on it. Probably the way I'll use it most of the time.  This is with the front on. It's reflective on the inside. There is also another piece to cover the hole. 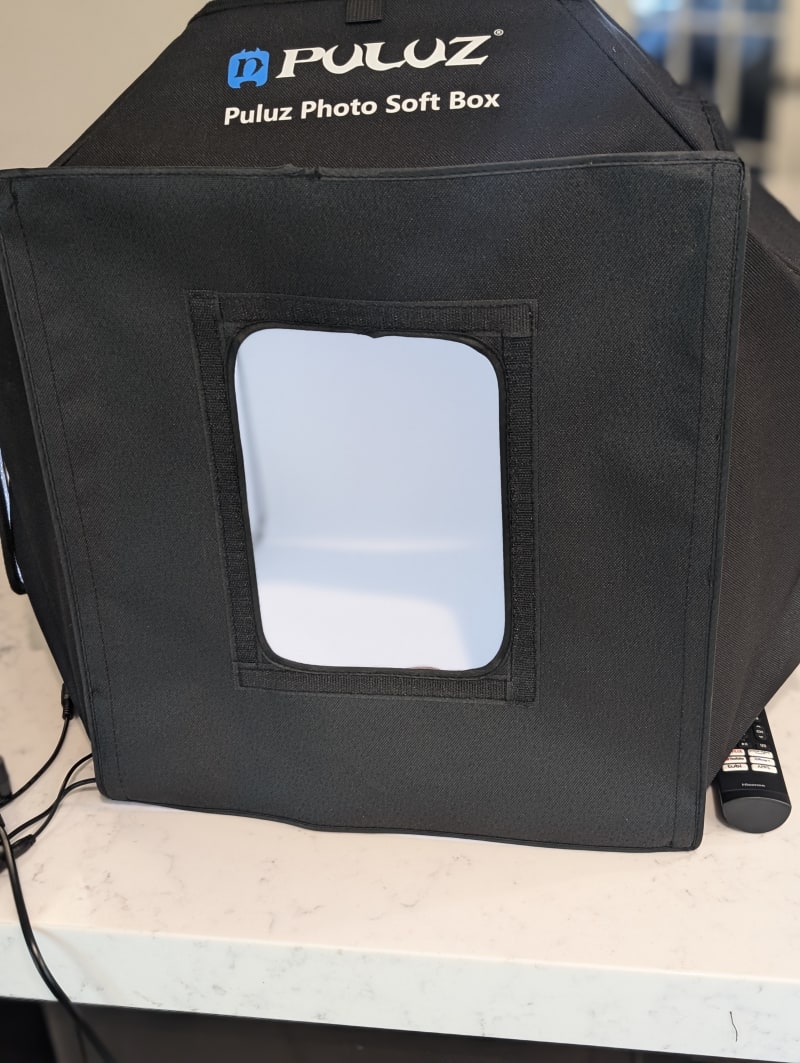 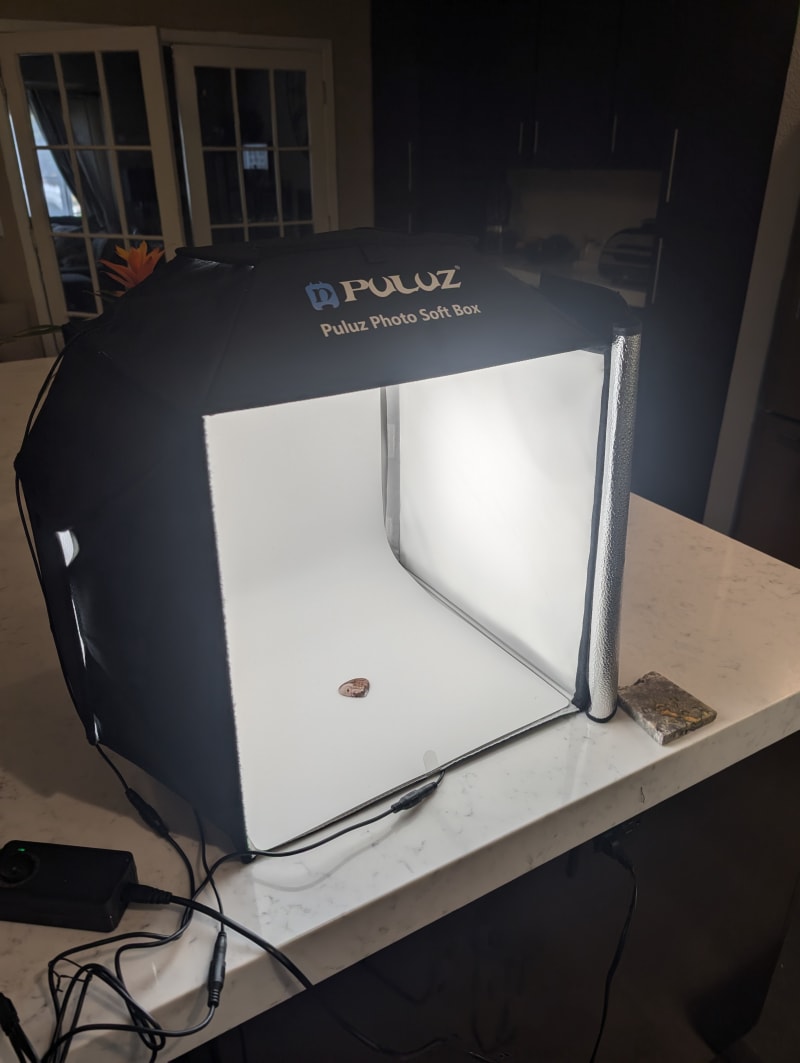 This is one of the two side lights.  This shows the top diffuser in place. There's a little hatch on the top to open and take pictures straight down but you have to remove the diffuser. If you remove it you get reflections of the led on your item if it's shiny. 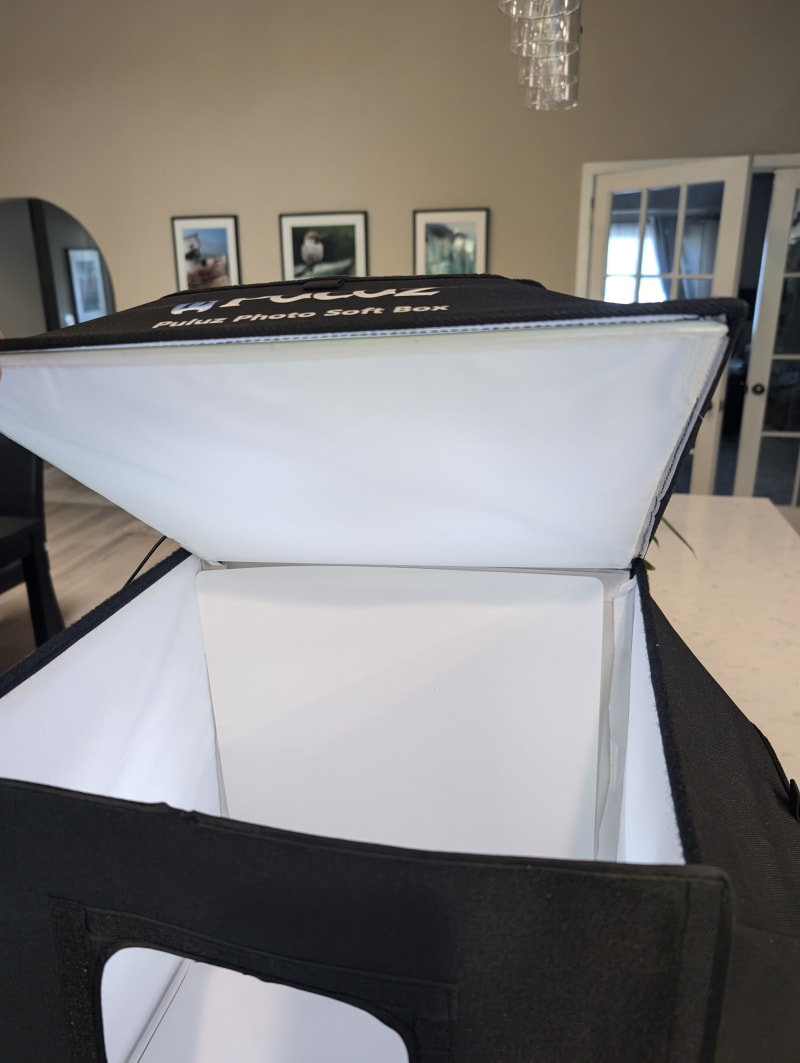 The top without the diffuser. I thought the reflections would be a problem because with my old box I hung my pendants from the hole and I shot through the hole to take pics of slabs and cabs. It turns out to not be an issue. The light is so regular and diffused I can just hold the cell phone inside over the object and still get nice even light on it. I can lift the velcro top and hang the pendant with the necklace cord undone and trapped under each side. It works great.  Pendant hanging.  Pendant on a clear plastic display stand.  |
|
|
|
Post by cabby on Jul 20, 2024 13:51:41 GMT -5
The pendant photos are great!!! Just the right amount of shine without being glare. Do the colors seem true to you, or is it tinting?
|
|
rockbrain
Cave Dweller
Member since January 2022
Posts: 2,992
|
Post by rockbrain on Jul 20, 2024 14:00:53 GMT -5
Colors seem good. They claim a CRI of better than 95. First impressions are that this is going to work really well as is. There doesn't seem to be a lot of Velcro holding things together, but once you get it together it seems like plenty. The dimmer has 3 connectors and each light has an individual cord. My old box has the same connections but there's 2 of them. I think I'll play with putting the other dimmer on the side lights and then I can control them separately. Not sure if I need it but it might give it a different effect. Of course like all of these it comes with multiple color backgrounds. Kind of a long plastic sheet that lays on the bottom and curls up for the back making a typical seamless back corner. One of the little things that's a huge difference for me is there's a little tab on the front to help hold this sheet in place. It's kind of surprising how much of an issue that was on the old one.
|
|
|
|
Post by cabby on Jul 20, 2024 14:07:55 GMT -5
I think I am more likely to build scenes with materials I have rather than the color backgrounds, even if it’s just throwing some suede or velvet on the bottom. The even, diffused lighting is what I care most about! And being easy to “grab and go” when I want to do photos. Setting up multiple soft boxes on tripods and messing with camera settings each time would be too much of a pain! A box with multiple well diffused light sources is exactly what would be best for me.
|
|
rockbrain
Cave Dweller
Member since January 2022
Posts: 2,992
|
Post by rockbrain on Jul 20, 2024 14:08:27 GMT -5
Here's a couple with the black background. This first one has nothing done to it post photo. On both backgrounds I adjusted the light setting on the camera as the white and black backgrounds throw the exposure off a bit. On the pic of the cab I did add a little saturation to take it to more of a true life value. All the others got only an exposure adjustment and cropping. 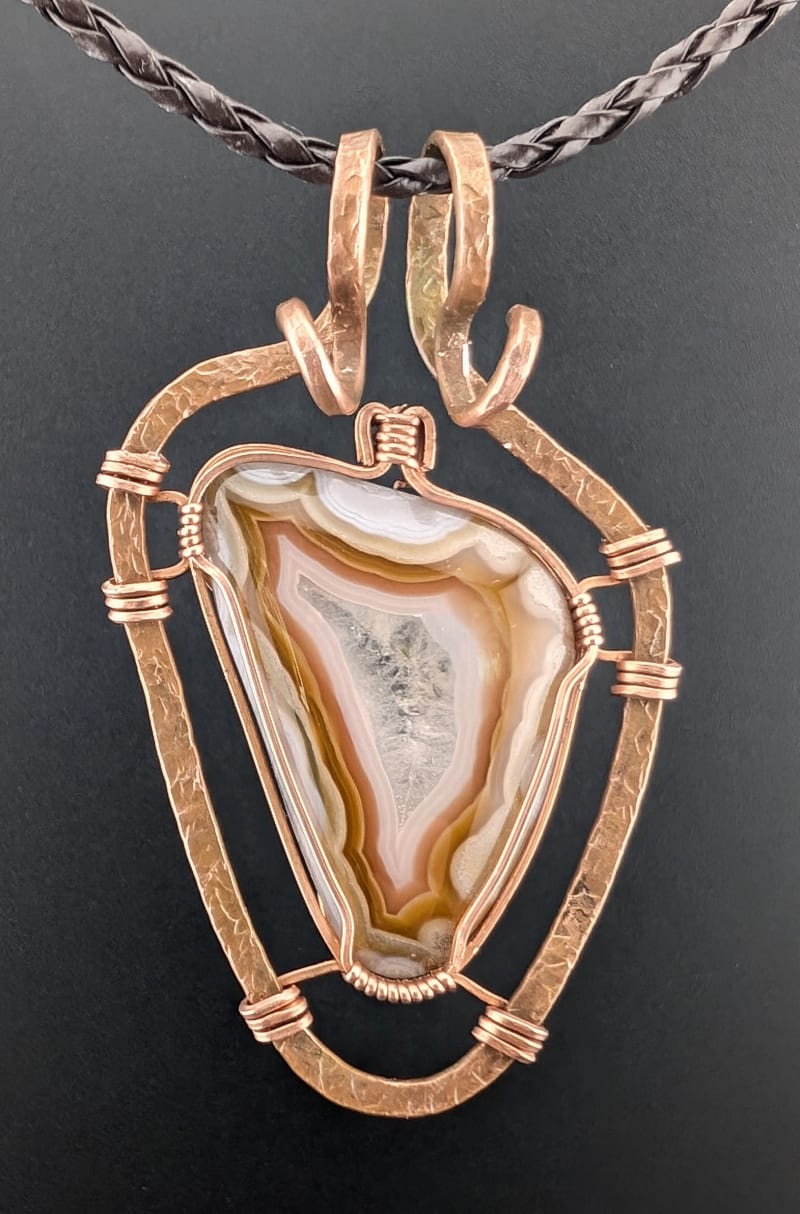 The black background does lighten up in places with a bid of reflection. This is the same shot with some vignette added.  |
|
|
|
Post by cabby on Jul 20, 2024 14:23:31 GMT -5
What are you using for the photo adjustments? Yeah, I’m thinking of being lazy, wondering if just using my phone for photos and adjustments would be good enough for most things. I COULD use my old DSLR plus photoshop, but that would be a pain lol. My old camera cant hook up to my comp so would have to take the card out and use a usb sd adapter each time… why I don’t use it anymore!
|
|
rockbrain
Cave Dweller
Member since January 2022
Posts: 2,992
|
Post by rockbrain on Jul 20, 2024 15:13:48 GMT -5
I have a Google Pixel. If I have the camera open and touch the image of the pic I'm going to take it brings up adjustments for Night Sight, Brightness, Shadow, White Balance, Focus, Shutter Speed and ISO. I just adjust the brightness until it looks like the subject.
|
|
|
|
Post by chris1956 on Jul 20, 2024 16:32:30 GMT -5
Here's a couple with the black background. This first one has nothing done to it post photo. On both backgrounds I adjusted the light setting on the camera as the white and black backgrounds throw the exposure off a bit. On the pic of the cab I did add a little saturation to take it to more of a true life value. All the others got only an exposure adjustment and cropping. The black background does lighten up in places with a bid of reflection. This is the same shot with some vignette added. I was going to ask if there were different backgrounds. Looks great! |
|
rockbrain
Cave Dweller
Member since January 2022
Posts: 2,992
|
Post by rockbrain on Jul 20, 2024 16:34:42 GMT -5
There's also beige and a Kelly green one. My old one has those plus blue and grey. I've only ever used the black, white and grey ones.
|
|


 Serious thought goes into a Chat Box v.2 post. "It Ain’t Easy"


