yaygems
starting to shine!

Member since February 2010
Posts: 41
|
Post by yaygems on Mar 27, 2010 0:57:07 GMT -5
I picked up 3 lbs of Labradorite from TheRockShed.com while purchasing some other supplies. The rough from here was exceptional right out of the bag. Photographed dry:  This stuff feels so good to hold! I felt like my hands had been dunked in a bucket of baby powder! Still dry but turned into the light to show schiller: 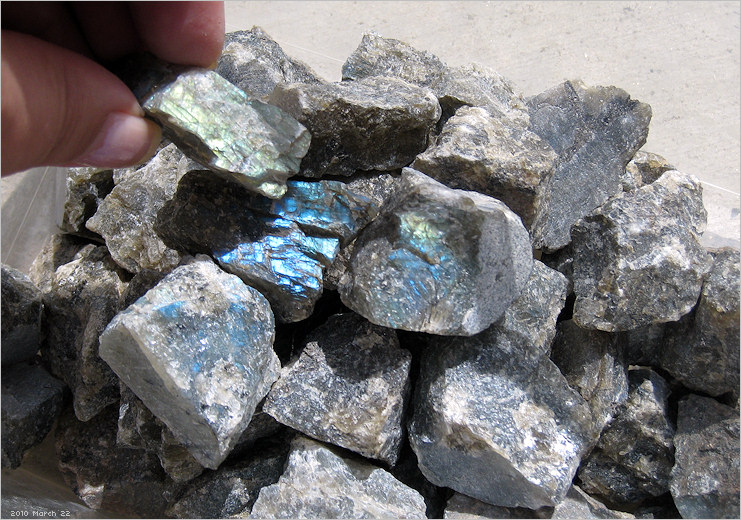 Magnificent schiller presenting out of many of these specimens dry and with no real effort to turn them in the light. A lot of the rough material was a light white color, almost translucent. Photographed wet: 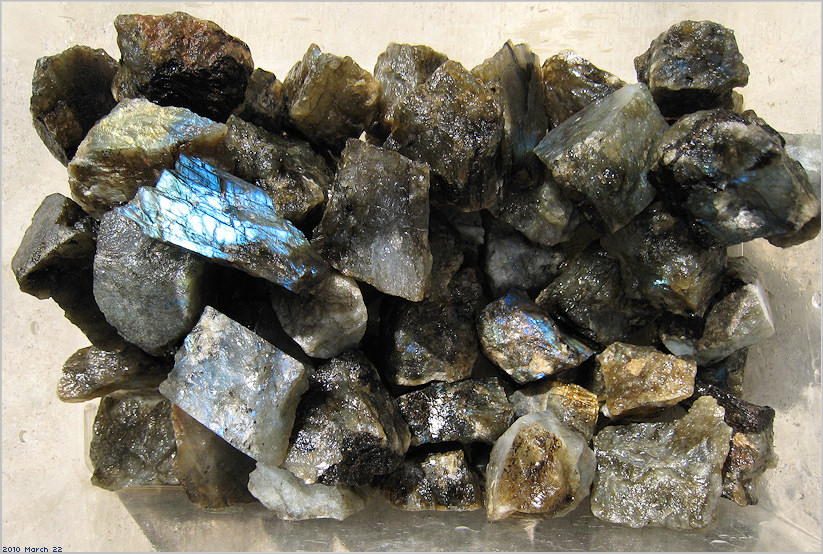 There is a lot of glitter on these rocks, not from being wet, but from the schiller that didn't quite catch color in the photographs. EEE!!! After 4 days, photographed wet:  The photo above shows the flash presenting out of just some of the rocks that have been tumbling in this batch. I used no grit, just the rocks and water. After 2 days I had to add more rough, and another two days later the bottom rocks are the result of 4 days of tumbling. The rocks on the top of that photo is the spare rough that hasn't entered a tumbling barrel to show the comparison of how much rounding has occured over 4 days with no grit. Closer: 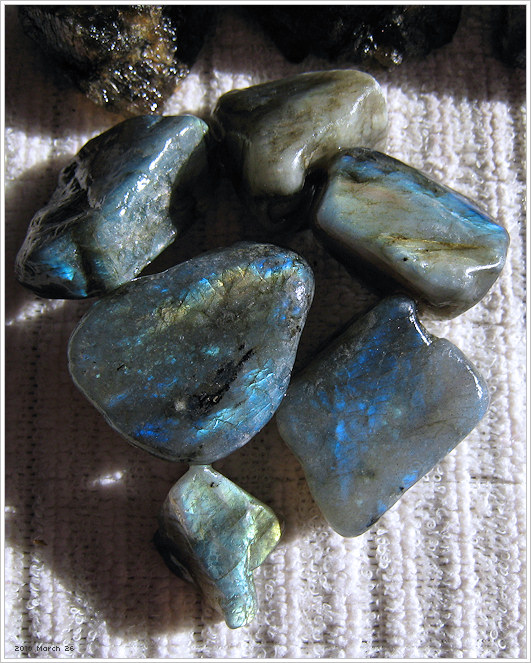 These are really beautiful. I may get some more of that same batch order from the vendor. The display of flash goes nearly all angles around the rocks without effort to be turned a certain way or angle. It is really phenomenal! I will keep checking these every 3 days or so. I think they might be ready for the next phase in about 7-10 days. Shawn said to me that for polish I should use AO. I have Cerium Oxide and I'm not sure what the difference is with these polishes. Any suggestions? Thanks for looking!!! |
|
|
|
Post by rockrookie on Mar 27, 2010 9:48:33 GMT -5
looks good !!
i used to keep a few samples of the untumbled of each batch , too .
for before & after .
---paul
|
|
|
|
Post by Bikerrandy on Mar 27, 2010 17:11:08 GMT -5
Those are looking great!! Be sure to post more pics after each stage, progression pics are cool  |
|
|
|
Post by susand24224 on Mar 28, 2010 0:32:54 GMT -5
They do look beautiful. I never would have thought of omitting grit altogether; the most creative I have been is starting some rocks with 120/220. As rounded as they are getting, I think 60/90 would have torn them up.
I am looking forward to seeing how they progress, although they are beautiful right now!
Susan
|
|
|
|
Post by Jack ( Yorkshire) on Mar 28, 2010 8:39:54 GMT -5
Thay realy show the colour well,
Id like to see how you will get a finish on them , I have tried and not suceeded
Jack
Yorkshire Uk
|
|
yaygems
starting to shine!
Member since February 2010
Posts: 41
|
Post by yaygems on Mar 28, 2010 15:06:12 GMT -5
Thank you! --Susan, this is my first time tumbling so I don't completely know what I'm doing. LOL...I'm working intuitively on this one. The primary composition of the rock is sodium and calcium with aluminum. It is really brittle. soft and can shatter easily. I am still trying to determine what to do for the next stage. I am considering going with #220 but with far less than what would be used for tumbling an agate. Maybe 1 tablespoon of it instead of 4 tablespoons. They are grinding down just fine and really quickly without grit at all. I think...it won't take too much 220 to smooth out cracks and pits. --Jack, I am nervous about them taking a turn for the worst when I get to stage 2! --- I checked them today to see if the barrel needed anything added to it to make up volume. Here are today's photographs. The labradorescence is really intense. There are some spots where reds and greens can be seen. It is just lovely!  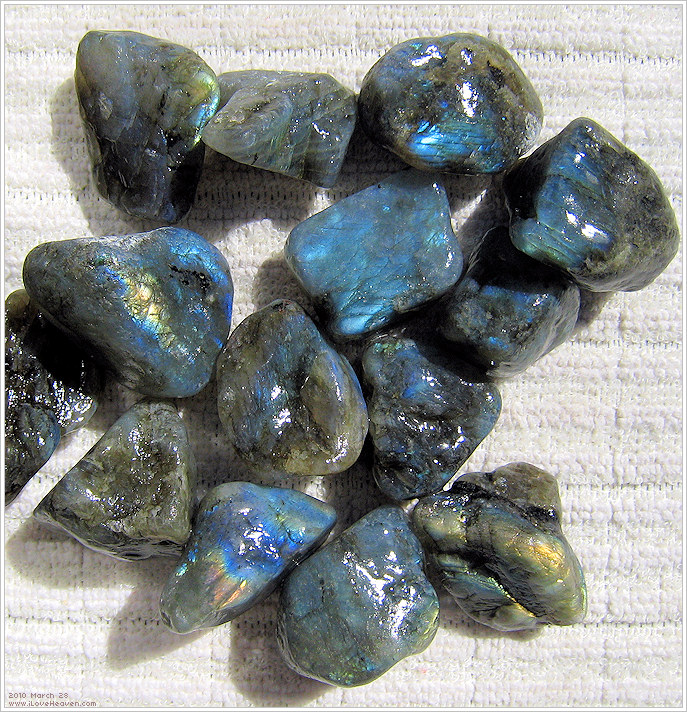 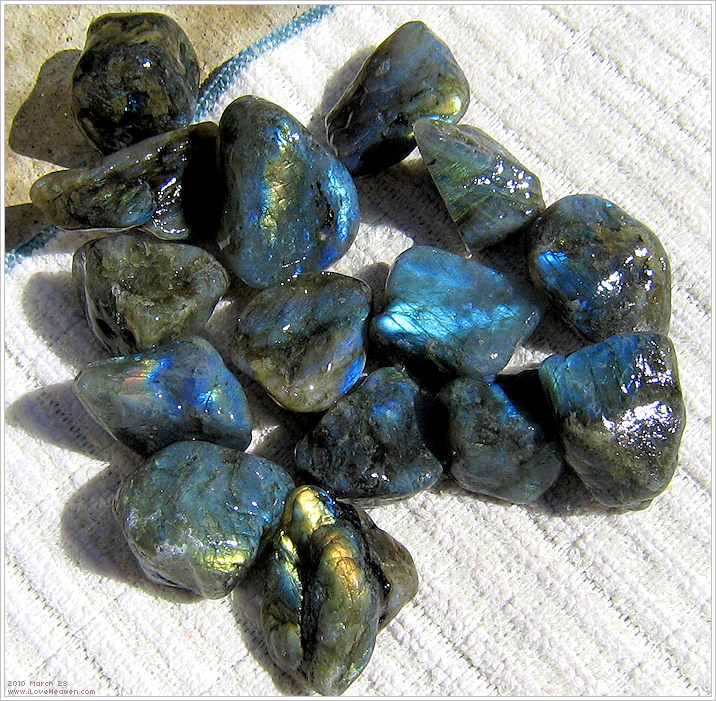 I will no longer be adding rough to the barrel as these continue to round out. It will be pellets going forward. The rough is too sharp and jagged to add, and it makes me nervous that the progressed stones will get stabbed and poked too much. I will check this batch for volume in the barrel again in two or three days. Enjoy your weekend! |
|
|
|
Post by Jack ( Yorkshire) on Mar 30, 2010 2:54:30 GMT -5
Hi They look great I have added previsly tumbled stage 2 material to make up the load as it gives "weight " to the tumble action as you say new pieces are rather rough I particulary like the knarled bottom piece in the last picture its a real jem (in my eyes) I didnt have any problems till the final polish , which I just couldnt get all the soft areas had dropped and they then retained the polish , Grrrr  have a good day jack Yorkshire uk |
|
|
|
Post by frane on Mar 30, 2010 7:37:29 GMT -5
That is a tough batch to start with! I can never get it to turn out the way I know they should. It will look great through the first 2 stages and then start showing all the fine lines and hold grit or polish. grrrr.
I am going to look for them soon and see if I can rework them.
Fran
|
|
|
|
Post by susand24224 on Mar 30, 2010 22:17:32 GMT -5
Well, your intuition has carried you this far, I hope we can all learn from your intuition in the next few stages. This is one I haven't tried yet, although I've got some rough. It is nowhere near as pretty as yours, though.
Susan
|
|
|
|
Post by tkrueger3 on Mar 30, 2010 23:10:32 GMT -5
I've never gotten labs to finish well in the tumblers. Here's the last batch I tried:  However, I've taken one of the above rocks that showed good flash, dopped it, and am working it on my expando wheel. It's looking a LOT (no, I mean a LOT!) better, and will make a gorgeous cab when I'm done. Tom |
|
yaygems
starting to shine!
Member since February 2010
Posts: 41
|
Post by yaygems on Apr 15, 2010 20:37:40 GMT -5
Tom, please make sure you find me so I can see the cab when you are done. Thanks for sharing your photo. Thank you, Susan. Do you have your batch of labs going already? Do you have photos? I have new pics, and made sure to get a photo of them dry to compare. Continuing from where I left off, I kept them in the barrel with water for another week. This is a photo of the result of tumbling for 10 days without grit: 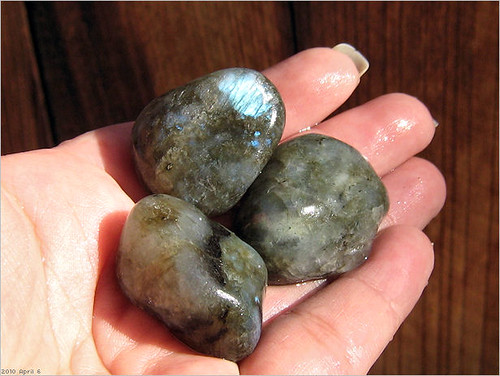 (photographed wet) Lines and cracks seemed to be under the surface of the rock. At that point the rocks were as smooth and slippery as a wet fish! LOL. I put them back into the barrel with #220 but only maybe 2 TEAspoons of it. I didn't think very much was neccesary since they were rounding out nicely without much help. I had them in with the #220 grit for 5 days. Here is what they looked like dry afterwards: 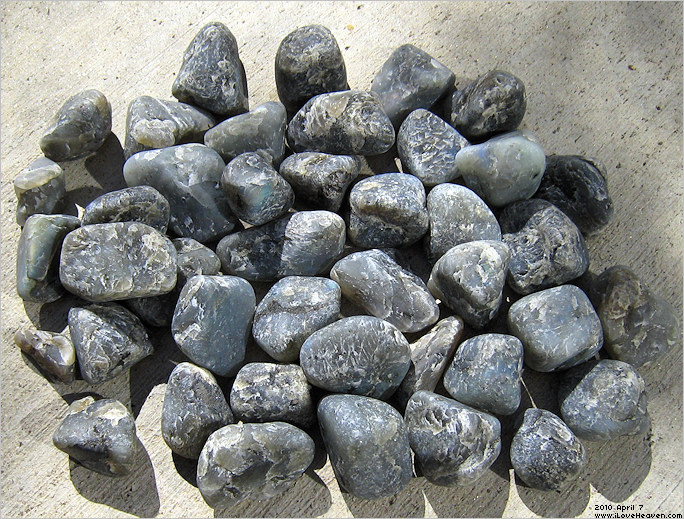 The different layers and marbling are mostly an illusion. The rocks actually felt in my hand very smooth and silky. All of the striations and strata and feathery chip layers that appear were all under the surface. Another photo: 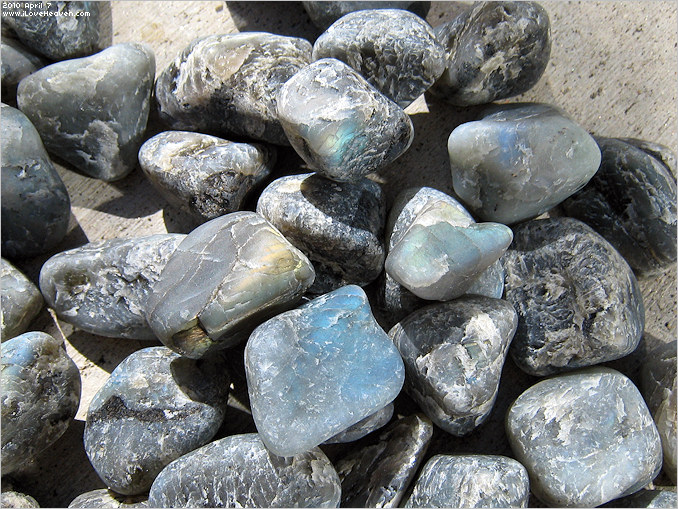 These rocks are really tricky I think, because, at the look of them dry, no doubt it looks like they are pitted and cracked but with eyes closed and going by feel they are absolutely not. I took a photo of them wet again to show the difference:  They still felt really slick and slippery when wet with no significant surface blemishes. From that day I tumbled them for 24 hours with Ivory soap and water: 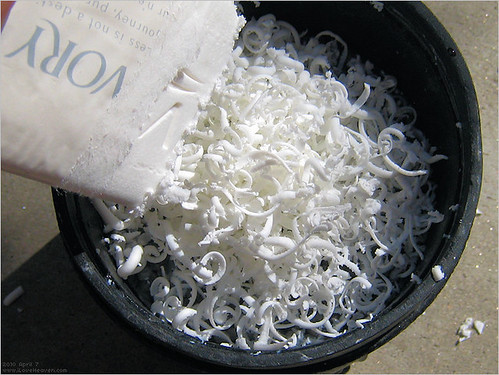  After the burnish I put them in with 600 grit where they will stay until this coming Monday morning. I will have more photos and notes then! Thank you for looking and enjoy your weekend! |
|
carloscinco
fully equipped rock polisher

Member since July 2008
Posts: 1,639
|
Post by carloscinco on Apr 15, 2010 20:59:08 GMT -5
I'm hoping you will crack the code that will reveal to us the secret to tumble polishing Labradorite. The best my attempts ever looked was after the first coarse stage. It was downhill after that. This was my finished product. I didn't have the heart to burnish 'em.  |
|
rollingstone
starting to spend too much on rocks

Member since July 2009
Posts: 236
|
Post by rollingstone on Apr 15, 2010 21:26:26 GMT -5
I'm surprised your Labradorite smooths so quickly with no grit, since when I tumbled some they spent 3 weeks in 60/90 grit, with weekly cleanings and recharges, before they were pit-free and smooth. I found my old thread from almost 4 years ago, and I'll post the link here in case there's something of relevance for you there in my or other people's comments. Unfortunately, the pics in the thread are gone because I've rearranged my photobucket account since then. Also, since I quit and rejoined this group since I posted the Lab. thread, RTH seems to recognize who I am (I signed back up with the same name) but it won't let me modify that old post to put the pictures back in. Anyway, here's a link to the thread: forum.rocktumblinghobby.com/index.cgi?board=Pictures&action=display&thread=11180And I'll repost 3 of the pics here... these are dry and after final polish. As you can see from the first pic, which is just dumping the Lab. out and taking a picture, your stones seem to have vastly better shiller than mine did. The other two pics I've oriented the stones to show the flash of color. -Don 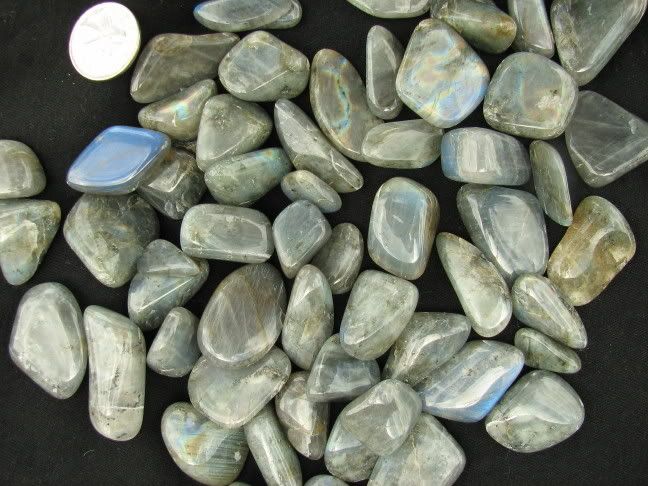 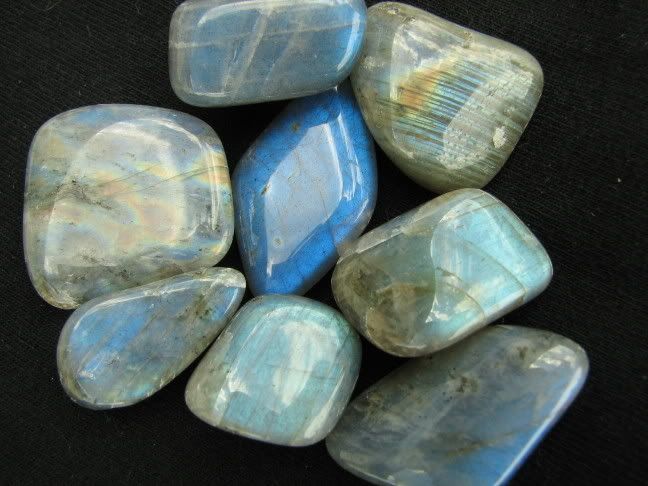  Labradorite is a tricky stone but patience and gentle action (ie lots of pellets) will pay off in the end. |
|
|
|
Post by NatureNut on Apr 15, 2010 21:35:45 GMT -5
I know this is heartbreaking to have stones with so much beauty and not be able to see it as well dry. Well, I collect Albite Moonstone here that looks very similar to your Labradorite and acts the same way when tumbled. Last summer, I slabbed a bunch of it along with some other Moonstone and tumbled all the scraps and smaller pieces. I had alot to play with to try to discover a way to get them to run all the way through and come out half decent. The layered nature of these feldspar causes the "crackled" look. Unless a piece is fairly hard and compact and cut along the exact plane of the crystals, they will appear. I found that it really helps to start with pieces cut by a saw, making smooth sides and edges, as much as possible. After burnishing with borax, they looked and felt really dry, not like other rocks. So, I tried adding an emollient in with the grit and for burnish. Now, I'm not sure if Dove soap has any more emollients than Ivory soap, but I added a couple shaves off the end of a bar of Dove soap and added it to each round of grit (including polish). It made bubbles that cushioned the load (I also had ceramic and plastic pellets and tile spacers, lots of them). Now the rounds took a little longer to do the work than they normally did, but they seemed to come out better and I actually felt okay to move them to the next stage instead of cringing about it. I did a thread on it and I'm not sure if anyone else tried it or if it helped. Anyway, these are pics from a batch of mixed moonstone last August. Ran these in my UV-10 from start to finish with a Dove soap helper each stage and burnish. These pics are before they went into polish.     This is after coming out of polish. 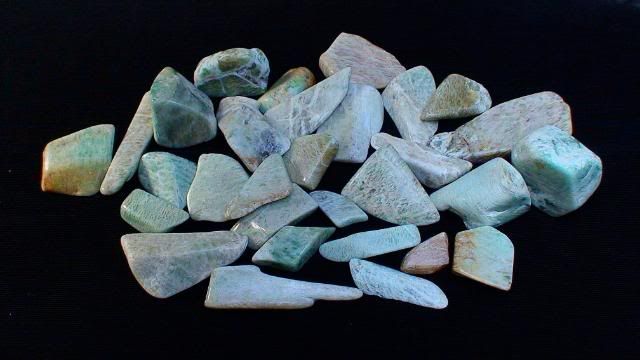 Jo |
|
|
|
Post by NatureNut on Apr 15, 2010 21:38:00 GMT -5
Don, those are gorgeous! Put mine to shame, LOL.
|
|
yaygems
starting to shine!
Member since February 2010
Posts: 41
|
Post by yaygems on Apr 15, 2010 22:17:45 GMT -5
Don I will have to pick my jaw up off of the floor after seeing the polish you got on your Labs!
I'm glad you have photos! It gives me hope that getting them to look glassy is possible! They almost do look like moonstone.
*nod* The pellets are really important for these I feel. It doesn't take too much to pock-mark these stones. Even the polished sphere specimen I have here at home has got fine dimples in it.
After seeing your result, I will be using 1000Ao on my batch for sure! I'm very excited. Yours turned out so beautifully! I really appreciate the input you have left. TY!
--
Jo, I am so glad you posted about the moonstone, I just scored 3 lbs. of rough in all types of colors this afternoon for an unbelievable price. It is shipping to me and heading for the tumbler as soon as I've got a barrel available for them in about 2 weeks.
I can see with the moonstone too, that the personality of the rock having crackles and micro dimples can be a challenge with these too. Can I ask which polish you used for the stones?
|
|
|
|
Post by NatureNut on Apr 15, 2010 22:29:08 GMT -5
I used AO from The Rock Shed. Don is one of the all time greats here and it is a privilege to see his work.
Seems like you are not afraid of a challenge and all these feldspar have a promise of big payoff, so get your tenacity out and you go make my pics look like chicken feed! Jo
|
|
|
|
Post by Toad on Apr 16, 2010 8:17:50 GMT -5
Wow DOn, much better than I ever got my labs - most of mine ground away to nothing...
|
|
carloscinco
fully equipped rock polisher
Member since July 2008
Posts: 1,639
|
Post by carloscinco on Apr 16, 2010 20:47:39 GMT -5
Rollingstone, those labs are some fine looking tumbles. Inspirational. Thanks for posting the pix.
|
|
karock
has rocks in the head

Member since November 2007
Posts: 667
|
Post by karock on Apr 22, 2010 22:09:59 GMT -5
I haven't tumbled labradorite before but I find that with softer stones that as soon as they are some what rounded you want to ad a variety of smaller ceramic media and even small glass marble and small tile spacers. I think it keeps the stones sliding instead of banging into each other.
Karock
|
|


 Al Falfa


