ryjen
starting to shine!

Member since October 2009
Posts: 49
|
Post by ryjen on Jan 31, 2012 1:54:41 GMT -5
thanks for posting the pics of the water set up
|
|
apehanger
off to a rocking start

Member since April 2012
Posts: 13
|
Post by apehanger on May 14, 2012 15:20:33 GMT -5
Awesome!! There are some very clever people on this forum  |
|
Tom
fully equipped rock polisher
   My dad Tom suddenly passed away yesterday, Just wanted his "rock" family to know.
Member since January 2013
Posts: 1,557
|
Post by Tom on Feb 9, 2013 16:47:39 GMT -5
Wow I wish I had seen this before I bought the Cab King, although I would have had to find a bigger room, hmmm that could have been done. Super nice job.
Tom
|
|
reddogrocks
off to a rocking start

Member since April 2012
Posts: 10
|
Post by reddogrocks on May 11, 2013 19:12:38 GMT -5
Zar guy inspired bad axx grinder! ;D  ;D Attachments:
|
|
herchenx
Cave Dweller 
Member since January 2012
Posts: 3,360
|
Post by herchenx on May 11, 2013 19:15:42 GMT -5
That's awesome (response to last post )
Sent from my phone.
|
|
zarguy
fully equipped rock polisher
   Cedar City, Utah - rockhound heaven!
Member since December 2005
Posts: 1,791
|
Post by zarguy on May 15, 2013 0:20:09 GMT -5
Reddogrocks,
I love what you've done with the place! Are those 6 or 8" wheels? How long have you been using it & how do you like it?
Lynn
|
|
pintoblades
having dreams about rocks
 Pinto Custom Blades
Member since May 2013
Posts: 67
|
Post by pintoblades on May 15, 2013 2:38:42 GMT -5
That is one awesome cabbing machine! Love it! You should offer the plans for sale. I would love to make something like that. approximately what would the wheels cost someone or one like this?
|
|
reddogrocks
off to a rocking start

Member since April 2012
Posts: 10
|
Post by reddogrocks on May 15, 2013 21:11:00 GMT -5
Thanks for the thumbs up guys! Love It!!! I polished my first rock ever on this thing and it's a dream. Nothing to compare it to but... 36" shaft. Both ends drilled and tapped. 28" clear space inside hood. 6" wheels and a felt pad on right. 480 light LED strip lights up the house... Had to get a dimmer  I' been thinking about building and selling these but pretty hard to compete with mass produced machines, but still thinking! Will post more pix when I get home from out of town work soon. Thanks guys! Steve |
|
reddogrocks
off to a rocking start

Member since April 2012
Posts: 10
|
Post by reddogrocks on May 15, 2013 21:13:32 GMT -5
Pinto,
You should look for the "agateer" on ebay. He has 6" Covington wheels for under 70 bucks. You could probably put wheels on this thing "new" for $650? on the bottom end. I'm sure someone here could set you up nice too!
Steve
|
|
|
|
Post by petrifiedwoodfarm on Jul 25, 2013 23:33:38 GMT -5
OMG, great work here! I have decided to bookmark this project for when I become a skilled craftsman at this trade.
Thanks for sharing.
Michael
|
|
|
|
Post by 1dave on Sept 30, 2014 13:17:25 GMT -5
Just a gentle bump - lest we forget.
|
|
|
|
Post by stardiamond on Oct 6, 2014 21:17:28 GMT -5
The only thing I would do to change it is remove the fronts of the three trays on the bottom so that removable trays could be slid in to change water and aquarium pump geysers to wet the stones.
I have five 8" wheels in my stardiamiond. I put a genie tray under 3 wheels and then empty, clean and move the tray for the other two wheels. There's room on the arbor for at least one more wheel, but I would need to remove the dividers to the left of wheels 4 and 5.
It's a pain to change wheels. I need to remove the hood and then the shaft. I need to lay out all the pieces; wheels and spacers on the pavement and then swap out the old wheel with the new wheel maintaining the order. That way everything lines up when I put the shaft back in. The good news is that 8" wheels last a long time. Wheel changing on a Genie, particularly the right side is easy.
They should make a 3 wheel Genie and you could have 2 or 3 sets of three wheels.
|
|
Deleted
Deleted Member
Member since January 1970
Posts: 0
|
Post by Deleted on Oct 30, 2017 14:38:38 GMT -5
Hi Lynn,
Amy updates on lighting or water feed? How did you do the water feed?
|
|
zarguy
fully equipped rock polisher
   Cedar City, Utah - rockhound heaven!
Member since December 2005
Posts: 1,791
|
Post by zarguy on Oct 30, 2017 15:27:04 GMT -5
@shotgunner , on page 2 of this thread I show my gravity feed bucket. I've since switched to an aquarium pump feed. 5 Gallon bucket sits on the floor. Pump is plugged in to power strip along with motor & lights. I only have a single feed line which I move from one wheel to the next. (not shown in the photo) See the holes above each wheel. About a year ago I added an LED lightbar made from PVC conduit. It pivots on each end so I can position it how I want. Up against the hoods gives a clear view of the work. 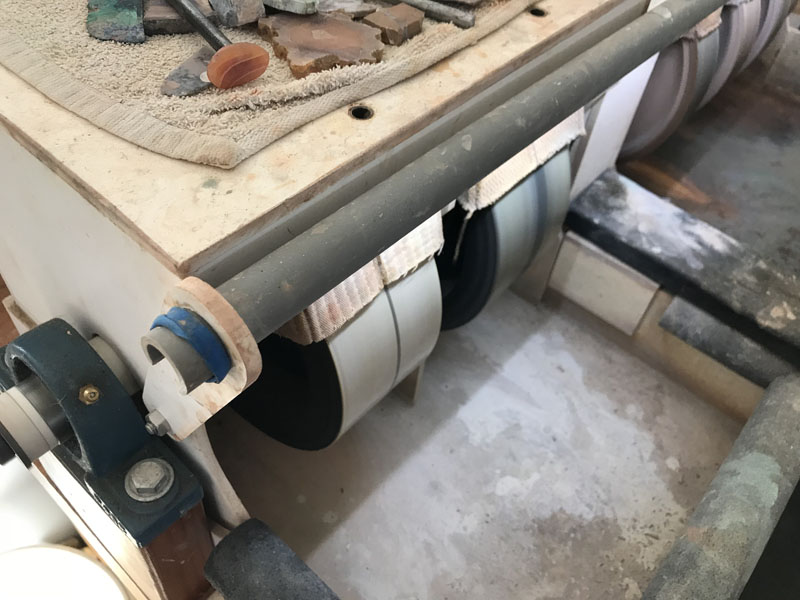 Pivoted away gives better lighting of the work. I just view it between the hood & lightbar. 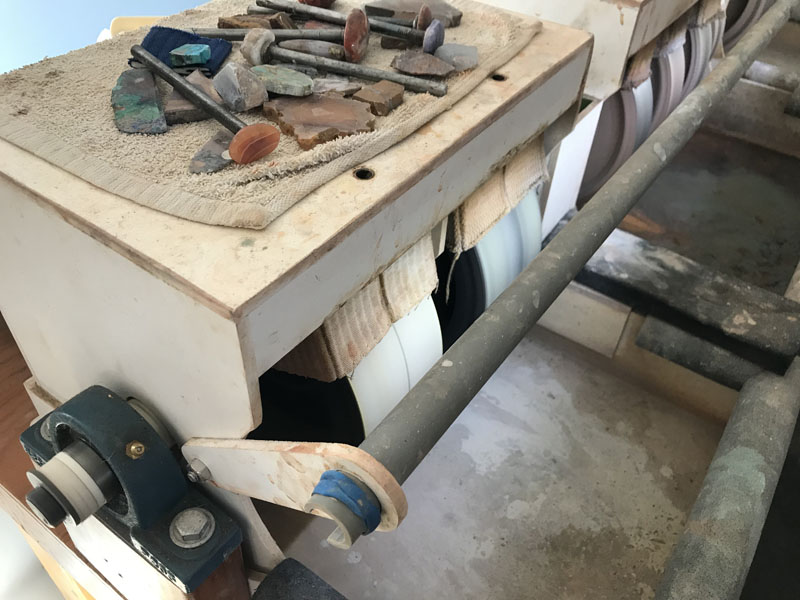 I bought some brighter LED strips, but haven't made version 2 yet. Give me a couple more years!  Lynn |
|
Deleted
Deleted Member
Member since January 1970
Posts: 0
|
Post by Deleted on Oct 30, 2017 15:34:02 GMT -5
Thanks lynn! Super nice
|
|
|
|
Post by melhill1659 on Nov 1, 2017 19:50:09 GMT -5
Wow... Just WOW
|
|
Tommy
Administrator 
Member since January 2013
Posts: 12,989
|
Post by Tommy on Nov 3, 2017 11:06:09 GMT -5
About a year ago I added an LED lightbar made from PVC conduit. It pivots on each end so I can position it how I want. Up against the hoods gives a clear view of the work Lynn, in your spare time could you post a picture of the business side of your light bar - where the light strip shines through the cut in the pvc and how you kept it fastened in place inside the PVC. I did something similar where I simply fastened the LED light bars directly to the hood but it's not working out long term. I'm looking for new ideas for my soon to be built version-2 as well. |
|
zarguy
fully equipped rock polisher
   Cedar City, Utah - rockhound heaven!
Member since December 2005
Posts: 1,791
|
Post by zarguy on Nov 3, 2017 18:41:33 GMT -5
About a year ago I added an LED lightbar made from PVC conduit. It pivots on each end so I can position it how I want. Up against the hoods gives a clear view of the work Lynn, in your spare time could you post a picture of the business side of your light bar - where the light strip shines through the cut in the pvc and how you kept it fastened in place inside the PVC. I did something similar where I simply fastened the LED light bars directly to the hood but it's not working out long term. I'm looking for new ideas for my soon to be built version-2 as well. Your request made me clean the rock snot off the LEDs. Wow It's much brighter! This uses a waterproof LED strip that has a mini in-line 110 AC to 12V DC converter. You can see it in the 3rd photo. I hope you like my professional quality retaining ring on the left end. I'm still going to remake this. I have some extruded aluminum with frosted covers made for LED strip lighting along with some LEDs with mixed color temps. They are much brighter than this one. I will try to post pix of the aluminum & new LED strip and specs for the LEDs. Lynn 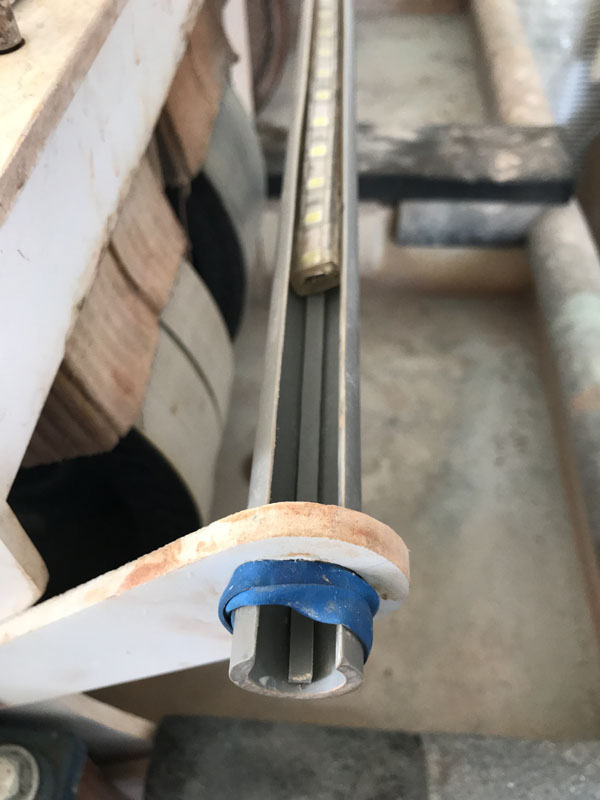 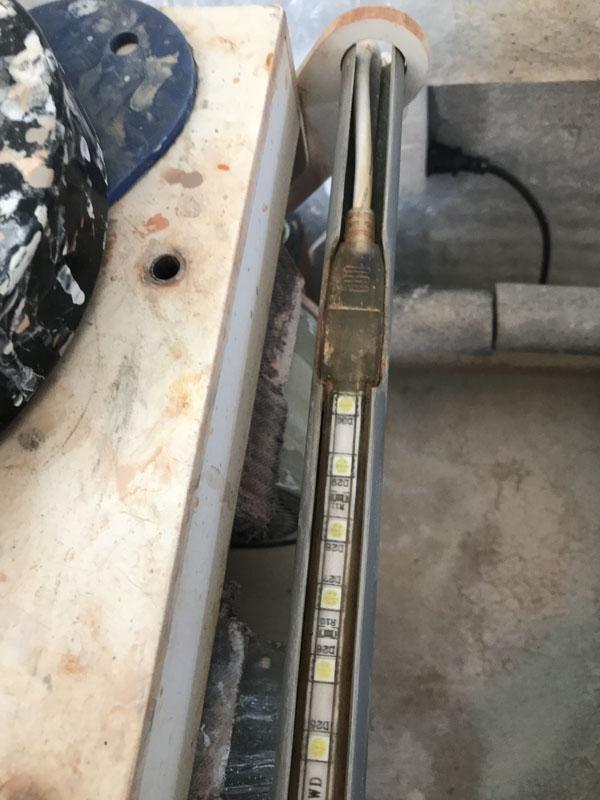 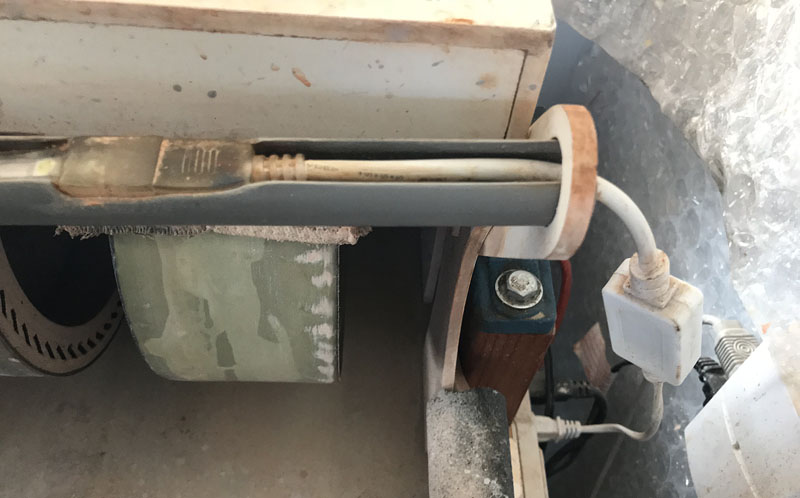 |
|
Tommy
Administrator 
Member since January 2013
Posts: 12,989
|
Post by Tommy on Nov 3, 2017 19:55:46 GMT -5
Wow, thanks Lynn. That's an amazing build all by itself. If you end up doing a new thread on the new light bar build tag me in it and I'll put it in the DIY page.
|
|
ᎡᎵᏔᎻ
having dreams about rocks

Member since November 2019
Posts: 57 
|
Post by ᎡᎵᏔᎻ on Nov 24, 2019 21:12:25 GMT -5
Of course, $150 didn't include the diamond wheels. This is posted in the buy/sell section as a reply to another thread, but I thought it belonged here too. I built a new cabbing machine from a shaft that Mike (spicerm) sent me. Thanks, Mike. I've been using it for several months & am finally posting some pix. I started with a platform built of plywood & 2 x 4s. It sits on a wheeled cart. I mounted a 1/3 HP, 1725 RPM motor that I picked up at a pawn shop for $20. The risers are blocks of hardwood - Maple.  I made trays & hoods out of Sintra - a 1/4" PVC sheet used to print & mount signs. I got a bunch of reject signs from a local sign shop. They were happy for me to take them off their hands. I cut out the pieces on a table saw & glued them together with medium thick superglue. I did a test of 3 different glues & this one worked best. So well, that I couldn't break the bond without breaking the plastic. The trays are held down by 8 screws into the threaded inserts - the kind that have 4 prongs to bite into the wood so I didn't have to deal with a bolt and a nut under the platform. Sorry, no picture of them.  Mike made me a 46" x 1" shaft with the ends drilled & tapped. This length with this many wheels gives me 2" of space between each wheel. Eat your heart out Genie owners! I still manage to nick my knuckles, though. I may cut down the shaft by 2" so nothing protrudes out the ends of the hoods. I'll have to re-tap the right hand threads. I bought cheap Chinese diamond hard wheels & Nova type soft wheels. The spacers between wheels are lengths of PVC tubing. It was hard to determine the sizes of the spacers since the inner hub of the wheels isn't as wide as the outside of the wheel & that dimension differs between hard & soft wheels & between brands. I assembled the wheels, spacers, bearings, pulley in order & tightened down the bolts on each end, then I tightened the set screws on the bearings. I bought 2 pillow block bearings. 4 bolts through the bearings & riser blocks into threaded inserts holds it down.  Here it is with hoods installed. They just sit inside the trays. I glued cotton belt material from a karate belt in front of each wheel under the front lip to spread the water evenly over each wheel. It also helps cut down on stray spray. The material has to drag on the wheel, or you still get water spraying you. I added extra belt to the sides of each hood to keep water from spraying from the side of the end wheels. Instead of a complex system of tubes & shutoff valves for each wheel, I just have a single hose running from my water supply (a 5 gallon bucket suspended higher than the machine). I move the tubing from one wheel to the next. It takes about 2 seconds. It's so much easier than shutting off a valve & turning on another one. This was in the garage & I was going to hook the water supply up to the hot water under my sink, but I just moved this indoors. It's so cold in the garage that I wasn't doing any cabbing on cold days.  Here's an oblique view of the machine. I've added foam pipe insulation as padding to the front edges of the trays, but I forgot them when I took these pictures. 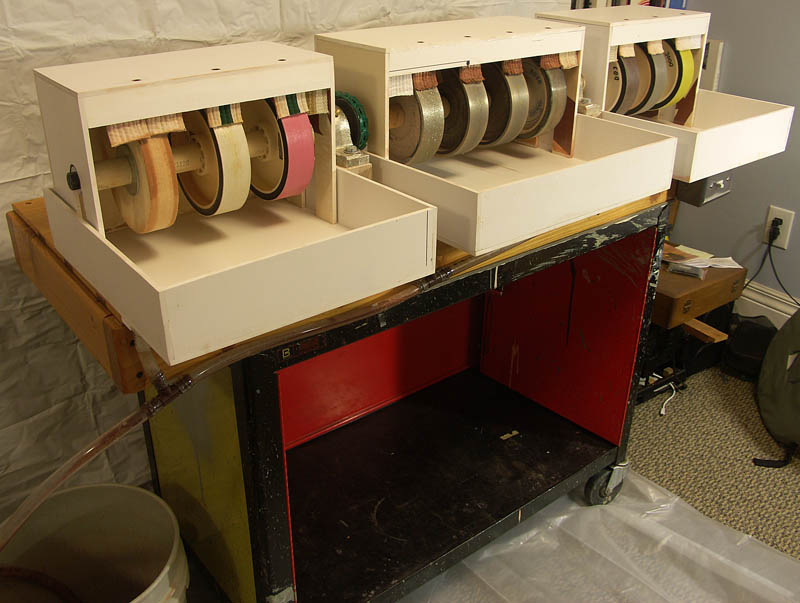 Here's a closeup. 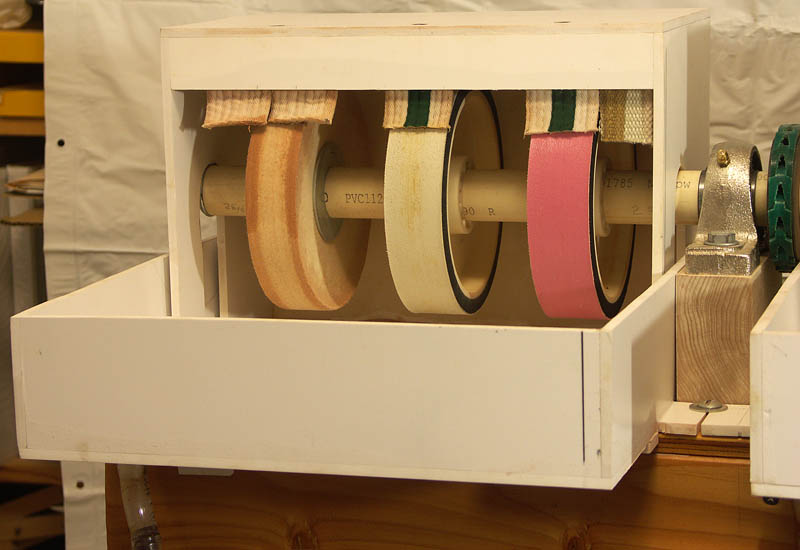 I'm running 3 hard wheels - 80, 220, & 360, 6 soft wheels - 300, 600, 1200, 3000, 8000, 14000 & a hard felt wheel on the left end for polishing. Sometimes 14000 is good enough & I don't need to do any further polishing. The Chinese 280 soft wheel only lasted about 6 weeks before it couldn't even remove the scratches from the 360. I refurbished it with 300 diamond powder. I highly recommend refurbing your own wheels. It'll probably last a year or more. & I do a lot of cabs! There are several threads here about refurbishing your Nova wheels. Here's the original - forum.rocktumblinghobby.com/index.cgi?board=tips&action=display&thread=27289Excluding the wheels, I have only about $150 into this machine. It's a sweet machine. I don't have to switch belts or have more than one machine. I went with 6" wheels because I like to do tight inside curves on some of my cabs. Otherwise, I'd have made an 8" machine. I could adapt it to 8" with taller risers & new hoods. Right now I'm using a desk lamp on top of the center hood, but bought some 12V LED strip lights will see how those work in illuminating the cab. If you have any Qs, post them here or PM me. Lynn How much did Mike charge you for the shaft? |
|