|
|
Post by 1dave on Nov 17, 2013 15:48:10 GMT -5
I just ran across this add: 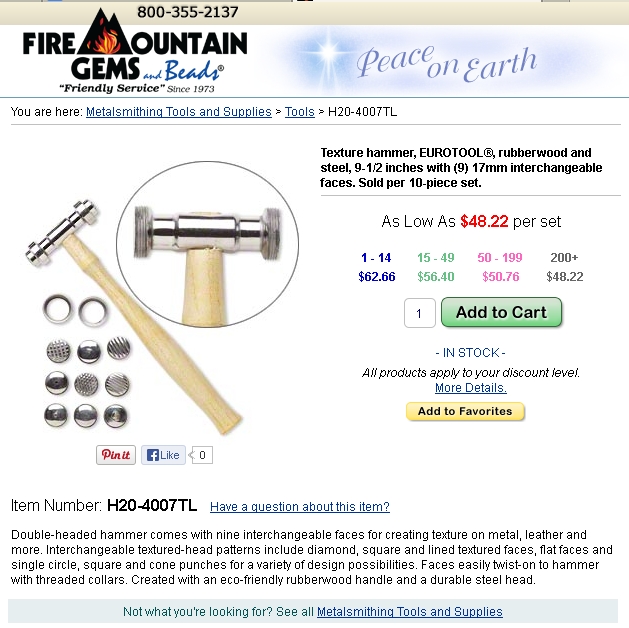 I always made my own punches out of big nails. Cut the point off, file a pattern into the head, heat to the second blue, quench to harden it, and happy stamping. |
|
adrian65
Cave Dweller  Arch to golden memories and to great friends.
Member since February 2007
Posts: 10,774
|
Post by adrian65 on Nov 17, 2013 15:52:26 GMT -5
"...heat to the second blue..." That sounds like requiring a bit of experience, ain't it? How should a newbie know when the second blue is?  Adrian |
|
|
|
Post by 1dave on Nov 17, 2013 16:04:14 GMT -5
"...heat to the second blue..." That sounds like requiring a bit of experience, ain't it? How should a newbie know when the second blue is? Adrian As you heat metal, the surface will display a brief display of colors, then the body will run through them in the same order. Blue is time to stop. go beyond that and the metal will lose it's strength. You will see the same deep blue on metal cut with a cutoff saw. Experiment a few times and it becomes evident. This is what blacksmiths do to harden metal. When drawing out silver wire, it increasingly becomes more brittle. Frequently coil and heat it until it "slumps." That is when the atoms re-arrange themselves and the metal becomes soft again. |
|
|
|
Post by talkingstones on Nov 18, 2013 7:01:14 GMT -5
What kind of torch are you using to heat with? I've got a little mini butane one… would this work for creating punches? Really, Dave, I know absolutely nothing about this, just that I want to learn how to do it...
|
|
|
|
Post by 1dave on Nov 18, 2013 9:05:20 GMT -5
What kind of torch are you using to heat with? I've got a little mini butane one… would this work for creating punches? Really, Dave, I know absolutely nothing about this, just that I want to learn how to do it... We are all in the same boat! We will all find better ways to do what we are doing. Be willing to experiment. Why are children so much better with computers than most adults (addled dolts?)? I learned this bending new hooks on steel fish tapes. They would break, or get snagged and had to be cut off and fished out with wads of string on another tape from the other end. Bend a new hook, and it would pull out. Too soft. bend a new hook and heat it to dark blue, and it would shatter. Heat it to light blue, and just like baby bear, it was just right! Your mini-butane would work on a nail as long as you didn't run out of fuel first. On torches, bigger is better, but you want to stop at the first of blue, deep blue can make the metal brittle. Experiment, it's easier than you may think. |
|
|
|
Post by 1dave on Nov 18, 2013 11:14:08 GMT -5
The Navajos I worked around loved to file out the shapes of deer etc. feet on nail heads, harden them and stamp them into all kinds of designs. The same for leaves, etc.
|
|
|
|
Post by 1dave on Nov 20, 2013 19:31:45 GMT -5
Punches made in quantity for other purposes can be acquired at reasonable prices. Consider using old drill bits, purchasing Dapping Sets and Lettering punches. 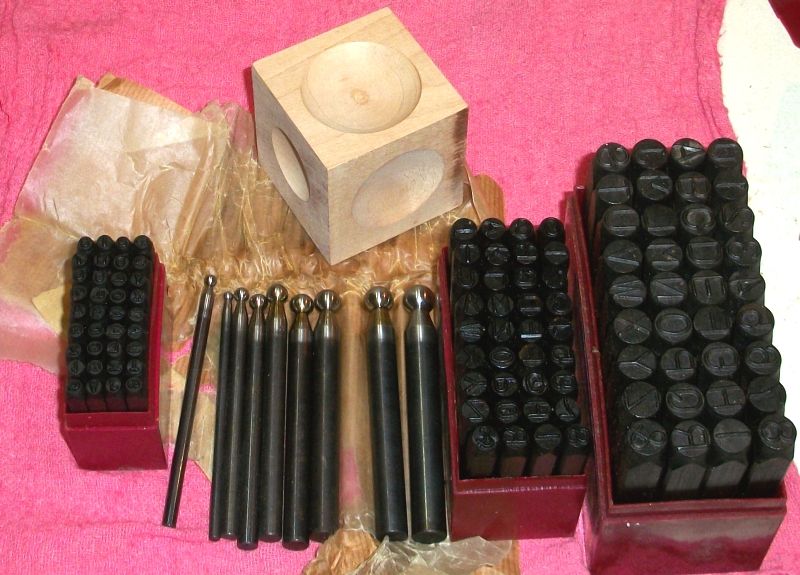 Interesting patterns can be made using a punch one way then rotating it 180 o. EEEEEEEE TTTTTTTT UUUUUU with half of them upside down, IOIOIOIOIO etc. |
|
gerard
starting to spend too much on rocks

Member since April 2011
Posts: 218
|
Post by gerard on Nov 21, 2013 10:44:06 GMT -5
I make my own texturing hammers from cheap yard sale found hammers - cut the face using an angle grinder with a thin a cutting wheel - or hand files.
I even made a reverse texture "anvil" and cut pattern into the anvil so it adds the pattern to both sides of the metal at once - the "anvil" is an old chunk of railroad rail. also a yard sale find
|
|
|
|
Post by rockpickerforever on Nov 21, 2013 11:58:51 GMT -5
Two more ways to texture metal (copper in this case). Hammer finish, the old fashioned way- These were the pulls for a large fireplace front   Decorative (and functional) hinge on door made from 1/4" plate  The sheetmetal was done using a pneumatic impact hammer with rounded tip. Sheets were sheared into strips, textured, then retrimmed to size again (due to expansion of metal)  Plate and sheet  Started with this  Fireplace front when we were finished with it. This is only one of the three different ones we built.  I posted these (and also the lights we made) on this forum back in October. Here's a link to the thread forum.rocktumblinghobby.com/thread/62257/lights-projects-more-pics-added |
|
|
|
Post by pghram on Nov 22, 2013 9:26:22 GMT -5
Really nice work R-P-F.
Rich
|
|
jamesp
Cave Dweller
Member since October 2012
Posts: 36,154
|
Post by jamesp on Nov 24, 2013 8:29:06 GMT -5
I make my own texturing hammers from cheap yard sale found hammers - cut the face using an angle grinder with a thin a cutting wheel - or hand files. I even made a reverse texture "anvil" and cut pattern into the anvil so it adds the pattern to both sides of the metal at once - the "anvil" is an old chunk of railroad rail. also a yard sale find This is works for me too. Been there and it works great. |
|
jamesp
Cave Dweller
Member since October 2012
Posts: 36,154
|
Post by jamesp on Nov 24, 2013 8:36:01 GMT -5
Two more ways to texture metal (copper in this case). Hammer finish, the old fashioned way- These were the pulls for a large fireplace front Decorative (and functional) hinge on door made from 1/4" plate The sheetmetal was done using a pneumatic impact hammer with rounded tip. Sheets were sheared into strips, textured, then retrimmed to size again (due to expansion of metal) Plate and sheet Started with this Fireplace front when we were finished with it. This is only one of the three different ones we built. I posted these (and also the lights we made) on this forum back in October. Here's a link to the thread forum.rocktumblinghobby.com/thread/62257/lights-projects-more-pics-addedOn the floor Jean??? Great work and lots of it. That hurts to look at. Can i get you a bench? A pneumatic or electric device for texturing on a small scale would be nice. I am sure they make such for jewelry. Look at this. A pneumatic hammer mounted in a c-frame.Basically called a 'planishing machine' in a sort. A hammer and an anvil is as simple as it gets. 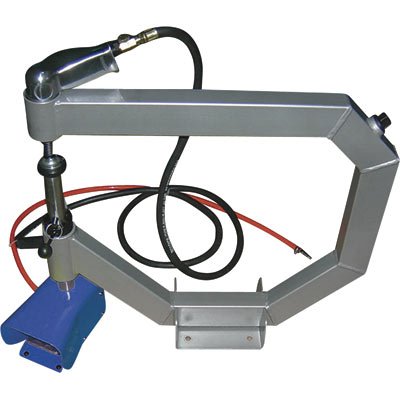 |
|
Tom
fully equipped rock polisher
 My dad Tom suddenly passed away yesterday, Just wanted his "rock" family to know.
Member since January 2013
Posts: 1,557
|
Post by Tom on Nov 24, 2013 9:19:38 GMT -5
Great info Dave, I love hearing all the money saving methods for accomplishing the same results! BTW I did buy that hammer in your first post, its pretty good actually.
You can get hand pieces for your Fordom tool that work like a mini jackhammer. Used for setting bezels and I believe you can get a plethora off tips for texturing as well
|
|
jamesp
Cave Dweller
Member since October 2012
Posts: 36,154
|
Post by jamesp on Nov 24, 2013 9:35:29 GMT -5
So i will post my first hammering forming/texturing project. Three rings. Of not so easy stainless steel. Formed these 3 rings around a bolt welded to a heavy chunk. But these were my first attempts and they gave me confidence to continue hammering mixed metals. Great winter work. So i self taught myself to hammer rings out. In an hour or two. Basically. It was easier than i thought. Most important was the confidence it built. I was thinking no way. Really Check em out 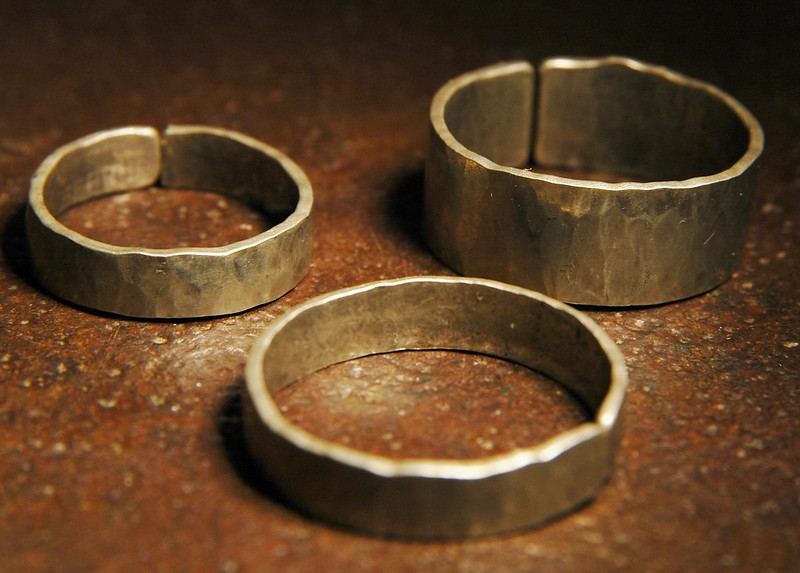 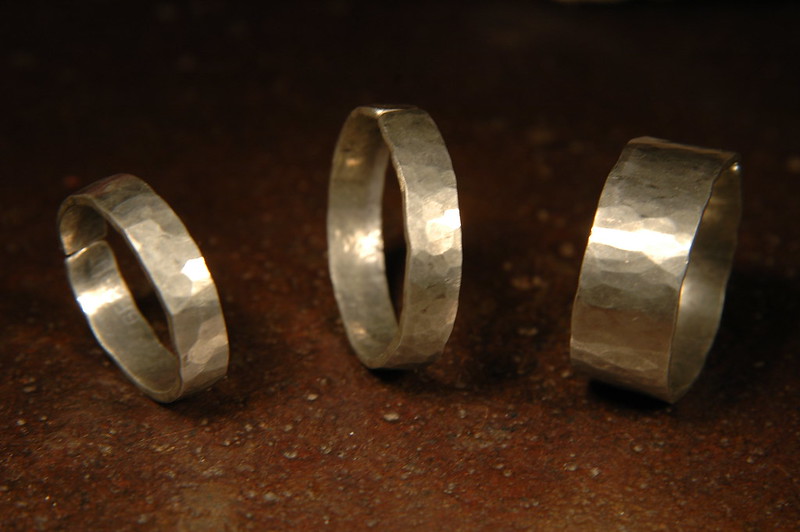 This is a wide band of brass (industrial shim material) with a Rhodesian Ridgeback's ridge soldered to it. Then buffed only with Tripoli on cotton buffing wheel. Copper is roofing material. 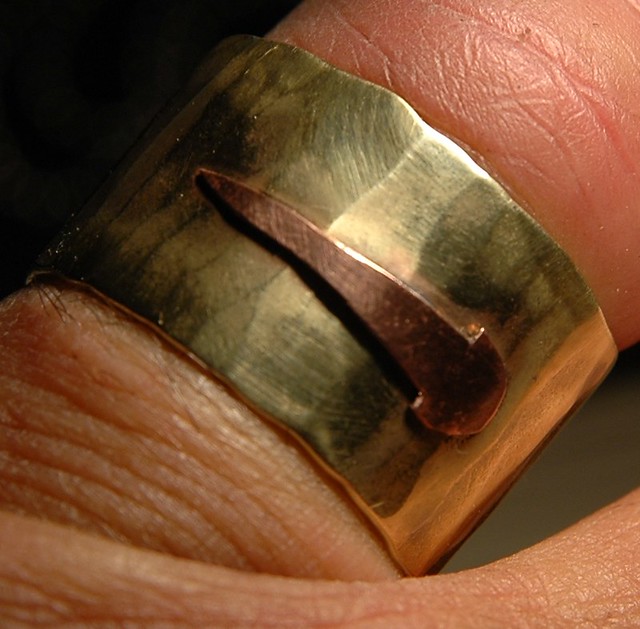 |
|
|
|
Post by 1dave on Nov 24, 2013 11:25:10 GMT -5
So i will post my first hammering forming/texturing project. Three rings. Of not so easy stainless steel. Formed these 3 rings around a bolt welded to a heavy chunk. But these were my first attempts and they gave me confidence to continue hammering mixed metals. Great winter work. So i self taught myself to hammer rings out. In an hour or two. Basically. It was easier than i thought. Most important was the confidence it built. I was thinking no way. Really Check em out This is a wide band of brass (industrial shim material) with a Rhodesian Ridgeback's ridge soldered to it. Then buffed only with Tripoli on cotton buffing wheel. Copper is roofing material. Nobody can force you to learn, but if you are determined, no one can stop you either! So with the stainless steel, you just cut off a strip and started pounding? Did you solder the copper to the brass before pounding? Thanks for sharing! Dave |
|
|
|
Post by 1dave on Nov 24, 2013 12:44:22 GMT -5
I make my own texturing hammers from cheap yard sale found hammers - cut the face using an angle grinder with a thin a cutting wheel - or hand files. I even made a reverse texture "anvil" and cut pattern into the anvil so it adds the pattern to both sides of the metal at once - the "anvil" is an old chunk of railroad rail. also a yard sale find Hmmmm . . . What about meat tenderizing hammers? Files used for checkering etc. would make fine patterns. Finish nail sets come in three sizes and with a little file work are useful. So are all kinds of punches. |
|
|
|
Post by rockpickerforever on Nov 24, 2013 14:26:11 GMT -5
On the floor Jean??? Great work and lots of it. That hurts to look at. Can i get you a bench? A pneumatic or electric device for texturing on a small scale would be nice. I am sure they make such for jewelry. Look at this. A pneumatic hammer mounted in a c-frame.Basically called a 'planishing machine' in a sort. A hammer and an anvil is as simple as it gets. James, the biggest problem we hae is lack of space. There is a 4 by 8 foot workbench in the middle of the garage, but like most horizontal surfaces around hereit tends to accumulatethings! Besides, using a small piece of steel plate on the concrete floor worked for me. Keep in mind, this was about about 17 years or so ago. I doubt I'd be down on the floor today! Since then, we've picked up a treadle hammer, hgaven'ty even used it yet! I think it is a 2 ton. I'll see if I can move some things around and get a picture for you. James, have you ever heard of Fabricator magazine? It is a free magazine, geared towards the metal trades. Mostly advertising it seems, but has good info and articles in it. We get a few different magazines, including Modern Machine Shop, and a welding one, as well. I can dig up info on them, if you'd like. |
|
jamesp
Cave Dweller
Member since October 2012
Posts: 36,154
|
Post by jamesp on Nov 24, 2013 17:14:37 GMT -5
So i will post my first hammering forming/texturing project. Three rings. Of not so easy stainless steel. Formed these 3 rings around a bolt welded to a heavy chunk. But these were my first attempts and they gave me confidence to continue hammering mixed metals. Great winter work. So i self taught myself to hammer rings out. In an hour or two. Basically. It was easier than i thought. Most important was the confidence it built. I was thinking no way. Really Check em out This is a wide band of brass (industrial shim material) with a Rhodesian Ridgeback's ridge soldered to it. Then buffed only with Tripoli on cotton buffing wheel. Copper is roofing material. Nobody can force you to learn, but if you are determined, no one can stop you either! So with the stainless steel, you just cut off a strip and started pounding? Did you solder the copper to the brass before pounding? Thanks for sharing! Dave Yes Dave. But i pre hammered the strips to flatten the curl from the shears. And then i tumbled them. I was fooling around tumbling metal to achieve various patinas. A bunch of silver plated trays cut up and tumbled Dave. From the scrap yard. Tumbled 1/2 metal and 1/2 tumbled granite pea gravel. To get rid of the burrs. So that they would not follow me in the hammering process. The burrs reap havoc. The tumbled granite leaves a finish on ALL that metal that can be left satin after hammering or polished in one step w/cotton buffing wheel coated w/tripoli. The shearing was done with a pair of large hand shears with half in the vise. So one hand fed the tray and the other operated the handle. Like a miniature brake shear. Learned to leave them long so they could be cut into shorter morsels and the only filing/deburring would be on the single reducing cut. Rio Grande would have charged a lot for this 30 pound lot. 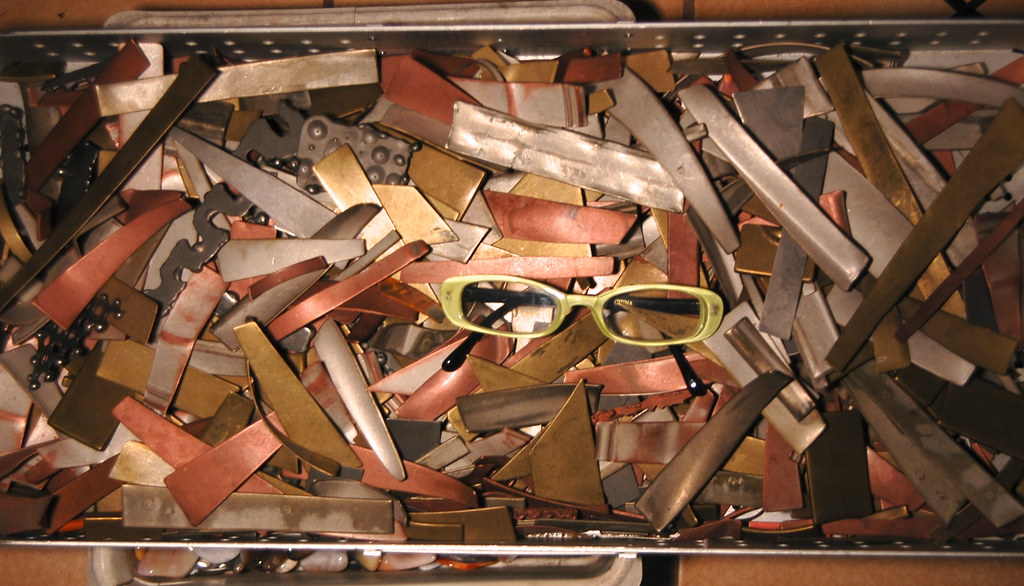 Silver plated serving ware was made out of stainless, brass, german silver, copper, white brass. Seems the older the better. The quality of the metals is impeccable. The older stuff could be nice and thick. And the old scratced up stuff is the stuff people are scrap ing. So the scrap yard can be a venerable metal mine. See the silver plate partially tumbled off: 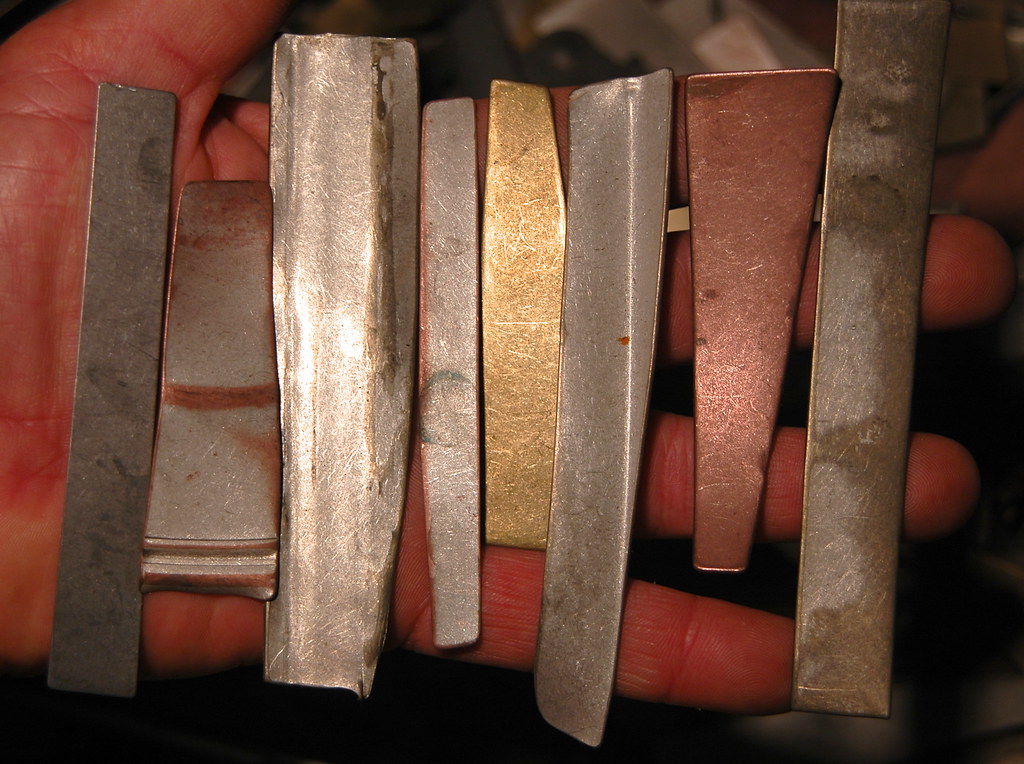 |
|
jamesp
Cave Dweller
Member since October 2012
Posts: 36,154
|
Post by jamesp on Nov 24, 2013 17:26:52 GMT -5
At one yard i found 8 serving trays of 1.5mm german silver for $5 each. It was about $1000 worth of metal from jewelry supply except the quality was way better. They were bent up.The had these emblems.  They looked about like this. They were mid 19th century. They could be hammered thin.Without cracking.  |
|
jamesp
Cave Dweller
Member since October 2012
Posts: 36,154
|
Post by jamesp on Nov 24, 2013 17:29:28 GMT -5
Brass ring was hammered and buffed first Dave. Then copper emblem cautiously soldered. Solder is nerve racking(to avoid smearing/running). Not my best talent,the solder.
|
|