|
|
Post by rockjunquie on Jan 31, 2014 23:00:25 GMT -5
I know this will sound really stupid, but...... I can't find any information for the steps involved with designing the backplate for a cabochon bezel setting. I cut out a rough of metal for the back piece. Do I glue a template on and saw it out? Do I scribe lines and cut after the bezel is on? I'm really confused. With other settings I did them flush, but now I want to spread my wings and I don't know how.  Please help.... |
|
|
|
Post by deb193redux on Jan 31, 2014 23:28:13 GMT -5
I don't think I am understanding. You just saw the shape you want.
|
|
|
|
Post by rockjunquie on Jan 31, 2014 23:34:55 GMT -5
Before or after the bezel is soldered? I'm thinking that if I do it after the bezel it will be hard to mark or see marks I may have already made prior to soldering. If I cut before soldering, do I just have to eyeball where the bezel sits?
|
|
|
|
Post by deb193redux on Jan 31, 2014 23:43:40 GMT -5
I cut before and eyeball where bezel sits. Not sure there is one way though. You can always file if you place the bezel a little off.
|
|
|
|
Post by rockjunquie on Feb 1, 2014 0:17:01 GMT -5
OK, thanks Daniel  What I did was scan a trace of my stone, popped it into PS and created an image 125% larger. That will give me a bigger back plate to work with and I can fit my design into that after I cut it out. I put some glue stick on it and stuck the template onto the metal to saw. I'm thinking that will do it. |
|
|
|
Post by Pat on Feb 1, 2014 0:26:54 GMT -5
Forget the glue sticks. Draw/print your design on a label. They're sticky on the back already.
I just put the cab on the as sheet, draw with Sharpie where I want edges to be, and draw around the stone, then start sawing or snipping.
|
|
steelandstone
has rocks in the head

Member since September 2008
Posts: 500
|
Post by steelandstone on Feb 1, 2014 11:57:35 GMT -5
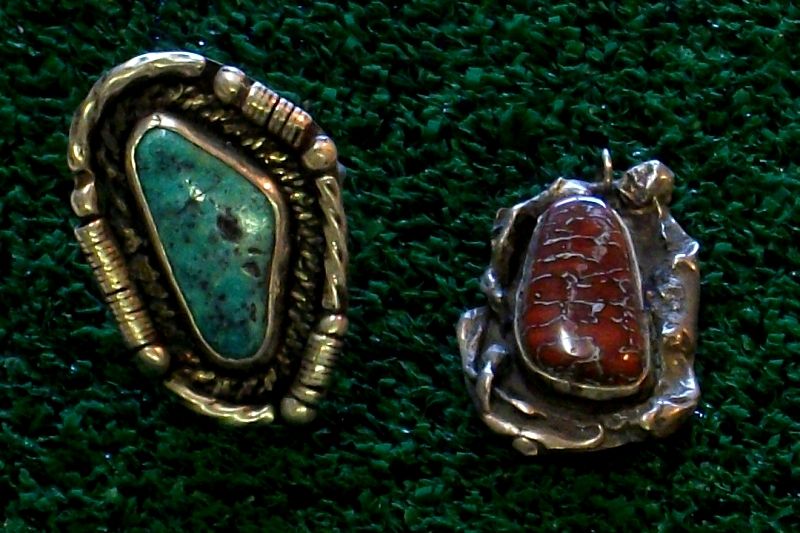
I assume you are referring to backings like these?   If so this is how I do it and I know it may not work for everyone as I do not pre-plan most of my pieces. I may have a general idea in my head but I am the worlds worst at drawing or sketching anything in fact I got a D in art class. I will take the cab lay it on the main sheet and figure how much room around the cab I need and then will draw that out with a sharpie and cut it out, next step depends on wheather or not I am going to texture the back ground and if so by what method, Running through the mill with sandpaper or wire; flame texturing, or by some other method. Once all that is done then I solder the bezel to the backing and go from there. My last step is always the bail as this way I can make sure it gets put in the correct position so the piece will hang as intended. |
|
|
|
Post by rockjunquie on Feb 1, 2014 16:24:26 GMT -5
Great! Yeah, see I wanted some texture in one section right up to the bezel and was trying to figure that one out. I guess I should do that first and be careful not to dimple where the bezel wire needs a flat join.
So, I got my backing plate all ready to go, had it all perfect, had the bail made and then somehow- probably placing it where I shouldn't have- it got a big dimple and huge gouge in it. I had to go back to the drawing board.
This has not been a good jewelry day. I was finishing a part of a silver back plate- a corner tip, when I inadvertently sanded a dimple. That section was supposed to be high polish. Not anymore. LOL! I gotta laugh to keep from crying. Learning how to use all the various sanding, polishing and finishing products has proven to be daunting. *sigh*
|
|
|
|
Post by Pat on Feb 1, 2014 16:27:35 GMT -5
Tela, bezels don't need a flat spot always. I've soldered bezels onto reticulated pieces with no trouble.
|
|
|
|
Post by rockjunquie on Feb 1, 2014 16:39:13 GMT -5
Really? I guess you can only get so much from a book. I'm working on the whole "experience" thing :)I am getting so much more comfortable doing this. I really enjoy it and love to make mistakes that I hate because I'm learning. But, there just isn't enough time in a day to do all I want to do.
So, did you push it down when it was time for the solder to flow- or did it just work out?
|
|
|
|
Post by radio on Feb 1, 2014 20:03:24 GMT -5
I lay the stone on a piece of paper and make several outline markings of it allowing plenty of room between. I then place the cab back on square one and start drawing a basic shape to compliment the shape of the stone. Rather than erase lines, I just move the stone to the next outline and start over and modify anything that didn't look right on the first drawing. repeat until you are happy with the composition then you can cut out the shape and mark around it on your silver sheet or freehand it if you like. Make the bezel for the stone and solder the joins. Cut out the shape of the backing and solder the bezel to the backing. Sounds simple enough, eh?  Keep in mind in any craft, there are numerous ways to achieve the same thing and the "correct" method is the one that suits your style the best If you start with smaller pieces it will go a bit smoother for you. For a relative beginner, soldering large diameter bezels can get frustrating as they are much more difficult to make contact with the backing evenly all the way around keeping in mind that silver solder will not fill a gap between the bezel and backing. The bezel must be filed to set flush on the backing or an instrument used to push the bezel down to contact the backing. Pushing the bezel down can be an exercise in frustration for the less experienced smiths and IMHO, it is best to practice getting a good fit before taking the next step of forcing the bezel down. Kinda like the old saying of putting the cart before the horse Bezels can be, and often are soldered onto backing with texturing or other effects, but as I mentioned earlier, silver solder will not fill a gap like lead or tin solder will, so make sure going in that a gap between the bezel and backing isn't going to be detrimental to the appearance of the finished piece. Have fun and learn from the "Ooops" moments. Practice is the only way to sharpen the skills  |
|
|
|
Post by 1dave on Feb 1, 2014 20:40:00 GMT -5
Back in the day, I fit a bezel to the stone, soldered it to a corner on a sheet of silver, partially melted scrap, moved them around until I got something I liked, soldered them in place, then trimmed the excess plate off. Soldered the bale or ring shank, pickled and polished, then set the stone.
Next job.
|
|
steelandstone
has rocks in the head
Member since September 2008
Posts: 500
|
Post by steelandstone on Feb 1, 2014 20:55:26 GMT -5
This has not been a good jewelry day. I was finishing a part of a silver back plate- a corner tip, when I inadvertently sanded a dimple. That section was supposed to be high polish. Not anymore. LOL! I gotta laugh to keep from crying. Learning how to use all the various sanding, polishing and finishing products has proven to be daunting. *sigh* I have had a few of those days myself. For me the high polish ones are always the hardest to get "perfect". Days like that just mean I have an extra glass a wine |
|
|
|
Post by Pat on Feb 1, 2014 22:16:42 GMT -5
1dave, I don't understand the use of the partially melted scrap. All else is how I do it, too.
|
|
|
|
Post by 1dave on Feb 2, 2014 2:50:01 GMT -5
|
|
|
|
Post by connrock on Feb 2, 2014 14:08:19 GMT -5
steelandstone,,,
You beat me with a D in art class.
In my high school days I got a 16 as a final mark in art!
Still can't draw! LOL
connrock
|
|
|
|
Post by rockjunquie on Feb 2, 2014 14:48:31 GMT -5
I'm finding that photo shop is my best friend. I trace the stone, scan it and play with the shape till I get a back that I want. Not freehand/freeform, but not too bad either. It's fun. I can't draw worth a crap.  |
|


 Keep in mind in any craft, there are numerous ways to achieve the same thing and the "correct" method is the one that suits your style the best