|
|
Post by txrockhunter on Jul 21, 2016 6:51:25 GMT -5
I have a small leak in one of my PVC barrels at the reducer. I try to keep the slurry thick enough so it doesn't leak. After adding a little water this week, there was a small amount that snuck out and this is what it produced! I Thought it was cool enough to share. Someday I will fix the leak.....maybe. 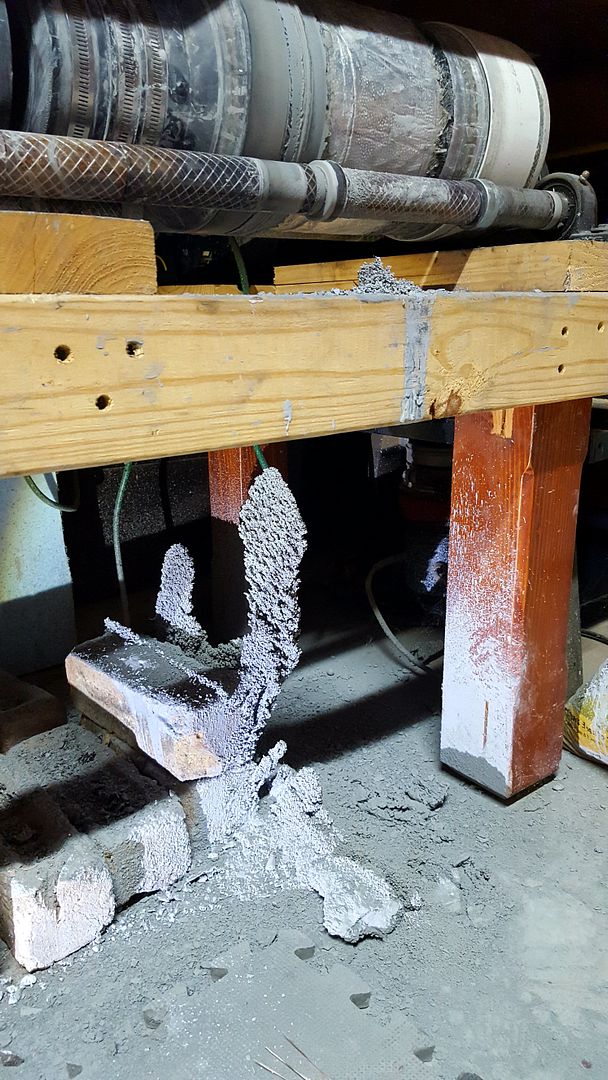 BTW, the square is 9" long.  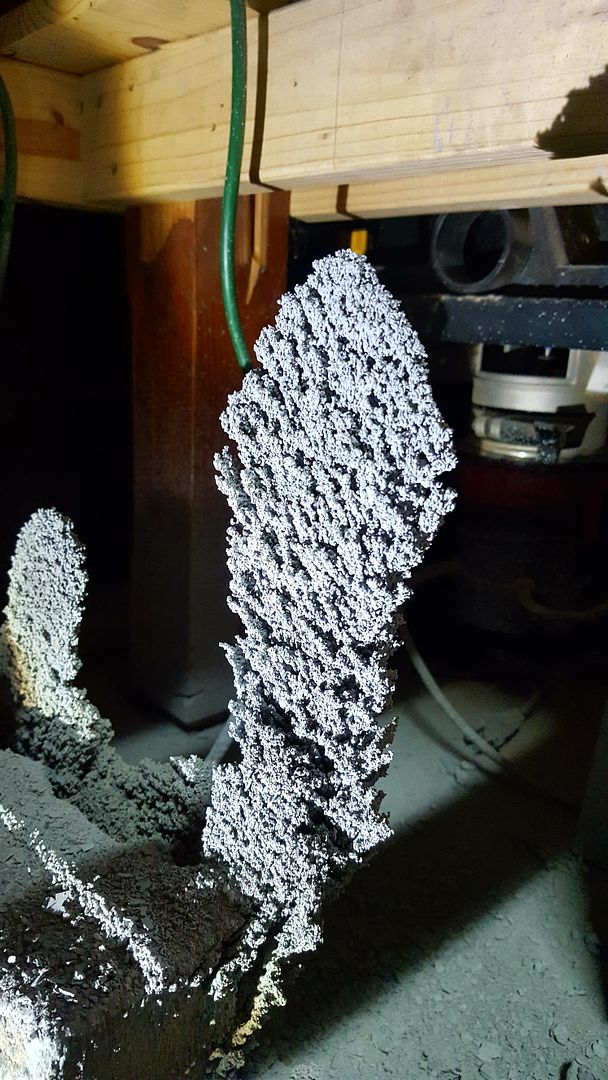 |
|
rodeodan
starting to spend too much on rocks

Member since January 2010
Posts: 213
|
Post by rodeodan on Jul 21, 2016 8:27:07 GMT -5
pretty cool
|
|
jamesp
Cave Dweller 
Member since October 2012
Posts: 36,555
|
Post by jamesp on Jul 21, 2016 8:46:31 GMT -5
Amazing structure tx. sorry to see though.
I have done glue joints with cut off couplings and caps to get them to fit on limited pipe stub.
Full glue joints are like 2.5 inches. No problems with leaks w/2.5 inch overlap.
BUT, I have glued with a 1 to 1.5 inch overlap and had bad results in the leaking dept.
The constant reversing seem to pump or milk slurry into the joint as the reversals fatigue the glue on such a short overlap.
Rubber has a big thermal coefficient of expansion. Heat quick to loosen a joint of PVC to rubber.
A loose joint turns into a diaphragm pump of sorts.
I have learned the hard way to cut the pipe longer and when the end cap wears thru just cut the sucker off and glue a new one on with full overlap. Cheap fix.
After 2-3 years the pipe wears thru. chunk the whole thing and glue up another. Economically it is a good bit cheaper than a high dollar factory barrel of 15 - 25 pound size.
Running higher speed, fresh SiC 30, broken up grinding wheels, large tumbles has a toll. But grind in shorter time frame.
But my electrical meter tells where my main tumbling expense is.
|
|
Fossilman
Cave Dweller
Member since January 2009
Posts: 20,709 
|
Post by Fossilman on Jul 21, 2016 8:57:07 GMT -5
Nasty smelling stuff too....LOL
|
|
jamesp
Cave Dweller
Member since October 2012
Posts: 36,555
|
Post by jamesp on Jul 21, 2016 9:05:44 GMT -5
Cap view. Used a 6 inch coupling. Packed a 6 to 4 bushing into it. Then 4" stub for cap. Fill the bushing gussets with high quality silicone caulk before using and getting dirty, right from the start. after a about 1.5 years the internal shoulder wears thru. The caulk solves that. The big wide 6 inch coupling gives a wide platform for the barrel to roll on. The other end is simply a 6 inch end cap. I would remove the rubber reducer and replace with glued coupling and 4 to 6 bushing.  |
|
jamesp
Cave Dweller
Member since October 2012
Posts: 36,555
|
Post by jamesp on Jul 21, 2016 9:17:15 GMT -5
The two barrels front and left Jeremy have seen about 3 years full time coarse grind. My favorite design. Last leg though, no more pipe left to cut off for another end cap except left most barrel. Funny, at 30 RPM the pipe wears faster than at 55 RPM. Slippage, probably. I picked up a four 20 foot sticks of sch 40 PVC pipe for a drainage job in Florida. Stole half from myself for new barrels. Lowes sells 6 inch sch 40 pvc fittings cheapest... the long 8 inch albatross was too much weight, 70# rocks and the barrel weight, HEAVY Don't do the SDR 35 green pipe. Drainage fittings only last 6months...  |
|
|
|
Post by txrockhunter on Jul 21, 2016 10:45:00 GMT -5
"Rubber has a big thermal coefficient of expansion. Heat quick to loosen a joint of PVC to rubber."
At some point I will have to heat it and re-glue or cut it off and replace. My short term fix is to take the column of dried slurry and throw it back in the barrel. It will thicken the mixture enough to keep it from leaking.....kind of a circular process. Put it in, to have it spill out, so I can put it back in again?! That Georgia Clay would accomplish the same results.
"I have learned the hard way to cut the pipe longer and when the end cap wears thru just cut the sucker off and glue a new one on with full overlap."
Most of my lessons are a result of your lessons, so keep learning!!!
Jeremy
|
|
|
|
Post by captbob on Jul 21, 2016 11:04:10 GMT -5
That is pretty cool. Is it hard enough to stay intact if you try to keep it in one piece? Reminds me of one of those aluminum ant hill castings.  |
|
jamesp
Cave Dweller
Member since October 2012
Posts: 36,555
|
Post by jamesp on Jul 21, 2016 12:37:33 GMT -5
PVC glue does some what of a weld joint by softening the pvc for a great bond. some disagree, i will coat each surface to be glued 3 times and letting it melt in deeper. Texas tumbler casting  |
|
jamesp
Cave Dweller
Member since October 2012
Posts: 36,555
|
Post by jamesp on Jul 21, 2016 12:39:31 GMT -5
Slurry floret
worse when they form over the bearings increasing air space between close tolerances lol
|
|
|
|
Post by txrockhunter on Jul 21, 2016 13:41:30 GMT -5
That is pretty cool. Is it hard enough to stay intact if you try to keep it in one piece? Reminds me of one of those aluminum ant hill castings. It's very brittle and reminds me of this type of sandcastle........taking wet sand and dripping it in columns. Probably shouldn't use this image, for multiple reasons, but it was the first example that I found.  |
|
|
|
Post by txrockhunter on Jul 21, 2016 14:03:07 GMT -5
Cap view. Used a 6 inch coupling. Packed a 6 to 4 bushing into it. Then 4" stub for cap. Fill the bushing gussets with high quality silicone caulk before using and getting dirty, right from the start. after a about 1.5 years the internal shoulder wears thru. The caulk solves that. The big wide 6 inch coupling gives a wide platform for the barrel to roll on. The other end is simply a 6 inch end cap. I would remove the rubber reducer and replace with glued coupling and 4 to 6 bushing. I will be replacing my rubber reducer today! Thanks for heads up! |
|
|
|
Post by Pat on Jul 21, 2016 14:32:44 GMT -5
That is so neat!!!
I was given a packet of about six such structures didn't have s clue what it was. At least now I know how it was made.
Thanks for showing.
|
|
|
|
Post by txrockhunter on Jul 21, 2016 15:18:37 GMT -5
That is so neat!!! I was given a packet of about six such structures didn't have s clue what it was. At least now I know how it was made. Thanks for showing. Thanks Pat! It serves no real value for tumbling, but was too cool not to share. I left it up to see if it would get bigger before falling over. I will update if it stays together! |
|
quartz
Cave Dweller
breakin' rocks in the hot sun
Member since February 2010
Posts: 3,352
|
Post by quartz on Jul 21, 2016 23:17:44 GMT -5
Hard way to get it done [the adjacent mess], but those are pretty nice homemade stalactites.
|
|
jamesp
Cave Dweller
Member since October 2012
Posts: 36,555
|
Post by jamesp on Jul 23, 2016 2:26:39 GMT -5
Acrylic concrete sealer is normally about 25% acrylic dissolved in solvent.
I use it on patina'ed steel after wire brushing as a clear coat.
It is thin and watery, leaves a plastic dissolved into rags for instance that make them hard.
Soaking that formation in it would probably freeze it into a harder state.
Would make a conversation piece for sure.
Most unknowing people are mesmerized by the rock tumbling process. Flip when you say how long it takes.
This formation would require quite an exposition.
|
|
Deleted
Deleted Member
Member since January 1970
Posts: 0
|
Post by Deleted on Jul 24, 2016 13:31:03 GMT -5
Acrylic concrete sealer is normally about 25% acrylic dissolved in solvent. I use it on patina'ed steel after wire brushing as a clear coat. It is thin and watery, leaves a plastic dissolved into rags for instance that make them hard. Soaking that formation in it would probably freeze it into a harder state. Would make a conversation piece for sure. Most unknowing people are mesmerized by the rock tumbling process. Flip when you say how long it takes. This formation would require quite an exposition. I was about ready to suggest mixing epoxy and diluting 10-1 in acetone, then misting the formation with a spray bottle. Concrete sealer may be easier! |
|
jamesp
Cave Dweller
Member since October 2012
Posts: 36,555
|
Post by jamesp on Jul 24, 2016 15:57:57 GMT -5
Acrylic concrete sealer is normally about 25% acrylic dissolved in solvent. I use it on patina'ed steel after wire brushing as a clear coat. It is thin and watery, leaves a plastic dissolved into rags for instance that make them hard. Soaking that formation in it would probably freeze it into a harder state. Would make a conversation piece for sure. Most unknowing people are mesmerized by the rock tumbling process. Flip when you say how long it takes. This formation would require quite an exposition. I was about ready to suggest mixing epoxy and diluting 10-1 in acetone, then misting the formation with a spray bottle. Concrete sealer may be easier! I could see Jeremy sealing it off in hot pink and wearing it on top of a helmut Roman style. |
|
|
|
Post by txrockhunter on Jul 25, 2016 7:45:48 GMT -5
I was about ready to suggest mixing epoxy and diluting 10-1 in acetone, then misting the formation with a spray bottle. Concrete sealer may be easier! I could see Jeremy sealing it off in hot pink and wearing it on top of a helmut Roman style. Sorry James, this is as close as you are going to get...........  The Tower crumbled before I could get it off. But, my superior ability to procrastinate has allowed another one to start forming!! More to come.....but don't expect any Leonidas photos of me! Sorry for the crude image. No photoshop at the office. Jeremy |
|
jamesp
Cave Dweller
Member since October 2012
Posts: 36,555
|
Post by jamesp on Jul 25, 2016 10:23:21 GMT -5
RalloverTFLMAO. You are good. Does not take much imagination to have a dirty thought looking at the Roman wearing that arrangement.
|
|