Getta Grip
noticing nice landscape pebbles

Member since November 2016
Posts: 81 
|
Post by Getta Grip on Nov 29, 2019 23:10:29 GMT -5
Greetings all, Here's a picture of saw marks, I'm getting on my 20" saw. I have found my alignment continually moves. I zero it, make a cut, and find it's once again .020" out of alignment. To align it, I make a mark towards the edge of the blade. I set up my indicator on the mark and zero it. I move the indicator across the blade and rotate the blade to a point that the indicator can measure on the same mark. I can get about 18" across the blade. My saw uses a spindle unit, that bolts into the side of the saw box. I added three adjustment screws to the spindle flange to make adjustment easier. I had been using shims. I discovered some looseness in the carriage guide rods. If I put side force on them, I can alter the indicator 5 to 10 thousanths. I am going to be pulling the whole carriage assembly and tightening the rod ends. I'm a little concerned about getting the carriage and rods to slide smoothly when I'm done, but I'll address that when I get to it. Here's a few pictures of my saw and my saw marks.  Marks on slab 2 Marks on slab 2 by Glen Ray, on Flickr  marks on slab marks on slab by Glen Ray, on Flickr  My saw 3 My saw 3 by Glen Ray, on Flickr |
|
Getta Grip
noticing nice landscape pebbles
Member since November 2016
Posts: 81
|
Post by Getta Grip on Dec 8, 2019 0:18:29 GMT -5
Progress pictures. I removed the carriage. Notice that the guide bars are bolted to 1" x 2" 1/8" x 18" channel iron with the legs to the walls. I don't like it. There is too much flexibility in that channel.  Carriage assembly removed Carriage assembly removed by Glen Ray, on Flickr I'm replacing the mount rails with solid 1" x 2" Cold rolled steel. In this picture, I have begun the process of laying out all the holes. Notice the mounting holes in the original are more or less, randomly located. I am going to keep the heights of the guide rods and the clearance hole for the drive screw, but I'm going to put the mounting holes on the same center line as the guide rods and 1-1/2" on each side of the guide rods. One other point here is that with the channel iron the guide rod bolt heads were inside the legs. I am going to use 1/2-13 flat head screws with allen drive. I believe there are star type lock washers made especially for flat head screws. I am going to attempt to find them. In the Portland metro area, the best chance of finding odd hardware is at the Parkrose Hardware stores. They have the best on-hand selection, I have ever found.  Front mount rails new and old Front mount rails new and old by Glen Ray, on Flickr The next picture shows where one of the guide rods was seated. I hit the face of the channel iron with a couple file strokes and revealed that the mounting face was not flat. As you can see, the area around the bolt was high. I believe this fact and the fact that the other guide rod mounting hole had been .... stretched a bit. ( probably with a rat tailed hole stretcher.) are probably part of the reason my saw wouldn't stay in alignment.  Guide Rod front left mounting hole Guide Rod front left mounting hole by Glen Ray, on Flickr Here is a picture of the other hole. You can see it is also high in the middle and not quite round.  Guide Rod front right mounting hole Guide Rod front right mounting hole by Glen Ray, on Flickr Well that's enough for tonight. I'll keep you posted on my progress. |
|
carver
starting to shine!

Member since November 2019
Posts: 36
|
Post by carver on Dec 8, 2019 14:23:33 GMT -5
This is a good write up. You seem like you know what you are talking about but I wanted to mention it anyway. You did check to make sure the arbor/pillow block bearings are not worn. Grab the shaft and see if there is any movement vertically or horizontally in the shaft. There shouldn’t be any movement. Of course the arbor also needs to be bolted down very securely. My carriage on my 18” always has a very little movement if you grab it but presumably the force is constant pushing back during a cut. The rails obviously shouldn’t.
|
|
Getta Grip
noticing nice landscape pebbles
Member since November 2016
Posts: 81
|
Post by Getta Grip on Dec 8, 2019 22:17:28 GMT -5
This is a good write up. You seem like you know what you are talking about but I wanted to mention it anyway. You did check to make sure the arbor/pillow block bearings are not worn. Grab the shaft and see if there is any movement vertically or horizontally in the shaft. There shouldn’t be any movement. Of course the arbor also needs to be bolted down very securely. My carriage on my 18” always has a very little movement if you grab it but presumably the force is constant pushing back during a cut. The rails obviously shouldn’t. Yea, that was my first concern, but after Rockoonz and I pulled this thing from it's home in a mud puddle, I cleaned it up and replaced the spindle bearings. They only have a couple hundred hours on them. I did check them though and they are fine. If these modifications don't eliminate the issue, the next step will be to ad some two inch, thick wall, square tubing to the side of the box to reduce any flexing around the spindle mount. But I'm hoping my current efforts will tighten it up. |
|
Getta Grip
noticing nice landscape pebbles
Member since November 2016
Posts: 81
|
Post by Getta Grip on Dec 10, 2019 21:54:10 GMT -5
I started drilling the new bars for the ends of the guide rods. I thought I had all the tooling I needed but...... I'm now waiting for a tool to counterbore for the heads of the bolts that will secure the guide rods to the end bars,  New rails in progress New rails in progress by Glen Ray, on Flickr |
|
Getta Grip
noticing nice landscape pebbles
Member since November 2016
Posts: 81
|
Post by Getta Grip on Dec 13, 2019 0:15:46 GMT -5
I decided I would use 1/2-13 socket head flat screws to connect the guide rods to the end bars. I suspect some of you are not aware that you can get lock washers for flat head screws. You can, but you should always consider them to be a one time device. In this picture, the lock washer on the left was used once and the one on the right is new. Notice how the points on the used one are all flattened out and the points on the new one are all angled. The used one "might" not allow the screw to come loose, but the new one will not allow the screw to come loose. I installed the one on the left to verify a proper fit in the countersink I cut into the bars.  Flathead lockwashers Flathead lockwashers by Glen Ray, on Flickr It looks like this installed.  Screw installed Screw installed by Glen Ray, on Flickr Today, I bolted the new end bars to the guide rods and I installed the carriage assembly back into the saw. I put the blade back in and did a rough alignment (+- .005") before I transferred the end bar mounting holes to the saw box. I haven't aligned it yet but I did get the drive screw re-installed. |
|
Getta Grip
noticing nice landscape pebbles
Member since November 2016
Posts: 81
|
Post by Getta Grip on Dec 14, 2019 0:28:00 GMT -5
I got my saw back together today. I was shocked! The alignment was only .004" out across 18". I aligned it to less than .001" out and completed the assembly. I picked a rock from my pile and started cutting. I made 2 cuts. The first had a couple saw marks in the first 1/4" but then was smooth. The second cut was perfect!!!!! YEA! not one saw mark on either half! This picture shows the end that is still in the vice. The face is 4" tall and 3" wide. Tomorrow I'll cut a couple more slabs. By the way ... does anyone recognize this type stone? 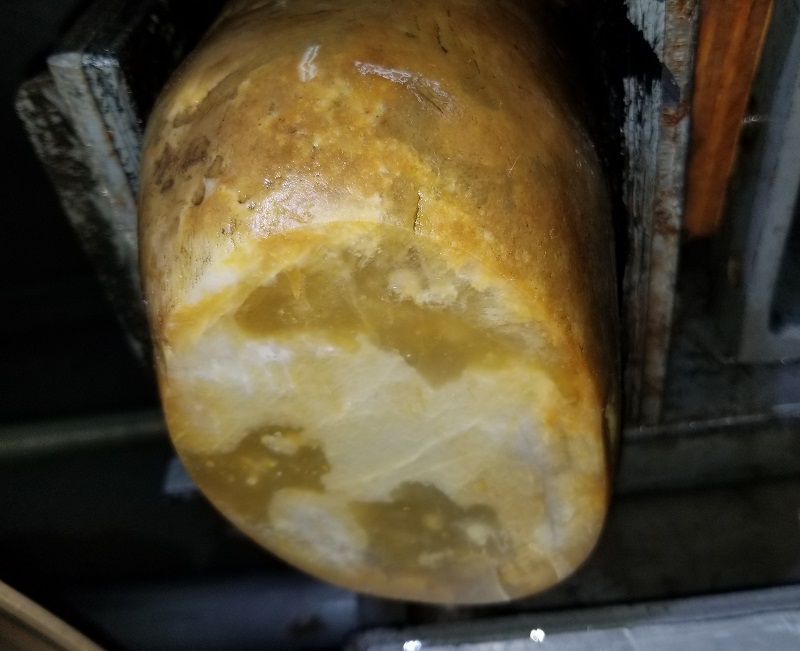 clean cut clean cut by Glen Ray, on Flickr |
|
|
|
Post by Rockoonz on Dec 14, 2019 1:15:25 GMT -5
I got my saw back together today. I was shocked! The alignment was only .004" out across 18". I aligned it to less than .001" out and completed the assembly. I picked a rock from my pile and started cutting. I made 2 cuts. The first had a couple saw marks in the first 1/4" but then was smooth. The second cut was perfect!!!!! YEA! not one saw mark on either half! This picture shows the end that is still in the vice. The face is 4" tall and 3" wide. Tomorrow I'll cut a couple more slabs. By the way ... does anyone recognize this type stone? clean cut by Glen Ray, on Flickr Looks like a petrified potato. Good news about the saw. |
|
Getta Grip
noticing nice landscape pebbles
Member since November 2016
Posts: 81
|
Post by Getta Grip on Dec 14, 2019 9:02:11 GMT -5
I got my saw back together today. I was shocked! The alignment was only .004" out across 18". I aligned it to less than .001" out and completed the assembly. I picked a rock from my pile and started cutting. I made 2 cuts. The first had a couple saw marks in the first 1/4" but then was smooth. The second cut was perfect!!!!! YEA! not one saw mark on either half! This picture shows the end that is still in the vice. The face is 4" tall and 3" wide. Tomorrow I'll cut a couple more slabs. By the way ... does anyone recognize this type stone? clean cut by Glen Ray, on Flickr Looks like a petrified potato. Good news about the saw. OF COURSE!! I should have recognized it!........ Taterite otherwise called Spudite! |
|
EricD
Cave Dweller  High in the Mountains
Member since November 2019
Posts: 1,142
|
Post by EricD on Dec 14, 2019 10:03:30 GMT -5
I got my saw back together today. I was shocked! The alignment was only .004" out across 18". I aligned it to less than .001" out and completed the assembly. I picked a rock from my pile and started cutting. I made 2 cuts. The first had a couple saw marks in the first 1/4" but then was smooth. The second cut was perfect!!!!! YEA! not one saw mark on either half! This picture shows the end that is still in the vice. The face is 4" tall and 3" wide. Tomorrow I'll cut a couple more slabs. By the way ... does anyone recognize this type stone? Well done Glen. Much better workmanship than what was in there to start with  |
|
Getta Grip
noticing nice landscape pebbles
Member since November 2016
Posts: 81
|
Post by Getta Grip on Dec 14, 2019 20:55:40 GMT -5
Well done Glen. Much better workmanship than what was in there to start with Thank you, but really that wasn't a real high bar. I think this was probably a kit saw from long ago. It seems to be working good now. I have slabbed about 2 feet of rock so far and it all looks real good. Right now I have a 8" long piece of pet wood in the vice. I'm cutting it with the grain. If I get a few good slabs with minimum saw marks, I will put what's left of the Brazilian agate back in the vice and see if I can get some clean slabs. I will be gluing it to a piece of 4x4. |
|


