panamark
fully equipped rock polisher

Member since September 2012
Posts: 1,343
|
Post by panamark on Nov 6, 2012 21:41:32 GMT -5
I am really new at this and learning a lot, but have some pictures of my first output. I had some pieces and bits of Gary Green jasper that were unusually brittle and soft, but they were just too pretty to throw out. So I decided to try and tumble them. I sure could have picked an easier first stone I guess, as these pieces cracked and chipped easy, even though I kept the tumbler full and used plastic filler media. Anyway, they came out pretty I think. I am going to make bracelets and necklaces out of them, so I wanted some natural curves and features from the original rock. Now I have to find out how difficult it will be do drill this stuff  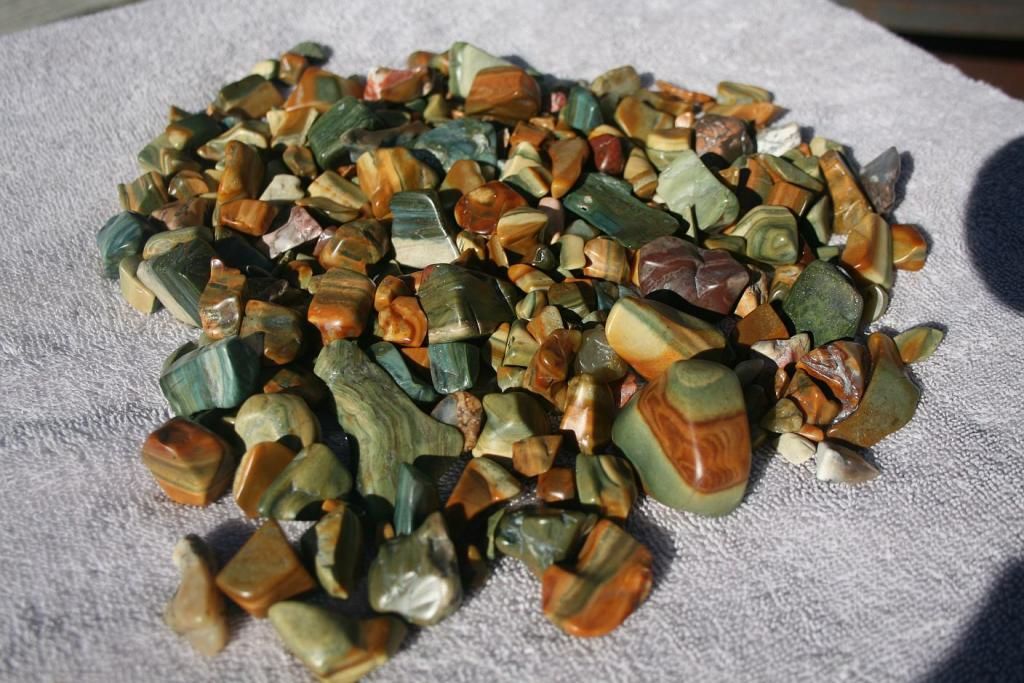 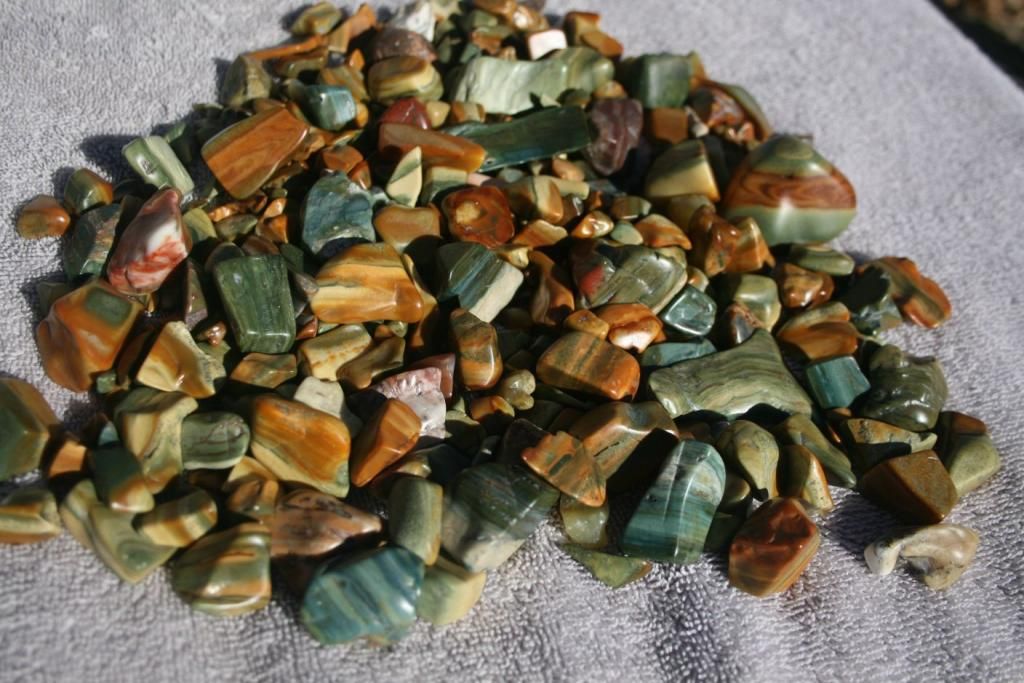 I did the rough 1st tumble in rotary, and finished in vibe. I was a bit frustrated that I couldn't get a better shine on them. I think some of the problem was the softness of the material and the rest was that I'm still learning ;D Maybe the AO isn't the best polish for material like this? Also, I don't think I like using a vibe for the final polish and burnishing on brittle stones like this. Several stones chipped when I briefly had them in the soap+borax+water final burnish, which didn't help the polish much  These are some of my favorites from the load. 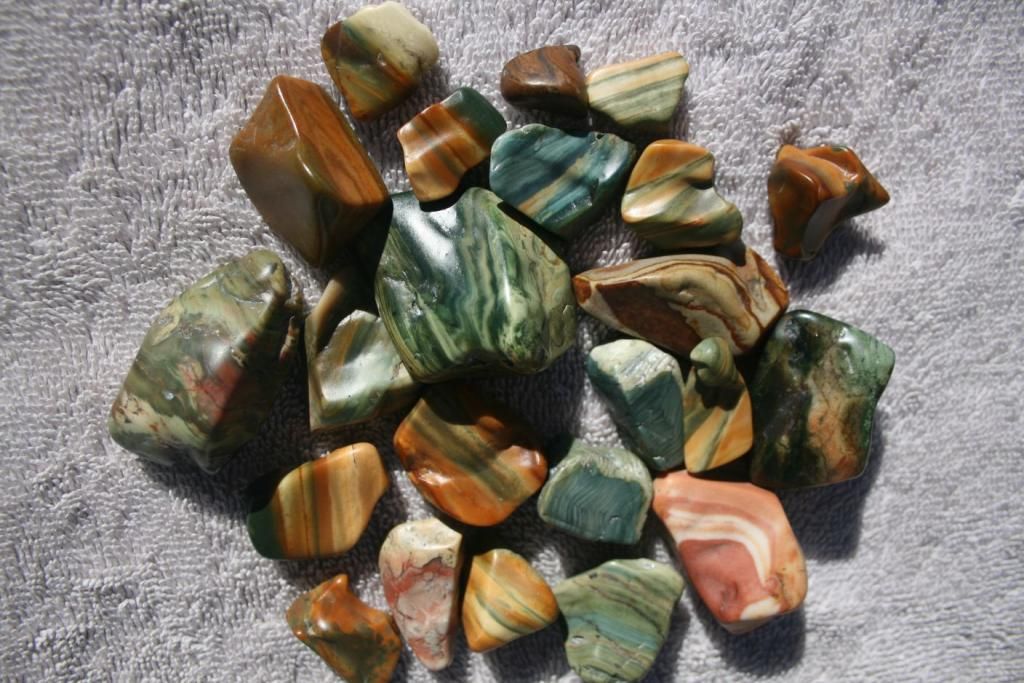 I think Gary Green is some of my favorite stone - I just love the colors. Thanks Tony (Katmandewe) for helping me get these! Someday I will slab up the solid stuff and really get a polish on it and post pics. Hope you enjoy,and any tips or suggestions are appreciated. - Mark PS: sorry - I should have put in "Photos section" |
|
|
|
Post by Jugglerguy on Nov 6, 2012 22:06:10 GMT -5
Those are some pretty rocks. I like the colors too. Looks like you got them nice and shiny!
|
|
jamesp
Cave Dweller 
Member since October 2012
Posts: 36,548
|
Post by jamesp on Nov 6, 2012 22:32:28 GMT -5
Cool jaspers the layers are great along w/the colors
|
|
cardiobill
freely admits to licking rocks

Member since March 2012
Posts: 880
|
Post by cardiobill on Nov 6, 2012 23:01:30 GMT -5
I think they look great. Congrats on your first batch. Welcome aboard
Bill
|
|
|
|
Post by connrock on Nov 7, 2012 8:35:42 GMT -5
Very nice material and congratulations on your first load! If I were to do these rocks I would have done a lot more roughing until they were without flaws.Flaws are OK if you want that "look" but you have to take special care when doing loads with flaws. I suspect that the flaws in you rocks contributed to the load not polishing up as well as you would have liked. It's difficult to tell from photos but it looks to me like I can see grit and or slurry in some of the flaws. If only 1 piece of grit carries over to the polish stage it will cause problems and you won't get that "glass" like finish you want. The best way to prevent this is to rough the rocks until the flaws are completely gone. If you want flaws in you finished rocks you MUST make SURE that all of the flaws are COMPLETELY cleaned out and free of grit and of slurry!This can be difficult to do and even scrubbing with a tooth brush may not get the flaws completely cleaned out and not something I would suggest for a beginner. What brand vibe unit do you have? I have shown this photo to beginners before and will show it to you too.These are pieces of Brazillian Agate and they have NOT been into the polish stage.They have ONLY been into a pre-polish in my vibe and they look pretty good to me.  I finish 99.9% of my rocks in my vibes and they come out pretty good. Let's see if we can help you to get a glass like shine on you rocks! connrock |
|
panamark
fully equipped rock polisher
Member since September 2012
Posts: 1,343
|
Post by panamark on Nov 7, 2012 9:30:47 GMT -5
Hi Connrock,
Thanks for your tips and advice. I am finding this is definitely as much art as science! I realized when I decided to go for the curves and flowing look that it might present problems in the finish. And a lot of the rocks had grooves and things that I decided to leave in and not grind out (lazy?), so I had to clean with a pick and toothbrush every stone after ever stage to get the grit out. What a hassle and not sure if I will go that route again. And of course the AO polish stuck in those spots bad. But I did learn that if I included some powder laundry soap before I added the polish, it would help in clean up.
I am using an oldie but goodie vibe - Crown Lapidary. I am sure the lack of polish was not thru cross contamination of the bowls, so that wasn't the problem. I have a load of agates and pet wood going now, and they are coming out with a great shine, so I do think it was a lot to do with the material (and maybe the voids in them). I hope I can get my agates to come out with the shine yours do, but the first stage looks quite a bit like the ones you show. So there is hope.
Thanks again. - Mark
|
|
herchenx
Cave Dweller
Member since January 2012
Posts: 3,360
|
Post by herchenx on Nov 8, 2012 0:40:04 GMT -5
Congrats Mark,
Connrock spent a lot of time helping me get my first batches right, and his words are very true regarding the zero-grit-carry-forward policy. There's nothing to stop you from going back and throwing the really cracked ones in rough again and working them more, but if you are happy with then then there's no need.
Glad to see you here and tumbling, keep it up!
|
|
jukerocks
starting to spend too much on rocks

Member since March 2012
Posts: 154
|
Post by jukerocks on Nov 29, 2012 19:39:17 GMT -5
You have some nice stuff in your first batch. You are learning the same lessons I learned. My first polished rocks came out unevenly polished and some had a white film that would not come off even after burnishing. I keep my rocks in 60/90 for weeks and weeks until all of the imperfections are rounded and worn away. There is a balance though - if you're not careful, the rocks grind down to pebbles. I now know some of the pieces won't make it to the final polish. Those that have deep pits simply get thrown back in for another load. I always wanted all of the rocks to begin and end at the same time, but sometimes that doesn't happen. Don't be afraid to throw the problem stones out of the mix so they don't chip the good ones. Also, a trick that has worked well for me - add a sugar packet to your polishing stage. It adds to the shine!
|
|
jukerocks
starting to spend too much on rocks
Member since March 2012
Posts: 154
|
Post by jukerocks on Nov 29, 2012 19:43:49 GMT -5
You have some nice stuff in your first batch. You are learning the same lessons I learned. My first polished rocks came out unevenly polished and some had a white film that would not come off even after burnishing. I keep my rocks in 60/90 for weeks and weeks until all of the imperfections are rounded and worn away. There is a balance though - if you're not careful, the rocks grind down to pebbles. I now know some of the pieces won't make it to the final polish. Those that have deep pits simply get thrown back in for another load. I always wanted all of the rocks to begin and end at the same time, but sometimes that doesn't happen. Don't be afraid to throw the problem stones out of the mix so they don't chip the good ones. Also, a trick that has worked well for me - add a sugar packet to your polishing stage. It adds to the shine!
|
|
jspencer
freely admits to licking rocks
Member since March 2011
Posts: 929
|
Post by jspencer on Nov 29, 2012 22:46:38 GMT -5
Panamark yours look much better than my first 2 or 3 batches of jasper did. I do mostly agates but am trying to work my way through more varieties of rocks. I am building up jaspers end cuts and pieces now to try another load of them.
|
|


 Serious thought goes into a Chat Box v.2 post. "It Ain’t Easy"


