panamark
fully equipped rock polisher

Member since September 2012
Posts: 1,343
|
Post by panamark on Nov 10, 2013 15:18:26 GMT -5
As you may know, I am in the midst of rebuilding an HP 20" rock saw. It is coming along. But given that the saw came disassembled with all the rusty parts piled inside the tank area, it has been like a big jigsaw puzzle. I am not exactly sure where the parts pictured below go. I am pretty sure they all go on the the threaded rod for autofeed. I think the locking collar goes on the rod just inside the tank to help hold the rod in position. But the brass parts are a bit of a mystery. I think the small brass bushing goes on the rod between the sprocket and the tank. But in which position? And is there supposed to be a washer? And on the other bigger brass bushing I am clueless. The bigger one also looks badly worn, so bad that perhaps it was machined this way??. And where does it go? And finally is there a bushing for the threaded rod end to go into the lower carriage support bracket that is affixed to the tank? Or does it just go in the hole? Any help or pictures would be appreciated. 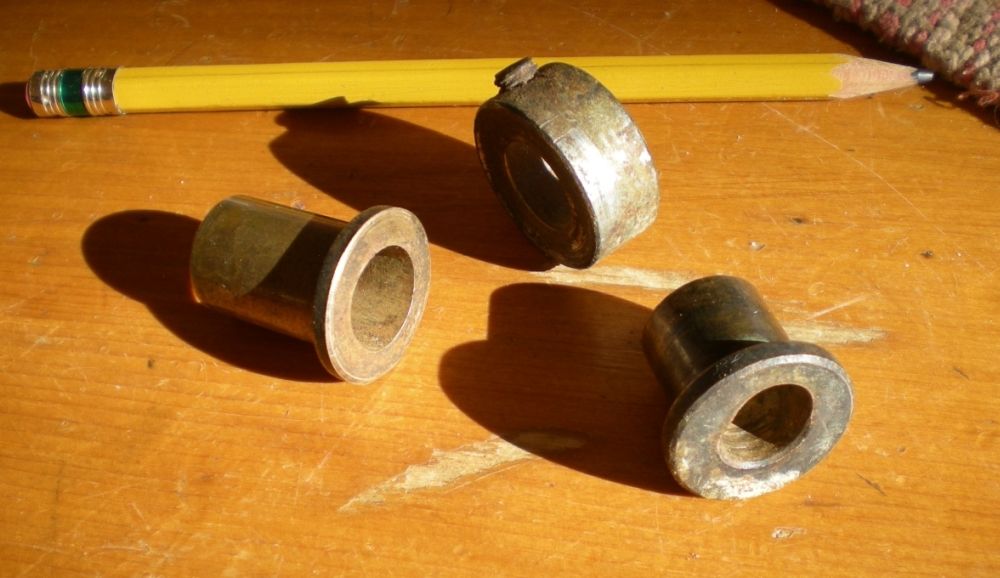 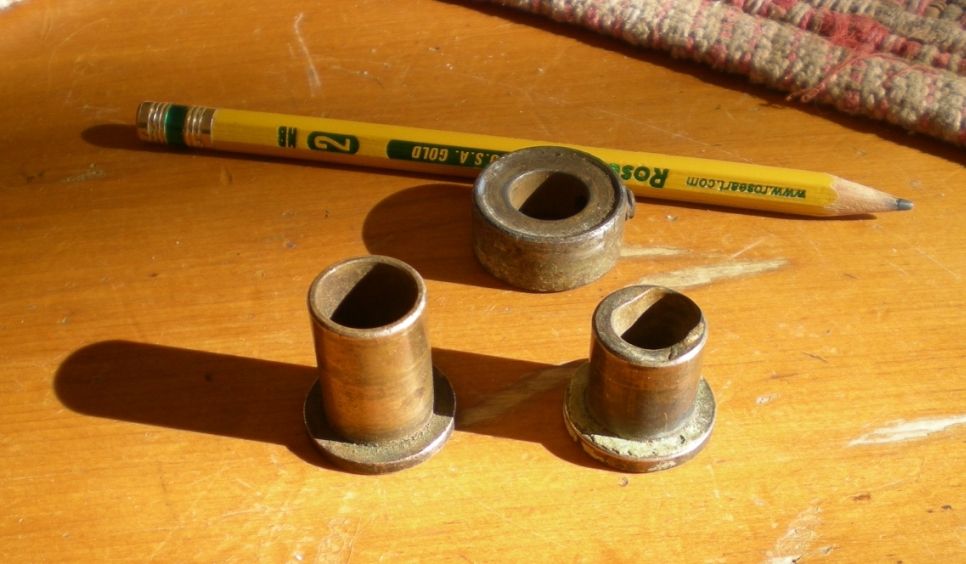 |
|
|
|
Post by jakesrocks on Nov 10, 2013 15:51:04 GMT -5
Not sure where the parts go. It's been years since I've owned a big HP saw. The collar with the set screw is a locking collar to prevent a shaft from moving back and forth in its bushings or bearings. The other pieces are Oilite bronze shoulder bushings, used just like bearings for a shaft to turn in. My guess would be that they are all parts for the power feed.
If you measure the ID , OD, and length of the bushings, you may find replacement parts on ebay. I just found replacement bushings for my vintage sphere machine on ebay.
|
|
|
|
Post by catmandewe on Nov 10, 2013 16:01:39 GMT -5
There are bushings that go inside the bearings on the roller carriage, looks like the lower left one, should be 10 or 12 of those.
The upper one looks like the lock collar for the feed screw.
I would guess the lower right one goes on the end of the feed screw and slides into the hole at the back of the saw in the center of the carriage support.
Tony
|
|
panamark
fully equipped rock polisher
Member since September 2012
Posts: 1,343
|
Post by panamark on Nov 10, 2013 19:31:38 GMT -5
Tony, yes I found a bunch of the centers for the carriage rollers. These are different. A lot bigger. I wonder if they are supposed to be pounded into the lower carriage support holes for the feed screw. But they seem just a bit too big in the OD to fit inside there. Hopefully someone remembers these and can let me know.
Thanks Jake, I will check online to see if I can find replacements. The one looks fine, but the other looks badly worn.
Thanks guys
|
|
Deleted
Deleted Member
Member since January 1970
Posts: 0
|
Post by Deleted on Nov 10, 2013 20:25:25 GMT -5
I am guessing the bushings for the feed screw and collar lock(Goes up front), the bushings for the carriage bearing should be much smaller. These should mount in the cast aluminum pieces on the back and front of the saw.
Tim
|
|
panamark
fully equipped rock polisher
Member since September 2012
Posts: 1,343
|
Post by panamark on Nov 10, 2013 20:54:49 GMT -5
I am guessing the bushings for the feed screw and collar lock(Goes up front), the bushings for the carriage bearing should be much smaller. These should mount in the cast aluminum pieces on the back and front of the saw. Tim Okay, I was thinking that Tim, but it sure will be a tight fit. They certainly don't easy press fit, but maybe hammer fit. I will try to replace the worn one. Funny thing about those cast aluminum pieces. They have two different size holes, the small holes fit the feed screw ends and the big holes almost fit these bushings. Maybe they made it so you could choose which setup you want by just reversing which goes tank front and back. Thx. |
|
Deleted
Deleted Member
Member since January 1970
Posts: 0
|
Post by Deleted on Nov 10, 2013 20:59:27 GMT -5
The bushings are pressed in, you should be able to get them in with some oil and a LEVEL tap with a hammer. The worn out bushing goes in the back and the one with the larger inner diameter goes in the front so that the feed screw can slide threw it from the front of the saw. Make sure you grease the ends of the feed screw where it rests on the bushings.
Looks like a fun project.
|
|
|
|
Post by phil on Nov 10, 2013 21:47:07 GMT -5
|
|
panamark
fully equipped rock polisher
Member since September 2012
Posts: 1,343
|
Post by panamark on Nov 10, 2013 21:57:37 GMT -5
@azrockgeek and philthat is exactly the info I needed. Now I can put those pieces of the puzzle in place. Thanks! |
|
|
|
Post by Woodyrock on Nov 11, 2013 2:27:56 GMT -5
Call Diamond Pacific..if you do not a have the drawing for the saw. They have them, and will make a copy for you. Knowing how a machine is put together can save you from breaking it taking it apart., and yes those bushings are for the ends of the drive screw.
Woody
|
|
panamark
fully equipped rock polisher
Member since September 2012
Posts: 1,343
|
Post by panamark on Nov 11, 2013 4:06:16 GMT -5
Call Diamond Pacific..if you do not a have the drawing for the saw. They have them, and will make a copy for you. Knowing how a machine is put together can save you from breaking it taking it apart., and yes those bushings are for the ends of the drive screw. Woody Thanks Woody! I have been trying to find a schematic for it, but with no luck....so far. I will call them. |
|


 Drifting along with the tumblin' tumbleweeds

