johnnymac1969
starting to spend too much on rocks
 I Like A Rolling Stone
Member since January 2016
Posts: 139
|
Post by johnnymac1969 on Apr 24, 2016 21:40:26 GMT -5
I hope that adhesive isnt your enemy. As always, shotgunnER is correct. Why I didn't think of using epoxy in the first place is beyond me… I'm an idiot. I checked on them after about 2hrs in the vibe and they came apart with the slightest of pressure. Getting some epoxy tomorrow and starting over. Live and learn. |
|
johnnymac1969
starting to spend too much on rocks
I Like A Rolling Stone
Member since January 2016
Posts: 139
|
Post by johnnymac1969 on Apr 23, 2016 23:02:36 GMT -5
I'm wondering if the black is thick. Asking because I have a polished baculites that is honey brown. Maybe mine is black under the honey!! This batch also had a few brown Baculites… some of my favorites! Just a guess, but I think they're the color they are all way the way through. |
|
johnnymac1969
starting to spend too much on rocks
I Like A Rolling Stone
Member since January 2016
Posts: 139
|
Post by johnnymac1969 on Apr 23, 2016 21:06:36 GMT -5
Those came out well! What would happen it you removed another layer of black? Would it be more black? Thanks! But I'm not sure what you mean by removing another layer of black? |
|
johnnymac1969
starting to spend too much on rocks
I Like A Rolling Stone
Member since January 2016
Posts: 139
|
Post by johnnymac1969 on Apr 23, 2016 19:38:54 GMT -5
|
|
johnnymac1969
starting to spend too much on rocks
I Like A Rolling Stone
Member since January 2016
Posts: 139
|
Post by johnnymac1969 on Apr 23, 2016 11:42:51 GMT -5
I wasn't expecting much of a shine, but was pleasantly surprised on how they turned out. I didn't run them through Stage 1 because they were already pretty smooth and they're very delicate. Here's what I did (all in the Lot-O, rinsing out and changing grit about every 12 hours)… - I only had about 1lb of material, so I used about 4lbs of ceramic media as filler - About 4 days with 2tbls SiC 120 - 2 days with 2tbls SiC 600 - 2 days with ½tsp TXP polish, 1tbls Borax and 1tbls sugar (I added the same amount of each every 12hrs without rinsing out) They still have some pits and vugs, but with this type of fossil, I think you just have to accept that. Overall, I am very pleased with the results! Before 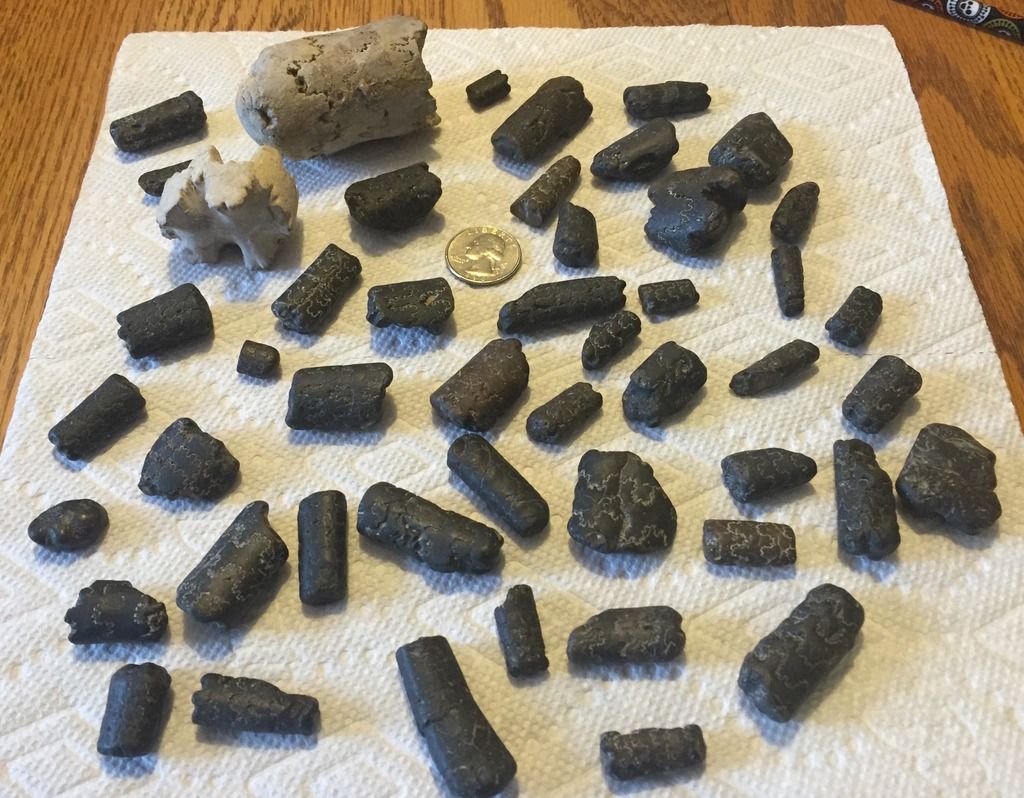 After  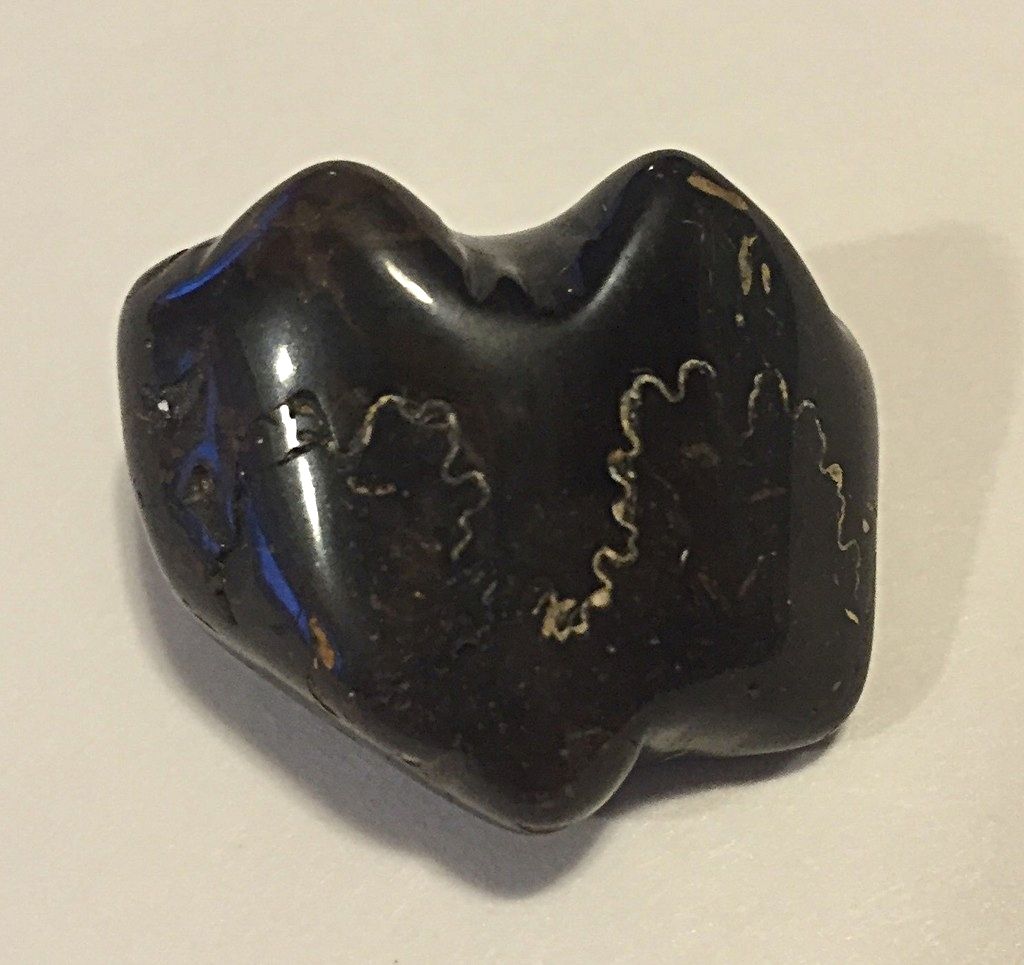 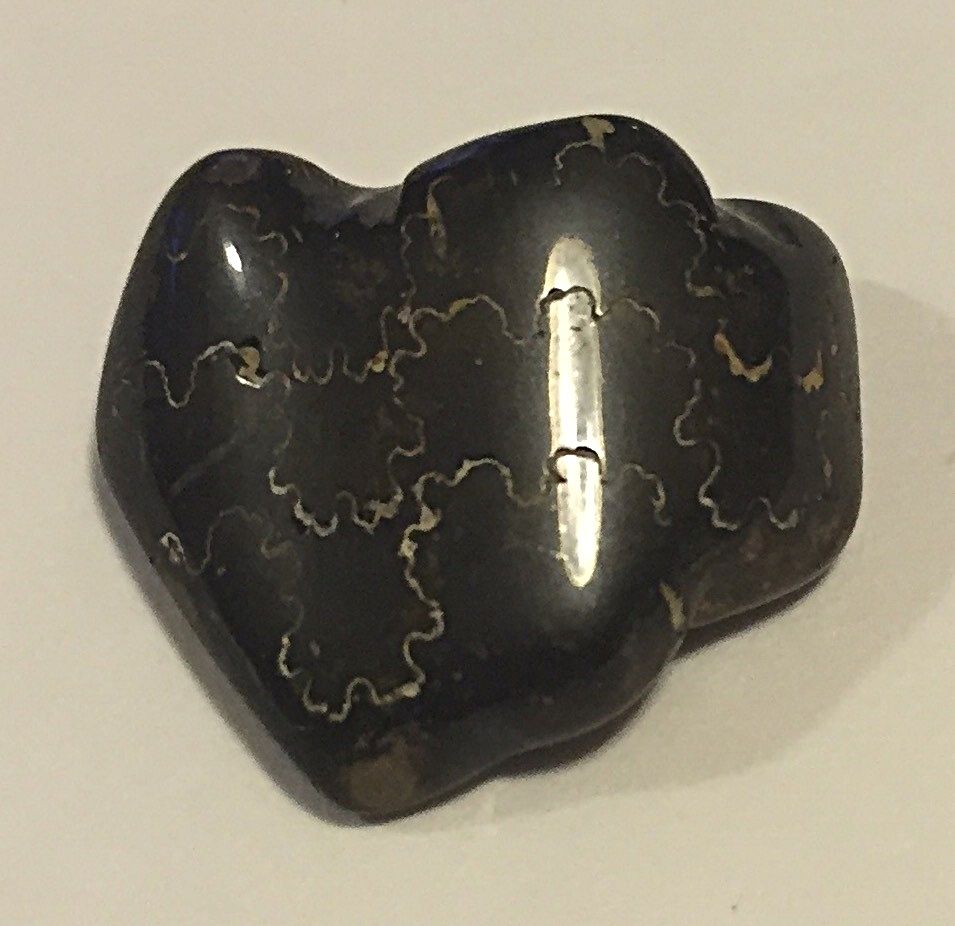 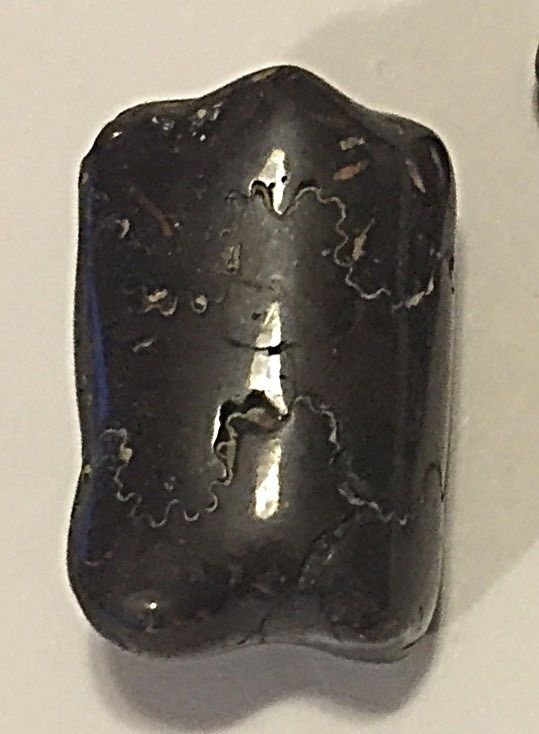 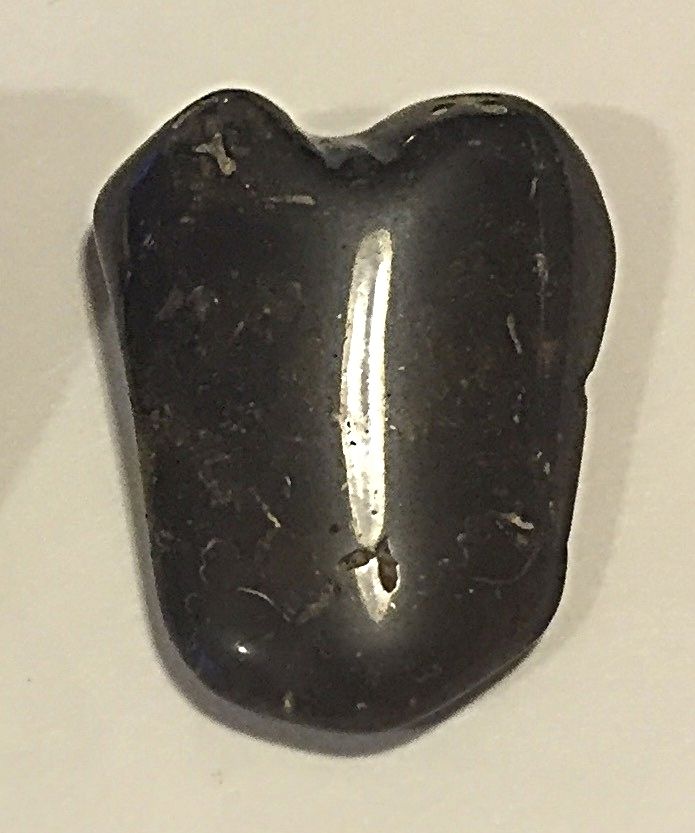 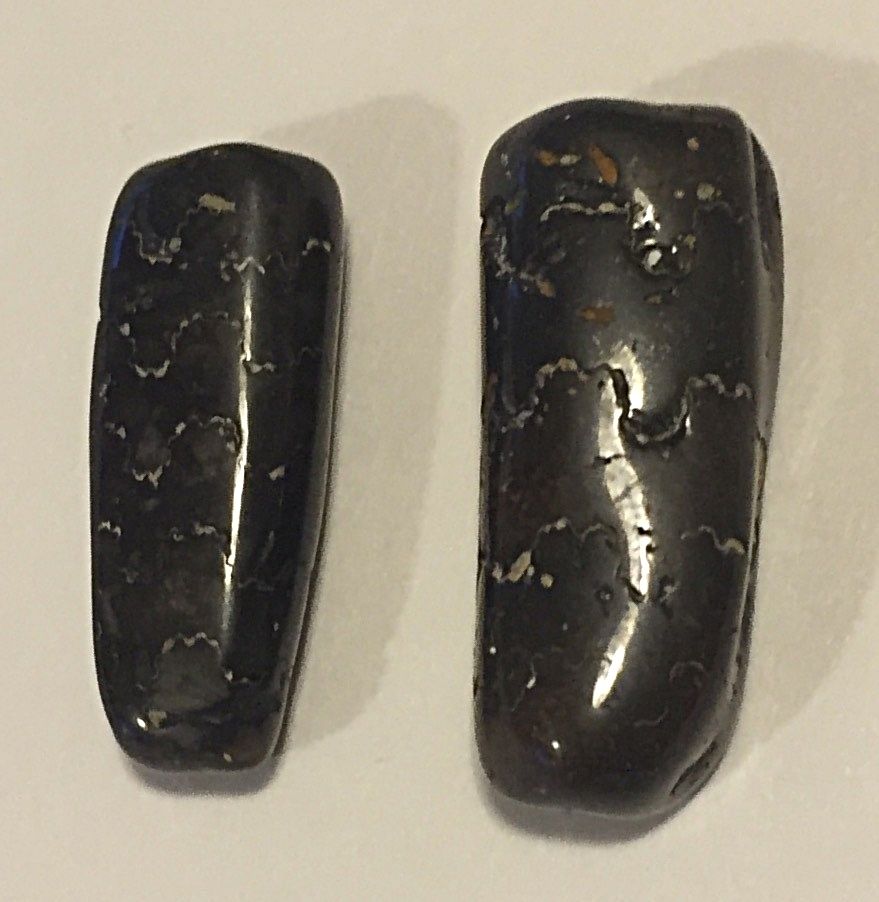 |
|
johnnymac1969
starting to spend too much on rocks
I Like A Rolling Stone
Member since January 2016
Posts: 139
|
Post by johnnymac1969 on Apr 22, 2016 22:39:58 GMT -5
Nice tumbles,great shine!!! Thanks Fossilman, you're the one who got me hooked on them in the first place. |
|
johnnymac1969
starting to spend too much on rocks
I Like A Rolling Stone
Member since January 2016
Posts: 139
|
Post by johnnymac1969 on Apr 22, 2016 21:08:39 GMT -5
You did great with those. They took a better shine then I expected. The close up shots are good. Chuck Thanks Chuck! |
|
johnnymac1969
starting to spend too much on rocks
I Like A Rolling Stone
Member since January 2016
Posts: 139
|
Post by johnnymac1969 on Apr 22, 2016 20:39:43 GMT -5
I wasn't expecting much of a shine, but was pleasantly surprised on how they turned out. I didn't run them through Stage 1 because they were already pretty smooth and they're very delicate. Here's what I did (all in the Lot-O, rinsing out and changing grit about every 12 hours)… - I only had about 1lb of material, so I used about 4lbs of ceramic media as filler - About 4 days with 2tbls SiC 120 - 2 days with 2tbls SiC 600 - 2 days with ½tsp TXP polish, 1tbls Borax and 1tbls sugar (I added the same amount of each every 12hrs without rinsing out) They still have some pits and vugs, but with this type of fossil, I think you just have to accept that. Overall, I am very pleased with the results! Before After |
|
johnnymac1969
starting to spend too much on rocks
I Like A Rolling Stone
Member since January 2016
Posts: 139
|
Post by johnnymac1969 on Apr 18, 2016 17:42:35 GMT -5
I just got a slab of Coquina (Script Rock) from eBay. Unfortunately, I didn't read the description closely enough and it's only about 7mm thick (and 5" x 7"). Being so thin (and soft), I'm sure it's going to disintegrate in a tumbler. So here's my idea… cutting it up in 1" squares with the saw and gluing several layers together to bulk it up. I think it might turn out really cool!
Has anyone here ever tried something like this?
|
|
johnnymac1969
starting to spend too much on rocks
I Like A Rolling Stone
Member since January 2016
Posts: 139
|
Post by johnnymac1969 on Apr 17, 2016 20:58:35 GMT -5
From the beginners (like myself) to the experienced rockhounds, I want to say "Thank You!". This forum has been an incredible resource for all things lapidary. And a special thanks to shotgunner, jamesp, manofglass, fossilman and Chuck (Drummond Island Rocks).
|
|
johnnymac1969
starting to spend too much on rocks
I Like A Rolling Stone
Member since January 2016
Posts: 139
|
Post by johnnymac1969 on Apr 16, 2016 23:10:04 GMT -5
Most of these came from members of this site… some are from my own experiences and observations.
- Fill the bottom of the barrel "hole" with epoxy (thanks for the tip, Jugglerguy!)
- If you don't have enough material to fill the Lot-O, fill it with rough to smooth out the sides, then put them in your rotary to round the edges in Stage 1. There is no reason to ever have your Lot-O not working on something.
- Rocks should not look like they're in a 40-yard dash… they should be moving like they're in a marathon. Slow and steady.
- During the grit stages, your rocks should be coated with grit. If they're not, all of your grit is sitting at the bottom of the barrel.
- Use a drop or two of Dawn liquid soap and a few squirts of water to help distribute the grit.
- Use a pump or two of foam hand soap (not the instant sanitizer type) 5-10 minutes before rinsing the rocks. This makes rinsing the grit off your rocks SO much easier!
- Buy a second barrel for POLISH ONLY!
- Drill a 1/16th hole into the lid(s). This will allow excess pressure to escape without losing too much moisture.
- Have fun and please share your own discoveries!
|
|
johnnymac1969
starting to spend too much on rocks
I Like A Rolling Stone
Member since January 2016
Posts: 139
|
Post by johnnymac1969 on Apr 16, 2016 22:27:29 GMT -5
This was a super helpful post. Just loaded the first batch into my new Lot-O. Welcome to this board of rock freaks like ourselves! |
|
johnnymac1969
starting to spend too much on rocks
I Like A Rolling Stone
Member since January 2016
Posts: 139
|
Post by johnnymac1969 on Apr 16, 2016 15:40:57 GMT -5
I have one,I just left it the way I found it...Sometimes the saw will ruin what you have or think you will get.... Just found out that it will cost $2 per inch to cut it lengthwise, about $10-$12. I'm hoping the "saw expert" at the shop will let me know his thoughts/opinions on whether to cut it or not. He's an old-timer (2nd generation family owner) and I respect his opinion. Will let you know what I decide to do. |
|
johnnymac1969
starting to spend too much on rocks
I Like A Rolling Stone
Member since January 2016
Posts: 139
|
Post by johnnymac1969 on Apr 14, 2016 22:40:07 GMT -5
OK to slice off that dendritic surface to minimize bulk. But, based on the photos, I wouldn't count on dendrites throughout. Lynn I agree, I'm guessing only the face has the best dendrite markings. Hoping I'm wrong and find more after it's cut in half! |
|
johnnymac1969
starting to spend too much on rocks
I Like A Rolling Stone
Member since January 2016
Posts: 139
|
Post by johnnymac1969 on Apr 14, 2016 21:58:01 GMT -5
Just bought this amazing Dendritic Agate! It's about 5½" long and 2½" thick, so it's too big for my small (7") saw. I don't want to take a sledge hammer to it because I don't want to ruin (break up) certain parts of it. I think I'm going to take it to my local rock shop and ask them to saw it in half (lengthwise, separating the front from the back). Then it will be about 1¼" thick and I will be able to cut it up with my saw. I have no idea what they'll charge me for that, but I think it will be worth the cost. Front 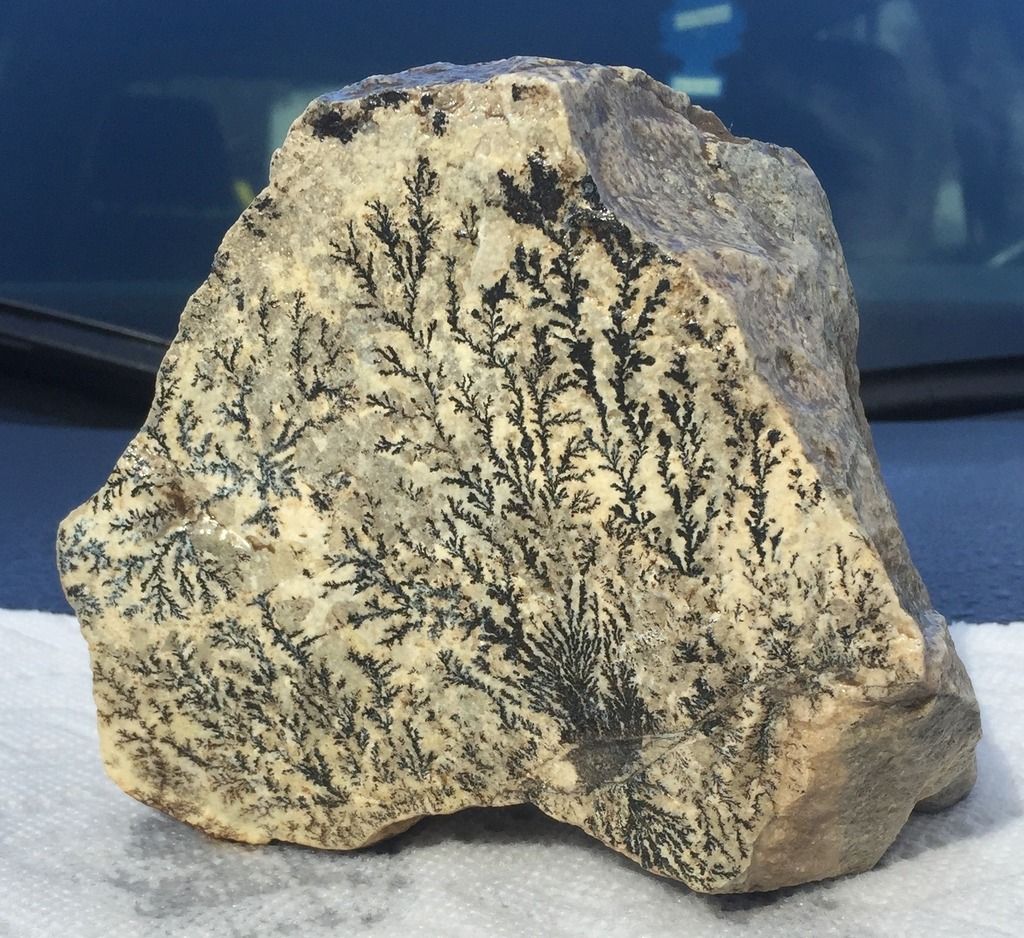 Back 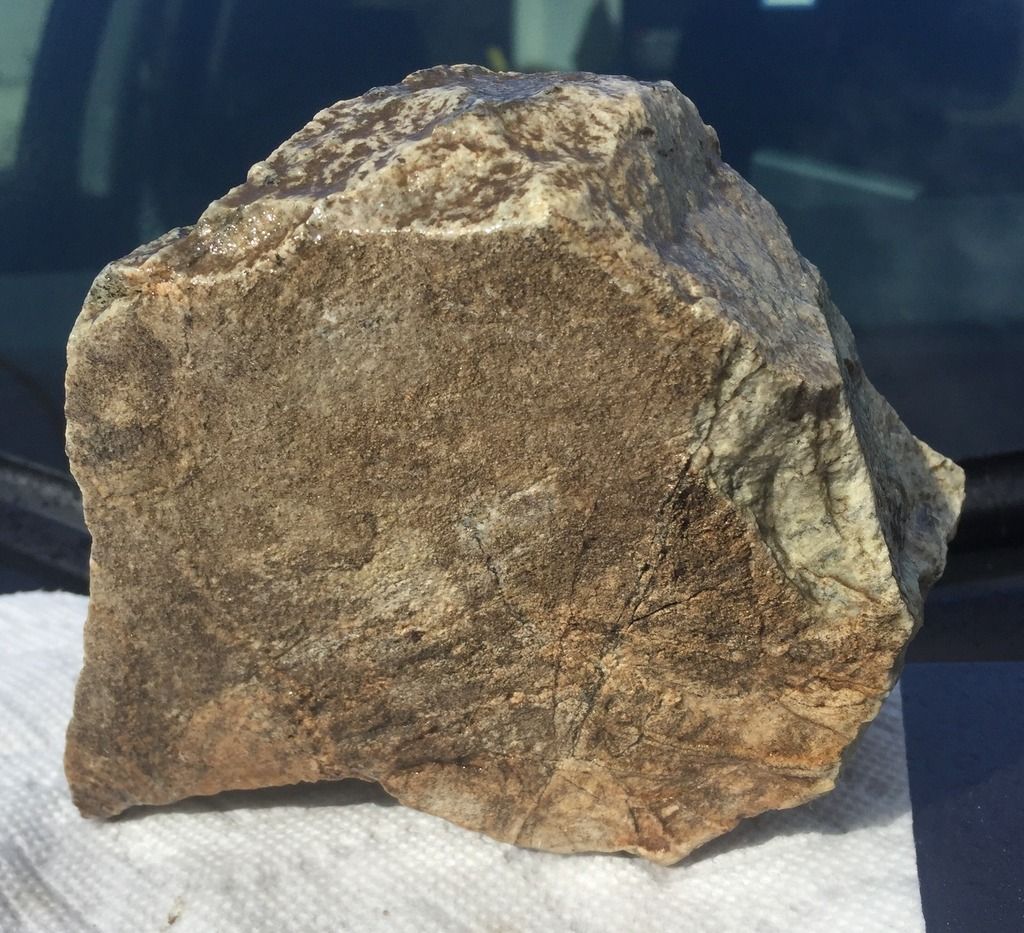 Side 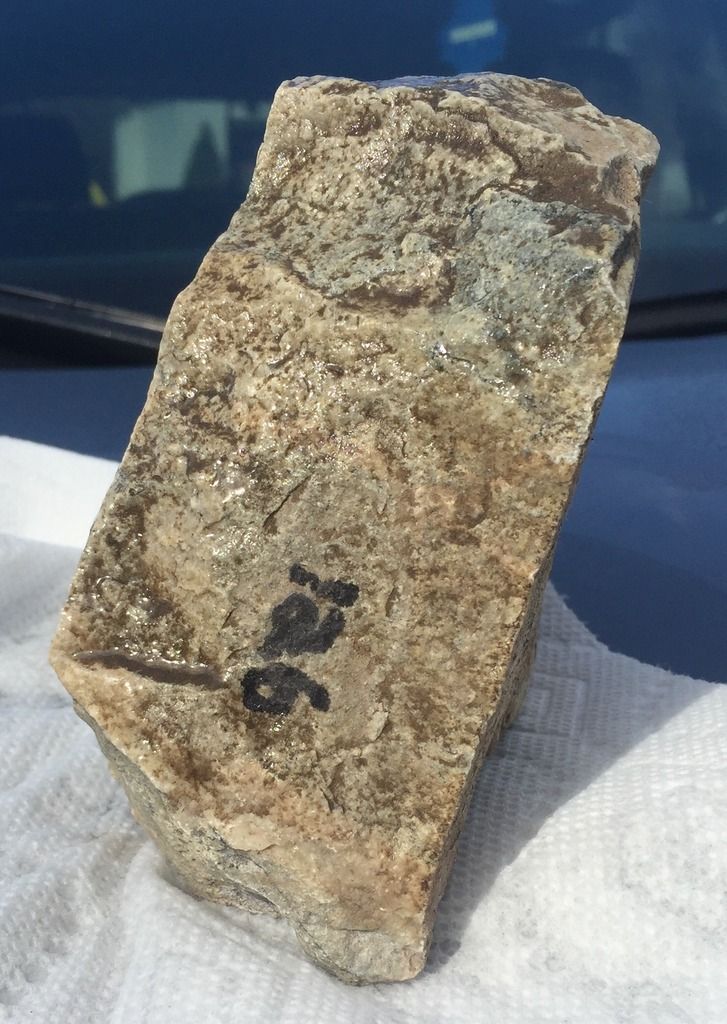 |
|
johnnymac1969
starting to spend too much on rocks
I Like A Rolling Stone
Member since January 2016
Posts: 139
|
Post by johnnymac1969 on Apr 11, 2016 16:39:25 GMT -5
Nice saw! You can do allot with a tile saw, I use a vibe to finish what I cut and shape using only the saw. I use cheap blades for grinding better ones for slabbing up to 3" stones. Thanks! I'm Day 1 into learning a whole new world of lapidary. First was a "toy" tumbler (from Hobby Lobby) that I bought for my 8 year rockhound for Christmas, then a 33B, then a Lot-O, and now a saw. OCD runs in the family… we're Scottish. Enough said. |
|
johnnymac1969
starting to spend too much on rocks
I Like A Rolling Stone
Member since January 2016
Posts: 139
|
Post by johnnymac1969 on Apr 11, 2016 16:00:28 GMT -5
I can usually get around 200 small cuts on a 7" blade, but this can be highly variable depending on size of cut, hardness of material, and care of cutter. If you push rock at a rate that you have "sparks", the blades will go fast. If you use the blade as an edge grinder, two things happen. You are wearing down diamond dust from the side of the blade that will be needed later as the blade wears down from regular cutting. Also, you are likely only grinding on one side of the blade and introducing uneven wear. The combination will prematurely reduce the life expectancy of your blade. In spite of all this, many of us do it. The best solution is a small edge grinder like the Gryphon grinder, or a similar machine. You can buy a more expensive blade for your wet tile saw. The MK Diamond "Hot Dog" is a popular choice. The advantage of this blade is a much smother cut (if you need it) and the "kerf" or thickness of the cut is much smaller. When you start cutting expensive rock, this can be important to minimize wastage. However, you can probably buy 3 or 4 thick blades for the price of one Hot Dog, so the thicker blades will probably be fine for a while. Darryl. Darryl, Thank you for the great information, that was exactly the kind of feedback I was looking for. I will Google the Gryphon grinder soon… right after I find my own place to stay when the wife kicks me out  |
|
johnnymac1969
starting to spend too much on rocks
I Like A Rolling Stone
Member since January 2016
Posts: 139
|
Post by johnnymac1969 on Apr 11, 2016 13:06:33 GMT -5
Sound thinking. You will be surprised by the machine. The motor in mine isn't junk. The blades are! Because we use water, the blades go fast. About how fast? I know a lot depends on the material that I'm cutting, but what is the average lifespan of the blades? Also, after playing around with it a little, I started using it as a quasi "grinder" (to straighten rough cut edges, etc). Anything wrong with doing that kind of thing with this saw? |
|
johnnymac1969
starting to spend too much on rocks
I Like A Rolling Stone
Member since January 2016
Posts: 139
|
Post by johnnymac1969 on Apr 11, 2016 11:50:28 GMT -5
I put my balls in a vibe once… and now I have 2 vibes  |
|
johnnymac1969
starting to spend too much on rocks
I Like A Rolling Stone
Member since January 2016
Posts: 139
|
Post by johnnymac1969 on Apr 11, 2016 11:06:16 GMT -5
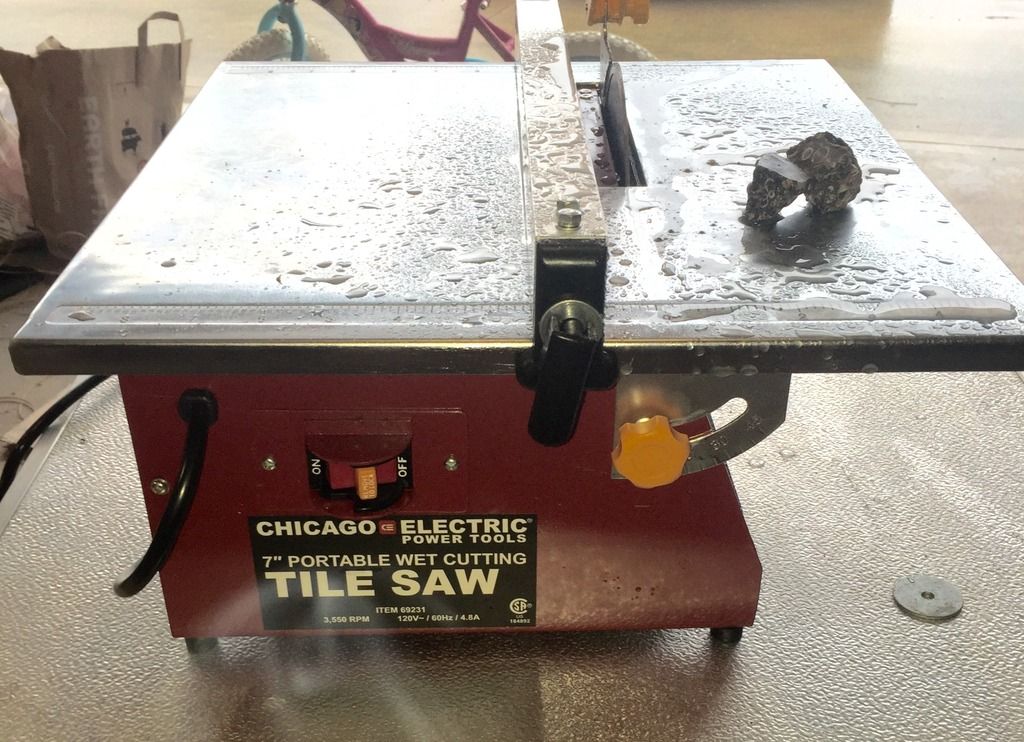
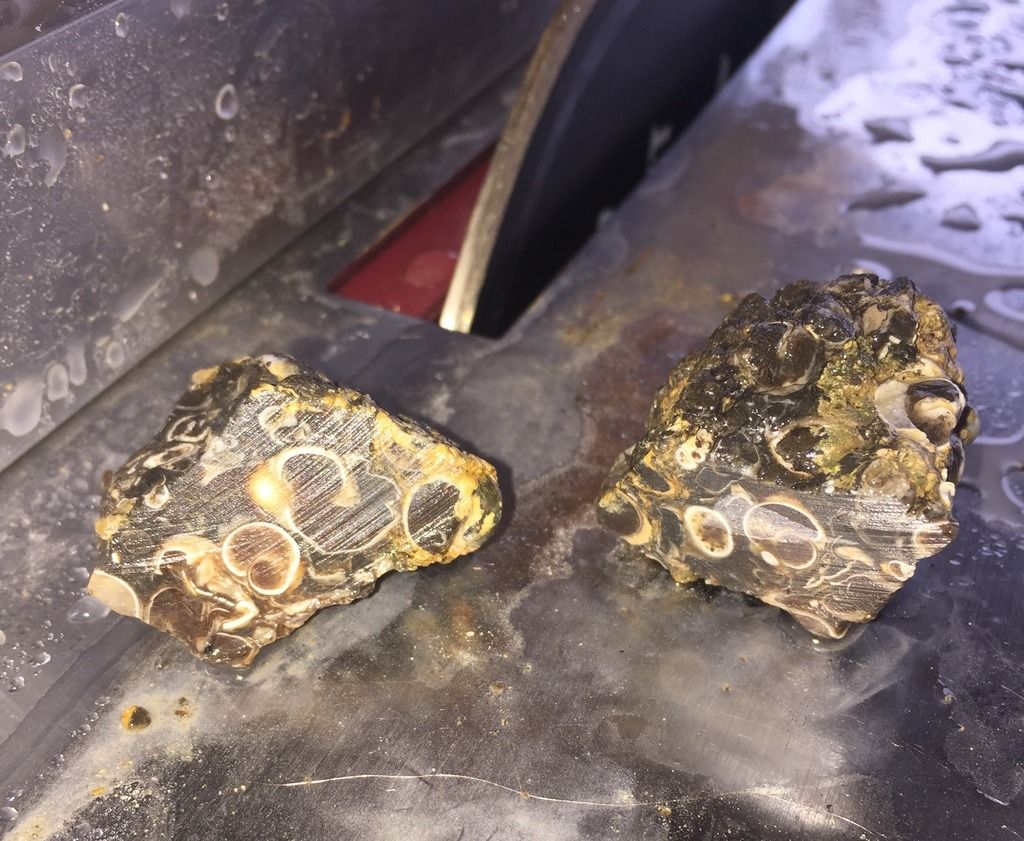
I've been considering financing a really good "beginner" rock saw ($600-$700). But after doing a little research and watching some videos on YouTube, I decided on a $64, 7" tile saw from Harbor Freight. I know that Harbor Freight motors are JUNK, so I paid $12 extra for a 1 year warranty (if anything goes wrong, I get a brand new saw). I just got done setting it up and cut my first rock… a Turritella. I figured I might as well put the saw to the test with the hardest material I have. And it did the job! Not the cleanest cut I've ever seen, but I didn't expect that (especially with the $20 diamond blade that I purchased with the saw). All in all, and with the 20% off coupon, I spent about $90. All I really want this saw to do is cut away small pits, vugs, etc. that a tumbler would never be able to do. I'm still going to break up my large rocks with a sledge hammer and use the saw to get rid of the imperfections from the smaller, tumbler rocks. Now all I have to do is figure out where I'm going to hide it before my wife gets home!!!
|
|


