|
|
Post by aDave on Sept 4, 2019 23:23:31 GMT -5
If you have a hard time with trying to stop the barrels, you just may want to see if you can roll the drive shaft by hand while holding onto the drive pulley on the motor shaft (tumbler not plugged in). If you can, the belt is too loose. I tend to do that more than the barrel stoppage thing. Sorry for the wild goose chase. I like chasing geese, no worries! I moved the motor a little and it seems to have worked. I'll check in the morning, thanks again. Well, I hope it works out for you. When I was rolling 45C's it was easy to stop the barrels due to their size to check belt tension. I found myself using the other technique for the QT66 barrels. Don't quote me, but I seem to recall there should be about 1/4" of belt deflection when pressing on it to check for tension. But honestly, I can't say for sure where I saw that. You definitely don't want the belt so tight that there's no deflection whatsoever when you press down on it. That would end up being hard on motor shaft bearings. |
|
|
|
Post by aDave on Sept 4, 2019 16:24:49 GMT -5
Could be a slippage issue. Pull the pulley cover off and then attempt to stop your rolling barrels by putting hand pressure on them. If the shaft stops, but the motor is still spinning, the belt is too loose. If it's adjusted properly, the motor should stop when you stop the drive shaft from turning. If it is slipping, I'd simply try to tighten it first. A new belt would be the next option. Ok, thanks! If you have a hard time with trying to stop the barrels, you just may want to see if you can roll the drive shaft by hand while holding onto the drive pulley on the motor shaft (tumbler not plugged in). If you can, the belt is too loose. I tend to do that more than the barrel stoppage thing. Sorry for the wild goose chase. |
|
|
|
Post by aDave on Sept 4, 2019 15:35:49 GMT -5
Could be a slippage issue. Pull the pulley cover off and then attempt to stop your rolling barrels by putting hand pressure on them. If the shaft stops, but the motor is still spinning, the belt is too loose. If it's adjusted properly, the motor should stop when you stop the drive shaft from turning.
If it is slipping, I'd simply try to tighten it first. A new belt would be the next option.
|
|
|
|
Post by aDave on Sept 4, 2019 11:46:49 GMT -5
Chuck, were those finished on wheels or solely done in the Lot-O? Wait...I think I got it now. The magnets were put in the tumbler according to your other thread, so I'd have to assume by the nice shapes that these were done on wheels, correct?
|
|
|
|
Post by aDave on Sept 4, 2019 11:36:58 GMT -5
Those turned out pretty nice. Not sure I've seen any of those tumbled before. Well done.
|
|
|
|
Post by aDave on Sept 4, 2019 11:28:06 GMT -5
How fitting I should happen upon this post...I have the exact condition as you experienced. My single Lot-O struggles to move material before I add borax and polish, seems fine after that for 12 or so hours, then gets constipated regardless of how much or little water I spritz in there. I have just been doing 12hr clean-outs, not that recharging a 1/2 tsp of polish is breaking the bank, but I'd prefer to let it just run longer. After reading here, I cannot WAIT to try rotating the barrel 90deg and/or maybe playing around with the dowel location. Great post! Thanks, and good luck. Feel free to jump back in with your results. If you do move the dowel, simply use hot glue as was originally done. I just realized I forgot to mention that in my post above. |
|
|
|
Post by aDave on Sept 1, 2019 21:46:58 GMT -5
Nice score on the saw and rocks. Glad to see you back.
|
|
|
|
Post by aDave on Sept 1, 2019 18:31:23 GMT -5
I really enjoyed that series of videos NevadaBill. Thanks for taking the time to do them. |
|
|
|
Post by aDave on Aug 31, 2019 18:46:00 GMT -5
Happy birthday, Brian. Hope all is well, as you've been on vacation from here for a while. Have a great day.
|
|
|
|
Post by aDave on Aug 30, 2019 17:12:42 GMT -5
|
|
|
|
Post by aDave on Aug 29, 2019 14:48:26 GMT -5
I'm no tumbling expert by any stretch of the imagination. But I do know that one of the most common mistakes made for beginning tumblers is tumbling stones of mixed hardness's together. Stones tumbled together must be near the same MOHs hardness or you can't get a satisfactory polish. Tiger eye and quartz are probably close enough in harness to tumble together but moonstone, lapis lazuli, and Brazilian emerald are too soft to tumble with tiger eye and quartz. Plus emerald is fairly brittle so if you are tumbling them together then you may have chips of emerald coming off in the mid to later stages and scratching your other stones. Larry C. Thanks for picking up the hardness issue. I'm not familiar with the emerald, but the lapis is going to be too soft which is going to make it difficult to get a polish on, even if run by itself. Moonstone should be ok, but it'll have to be watched. A good guideline is to stick to tumbling material where the difference(s) in hardness are no more than 1-1.5 on the Mohs scale. The moonstone is on the bottom edge of that difference (with the quartz and tiger eye), but the lapis pretty clearly outside that. |
|
|
|
Post by aDave on Aug 29, 2019 13:22:03 GMT -5
Welcome to the forum.
What type of tumbler(s) do you own? Also please list the grit sizes that were used in each stage. I'll quickly tell you that 7-8 days in a stage is not near enough time for good results. I know, the manual said to run at that time frame, but rotary tumbler instructions are pretty lacking and don't reflect experience in the real world.
|
|
|
|
Post by aDave on Aug 29, 2019 13:16:09 GMT -5
That is a lot of good information. If I owned a Lot-O, then I would certainly be reading every one of these posts with great interest. I was not aware of a dowel part on the vibratory tumbler you own. Or that someone would need to tune the tumbler properly to get ideal results. While I have had my struggles finding my own balances for tumbling, I am happy to be long past those days and happy to have bought a vibratory tumbler now. I am sure that once you get yours dialed in, you will quickly be churning out results that rival your legendary rotary efforts, in much less time and expense! Thanks for sharing your experiments. It will no doubt help others. Thanks Bill. I truly think that my need to move the tuning dowel is somewhat of an anomaly - at least among the folks here. I can't recall anyone being concerned about how slowly material was circulating, and I was only able to find one old thread that spoke to moving the dowel. In that instance, the user had just replaced his springs and upon startup, material didn't move. His solution was moving the dowel which solved his problem. Just for your reference, I've added a photo of the dowel placement on a Lot-O, and this was mine before I moved it. Now, the edge of the dowel is about 1/8" from the vertical upright of the frame. The dowel serves as a fulcrum, and by moving it closer to the frame, it effectively lengthens the springs which are right below the rotating weighted fans. 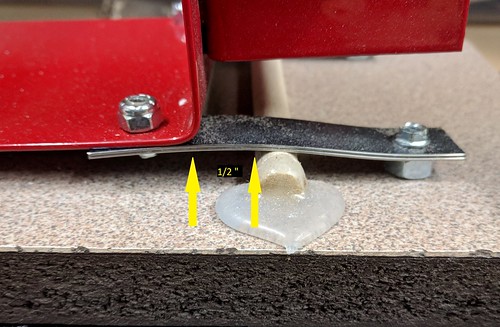 |
|
|
|
Post by aDave on Aug 28, 2019 16:17:35 GMT -5
Thank you all for the kind words and wishes. A special thanks to Tommy for bringing me along and allowing me to help out. It's been a true pleasure.  |
|
|
|
Post by aDave on Aug 27, 2019 20:18:32 GMT -5
My bet is on the dowel placement. I just feel bad for anyone who buys a poorly tuned Lot-O but doesn’t have a support group or a video to realize that it is not working properly. Who would ever think to move the dowel? (Long post. For those who think it's TLDR, the summary is a slow moving Lot-O may be assisted by moving the dowel closer to the vertical upright of the frame.) Rob, I totally agree with you. Heck, I wouldn't have even known about the Lot-O if I hadn't ventured here in the first place. But, that said, the ability to go to the 'net and here really made me question how well my Lot-O was circulating material. Based upon what I'd seen, I was skeptical at the outset. With that skepticism, I contacted the Lot-O folks looking for help in how to deal with my "seemingly" slow circulating machine. Compared to everything I'd seen on the internet, my machine turned stuff much slower. In my contact with those folks, I was told that each machine was "eyeballed" (my quote) to establish where the dowel should be placed. A test barrel was inserted into the frame, and when the tester was happy with circulation, the dowel was glued in place. As I mentioned in another post, it's not rocket science. But, I was told that I could move the dowel, but I'd no longer have any warranty for the springs. OK, whatever. After that phone call, I struggled with my batches. While I could ultimately get through them, I found myself wondering why others have not expressed the same concern that I have. Fast forward to now. After not being able to complete a polish stage without material coming to a standstill near 18 hours, I decided to move the dowel. So far, that's the best thing I've done. I restarted my polish stage after things came to a halt at around 10-12 hours before the dowel move. As of today, I was able to complete the stage at 48 hours, with just a minor tweak. More below. Moving the dowel was not a big issue. It's held to the base with hot glue. All I did was use a razor and chisel to remove the glue off the base and dowel. If you're choosing to do this, your choice of tools may vary. Once the old glue was removed, it was time to move the dowel. Don't try to do this without the machine running. A fully loaded barrel in the frame with the machine running will make this task much more easy. Besides, you'll need to see how material circulates in different dowel positions, so the machine will have to be turned on. My stock machine's dowel was 1/2" from the vertical upright of the barrel frame. When I informally surveyed folks about their machines, the dowel was sometimes 1/8" from the upright. Some were a bit more. But, of all the folks I had contact with, mine was the furthest away out of any of them. Once I removed all existing hot glue, I turned on the machine and started to move the dowel closer to the vertical upright. Surprisingly, each incremental move did not come with a corresponding increase in barrel circulation. Sometimes there was an increase; sometimes there was a stall in movement. I ended up picking a spot for the dowel being about 1/8" from the vertical upright. This is quite significant from where my dowel was originally placed. I should note that once I moved my dowel from the original location, the noise became louder. That left me wondering if there is a "sweet spot" where the Lot-O folks are looking for noise and vibration reduction, as opposed to evaluating how well things are actually circulating. So, as it stands now, I was able to get through a complete polish stage (after moving the dowel) where I couldn't do that before. However, with the increased noise, which I'm assuming corresponds to vibration amplitude being increased, I'm wondering how long my springs will last. Maybe with the increased amplitude will come increased work hardening or fatigue- which may cause early breakage of the springs. So, that's it for now. You need a scorecard yet?  |
|
|
|
Post by aDave on Aug 27, 2019 19:39:47 GMT -5
Is it hard or soft? That should tell you real quick if it's dolomite or agate. Agate should polish up better. Agree. captbob's suggested material is pretty soft. If that's what it is, I'm wondering how well it would do as a pick. To me (and I'm no ID expert at all), I thought the pick looked like some banded Rhyolite that I've picked up. That's much harder and might tolerate polishing and being a guitar pick. |
|
|
|
Post by aDave on Aug 27, 2019 13:36:04 GMT -5
Ill add a little to ADaves Recipe, When I burnish I start from a fresh wash out. Fill w/ water and drain as per dave I then add a tbl spoon of borax and a tbl spoon of Ivory bar soap flakes. Sprits the LotO with several squirts/sprays of water then run for 2 to 6 hrs then wash out. Hey Bob, I've usually seen it mentioned that you could use Borax OR Ivory soap flakes to burnish. Just curious as to why you're running the two together. Not saying it's wrong or anything, I'm just wondering if you've seen a difference in running the two together as opposed using one or the other alone. Thanks.  |
|
|
|
Post by aDave on Aug 27, 2019 13:28:52 GMT -5
This exactly, would be my only comment. Larger rocks, or funny shaped oblong rocks, have a adverse effect on the load. I use a different model vibratory tumbler though, which, oddly enough, does not need any grit at all for proper locomotion. But when I have problems with speed or motion, it is always related to funny shaped, larger rocks (and too many of them) that I am trying to run.
I was tending to run about 30% ceramics which has seemingly been the norm with "normal" rough. For this last batch that I'll be pulling today, I used more. Rocks have not been excessively large, and I think the composition (of rock size-wise) has been pretty balanced. I do have some oblong shaped items, but they aren't too large. I'm not sure this would really be a factor, as Rob Jugglerguy doesn't have issues when doing crosses, deer heads, and other odd shaped items. Ceramics are increased with these items since it's needed to help process the excessive flat surfaces. I know I don't have a definitive answer yet, but all of the suggestions thus far have been noted for future use. As mentioned, I'll be pulling a batch out of polish today, and the material is still moving after 42 hours. This is following the movement of the dowel. Before I moved the dowel, this same material in the polish stage was standing still after 1/4 the amount of time. I'll update later about moving the dowel and what I did to accomplish it. |
|
|
|
Post by aDave on Aug 26, 2019 19:30:50 GMT -5
When I've chosen to burnish solely with Borax, the stage is started like all others - water drained. I'll then start the machine and add a bunch of squirts from a bottle to overly soak the rocks. I then add the Borax.
I really don't know how exact this needs to be. I've seen mentions of a "capful of water" (Lot-O cap) and 1/4 cup of water. At the end of the day, I'm thinking this is not too exact a science. FWIW, I'm just looking for material to be fairly wetted with the Borax then added.
If you go this route, things will move slowly, since you're adding more water than what is called for. With my last few batches, I've disregarded the final Borax burnish as I added soap at the end of the polish stage to help with the cleanout. If I go this route, I add some squirts of water, a squirt of handsoap or Dawn, and let the stuff go for an hour. Yeah, it doesn't move much, but as long as there is some movement, that's OK.
Oh yeah, if you are simply looking for how much Borax, I'm typically using 2 TSP (teaspoons). That's just me and how it's worked out.
|
|
|
|
Post by aDave on Aug 26, 2019 19:10:16 GMT -5
The material is great, but are these photos going to be used for selling this stuff? If so, I'd find an alternative to having your hand in the photos. If not, disregard my comment.
|
|


 Drifting along with the tumblin' tumbleweeds

