Post by LCARS on Oct 20, 2007 19:17:30 GMT -5
This is the third installment in my latest "candy batch" series.
Here you will find my latest pendant projects to be finished.
These few photos aren't very large so there's no need to bore you with a lengthy pretext for the sake of giving the dialup users something to do while they wait for the pics to load, I'll just do that as I go.
I will tell you that each and every thing posted here was made using scraps of material that I preshaped using the Dremel and a few small diamond bits & wheels, no saw, no cabbing machine & all tumbled to a high polish with no blemeshing.
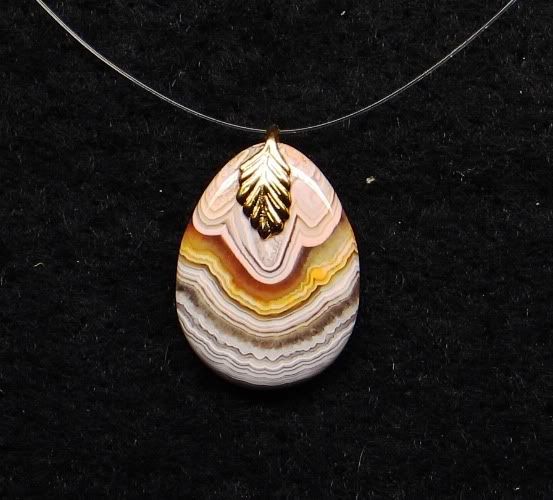
OK so first off, a Brazillian agate trimming that had the basic shape already. I only ground it into this perfectly symetrical zipper tab shape with the Dremel and it eventually became this pendant.
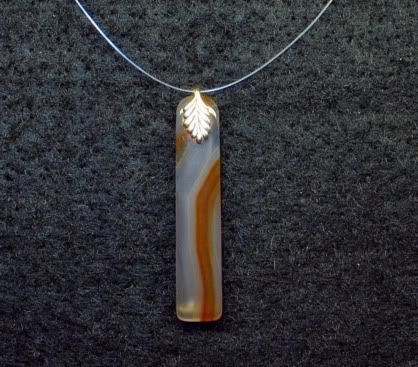
The agate measures 8.25mm wide tapering to 7.75mm at the top x 40mm tall x 4.25mm thick at the base tapering to 3.25mm at the top.
This was a nice & easy little pendant to make with the Dremel since there wasn't much shaping involved and the agate co-operated with me
This here is one of those "enhanced" (pronounced: "dyded") agates I got at the scratch patch a while back. This one has always wanted to be a pendant but it needed to be repolished after all the abuse it took before I got it.
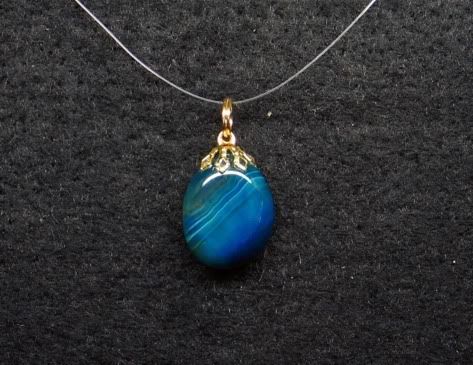
The stone measures 16.25mm at it's widest, 21mm tall & 9.5mm thick with a 7-prong cap and plated split ring. I had some problems with the cap on this one (it's a cheapy anyay) and I was thinking of redoing it but in all honesty, i'm going to sell this cheap & all I had to do was throw it in the tumbler and glue the cap on so i'm done with it. If someone actually offers to buy it then I'll throw on a split ring, I ruined the first cap trying to get the ring on too soon after gluing it and it peeled right off.
This is a pendant made from one of Vancouver Island's local stones.
It is a feldspar porhyry, feldspar being the white crystals in softer blue/green/grey bassaltic matrix.
Depending on where it's from and exactly what the arrangement of feldspar cytals looks like, it can be called "flower stone", "caligraphy stone" or "chinese writing stone" as well.
I know the bottom looks sorta lopsided in the pic but I assure you it's shaped nearly perfectly. I used an overhead flourescent tube that cast shadows at the angle where there was the least glare.
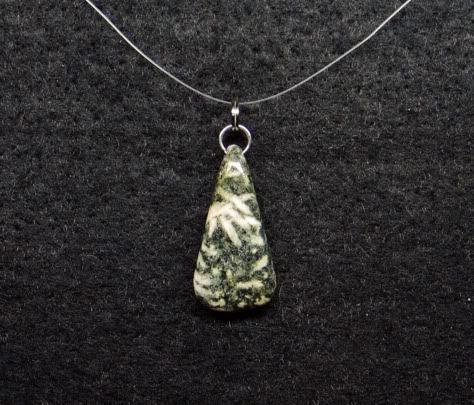
It measures 15mm wide at the base, 30mm in height & 7mm at it's thickest.
It's drilled through the side and has double chrome-steel split rings.
The chrome ring through the side of the stone was meant to be part of the "look" of the piece, the other one is simply there so a chain can be oriented correctly and it matches.
This stuff is a real bugger to succesfully tumble to a good overal shine as well. The feldspar crystals are the hardest part of the stone and the bassaltic matrix tends to undercut around it so it's best to either tumble an entire batch of just this material or use a cabbing machine on it if you don't want dull spots. Even after babying this one in the tumbler I still needed to finish polishing it with a Dremel pad impregnated with tin oxide to get out all the dull spots.
This one was a chip that came off of a rose quartz slab that was in "the rock box" one of the times I had it. I didn't want it to go to waste as tumbler scrap so I carved it into this little triangular pendant, cutting away as little material as possible since it was already so small.
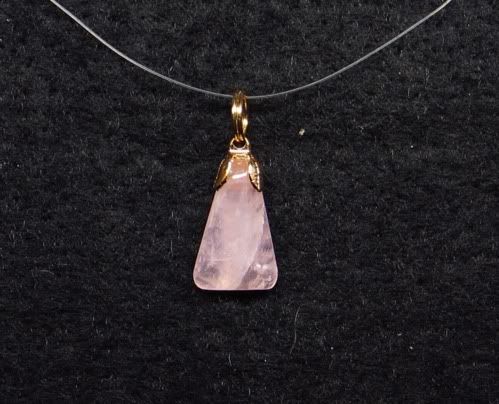
The stone measures 11.5mm at the base, 19mm high and 5.25mm thick in it's center.
Somehow this one also managed to survive unscathed in the tumbler despite it's reputation to chip and fracture. You can see there is one self terminated natural fracture in the stone but it has remained stable throughout the process of shaping and polishing it so I know it will withstand actually being worn for what it's worth and i'm just glad I didn't end up wasting all the time I spent coaxing it into form on the Dremel only to have it fall apart in the tumbler. That's one thing I like about tumbling the stones, I can be assured the finished pieces will be pretty sturdy if they survived the torture they took in the barrel.
This is another one of those "oops, a piece broke off this slab" pendants that I cut and shaped with the itty bitties on the Dremel.
I am assured that this is a naturally colored blue quartz as well.
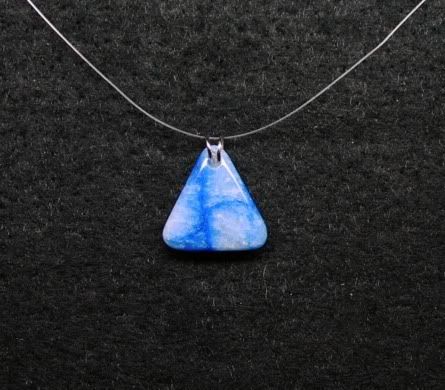
It measures 19mm at the base, 19mm high and 5mm thick.
It has been face drilled at the top radius and features a permanently epoxy set, modified chrome-steel split ring as a bail.
It looks a little bit closer to "true blue" in real life as opposed to the slight teal hue it has in the pic but the dynamics are off a bit in the image. My apologies again for not doing these with a proper set-up, it was late at night or I would have done hem outside to at least get the full spectrum of daylight light instead of using a crappy fluorescent.
I actually really enjoyed working with this material on the Dremel but all the microfractures and tiny voids in it make it a tough one to get a super smooth surface finish on. no mater what i do to it, there is always a slightly mottled look to the surface when it's viewed at the incident agle to a light source.
At any rate, i'm very happy with how this one turned out and i'm told that the color & depth of this stone actually improves over time as it is worn since it will absorb skin oils into it's microfractures but in the process it also loses some of it's "inner sparkle".
Last but not least, I will have to include my "Cracked Easter Egg" ;D
Read all about this one in the original thread, where I give a full biography of this cab turned pendant.
Well folks I hope you enjoyed this three part candy series cuz' that's it, it's over, all done.
...
Why y'all lookin' at me for?
I ain't got no candy for ya![/b]
;D
Rob
Here you will find my latest pendant projects to be finished.
These few photos aren't very large so there's no need to bore you with a lengthy pretext for the sake of giving the dialup users something to do while they wait for the pics to load, I'll just do that as I go.

I will tell you that each and every thing posted here was made using scraps of material that I preshaped using the Dremel and a few small diamond bits & wheels, no saw, no cabbing machine & all tumbled to a high polish with no blemeshing.

OK so first off, a Brazillian agate trimming that had the basic shape already. I only ground it into this perfectly symetrical zipper tab shape with the Dremel and it eventually became this pendant.
The agate measures 8.25mm wide tapering to 7.75mm at the top x 40mm tall x 4.25mm thick at the base tapering to 3.25mm at the top.
This was a nice & easy little pendant to make with the Dremel since there wasn't much shaping involved and the agate co-operated with me
This here is one of those "enhanced" (pronounced: "dyded") agates I got at the scratch patch a while back. This one has always wanted to be a pendant but it needed to be repolished after all the abuse it took before I got it.
The stone measures 16.25mm at it's widest, 21mm tall & 9.5mm thick with a 7-prong cap and plated split ring. I had some problems with the cap on this one (it's a cheapy anyay) and I was thinking of redoing it but in all honesty, i'm going to sell this cheap & all I had to do was throw it in the tumbler and glue the cap on so i'm done with it. If someone actually offers to buy it then I'll throw on a split ring, I ruined the first cap trying to get the ring on too soon after gluing it and it peeled right off.

This is a pendant made from one of Vancouver Island's local stones.
It is a feldspar porhyry, feldspar being the white crystals in softer blue/green/grey bassaltic matrix.
Depending on where it's from and exactly what the arrangement of feldspar cytals looks like, it can be called "flower stone", "caligraphy stone" or "chinese writing stone" as well.
I know the bottom looks sorta lopsided in the pic but I assure you it's shaped nearly perfectly. I used an overhead flourescent tube that cast shadows at the angle where there was the least glare.

It measures 15mm wide at the base, 30mm in height & 7mm at it's thickest.
It's drilled through the side and has double chrome-steel split rings.
The chrome ring through the side of the stone was meant to be part of the "look" of the piece, the other one is simply there so a chain can be oriented correctly and it matches.
This stuff is a real bugger to succesfully tumble to a good overal shine as well. The feldspar crystals are the hardest part of the stone and the bassaltic matrix tends to undercut around it so it's best to either tumble an entire batch of just this material or use a cabbing machine on it if you don't want dull spots. Even after babying this one in the tumbler I still needed to finish polishing it with a Dremel pad impregnated with tin oxide to get out all the dull spots.
This one was a chip that came off of a rose quartz slab that was in "the rock box" one of the times I had it. I didn't want it to go to waste as tumbler scrap so I carved it into this little triangular pendant, cutting away as little material as possible since it was already so small.
The stone measures 11.5mm at the base, 19mm high and 5.25mm thick in it's center.
Somehow this one also managed to survive unscathed in the tumbler despite it's reputation to chip and fracture. You can see there is one self terminated natural fracture in the stone but it has remained stable throughout the process of shaping and polishing it so I know it will withstand actually being worn for what it's worth and i'm just glad I didn't end up wasting all the time I spent coaxing it into form on the Dremel only to have it fall apart in the tumbler. That's one thing I like about tumbling the stones, I can be assured the finished pieces will be pretty sturdy if they survived the torture they took in the barrel.
This is another one of those "oops, a piece broke off this slab" pendants that I cut and shaped with the itty bitties on the Dremel.
I am assured that this is a naturally colored blue quartz as well.
It measures 19mm at the base, 19mm high and 5mm thick.
It has been face drilled at the top radius and features a permanently epoxy set, modified chrome-steel split ring as a bail.

It looks a little bit closer to "true blue" in real life as opposed to the slight teal hue it has in the pic but the dynamics are off a bit in the image. My apologies again for not doing these with a proper set-up, it was late at night or I would have done hem outside to at least get the full spectrum of daylight light instead of using a crappy fluorescent.
I actually really enjoyed working with this material on the Dremel but all the microfractures and tiny voids in it make it a tough one to get a super smooth surface finish on. no mater what i do to it, there is always a slightly mottled look to the surface when it's viewed at the incident agle to a light source.
At any rate, i'm very happy with how this one turned out and i'm told that the color & depth of this stone actually improves over time as it is worn since it will absorb skin oils into it's microfractures but in the process it also loses some of it's "inner sparkle".
Last but not least, I will have to include my "Cracked Easter Egg" ;D
Read all about this one in the original thread, where I give a full biography of this cab turned pendant.
Well folks I hope you enjoyed this three part candy series cuz' that's it, it's over, all done.

...
Why y'all lookin' at me for?
I ain't got no candy for ya![/b]
;D
Rob