theimage1
starting to shine!

Member since August 2008
Posts: 33
|
Post by theimage1 on Sept 9, 2008 14:31:36 GMT -5
I finished on cab from a small slab of mookite, got it mounted and decided I need to try and use the last little piece so I created the second cab. I love Mookaite especially the reds with yellows. 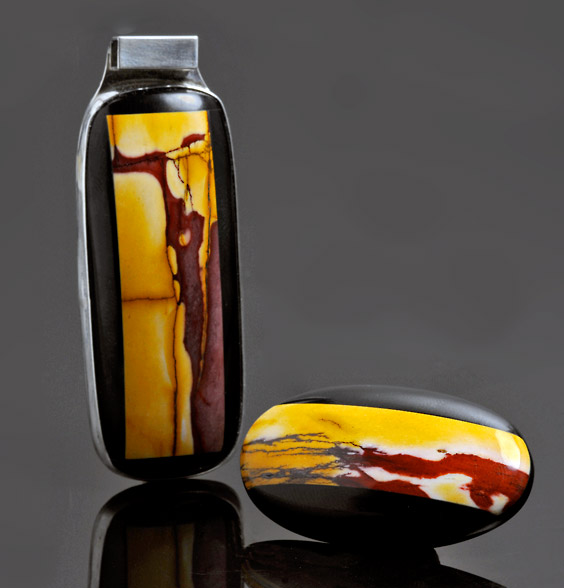 |
|
|
|
Post by parfive on Sept 9, 2008 15:13:20 GMT -5
Great stuff, there, 1. Especially like the oval.
Whadja use for black stuff? The mook looks awesome with that border.
Rich
|
|
|
|
Post by stardiamond on Sept 9, 2008 15:44:32 GMT -5
settings really set off the cabs.
|
|
theimage1
starting to shine!
Member since August 2008
Posts: 33
|
Post by theimage1 on Sept 9, 2008 16:08:02 GMT -5
The border material is Australian Black Jade. It's the only black (for that matter any color) jade that I have ever found that polishes easily.
|
|
|
|
Post by Bikerrandy on Sept 9, 2008 17:59:05 GMT -5
Those look great!! The border really brings out the colors.
|
|
SteveHolmes
fully equipped rock polisher

Member since July 2009
Posts: 1,900
|
Post by SteveHolmes on Sept 9, 2008 18:07:03 GMT -5
These look amazing! ;D this is something I've wanted to try for so long, but still haven't done so. You did a fantastic job on these, and the black really brings out the bright colors. Thanks for posting, and welcome to the board!
Steve
|
|
|
|
Post by Hard Rock Cafe on Sept 9, 2008 18:58:29 GMT -5
Fantastic cabs! I'm amazed at how tight a fit you got, especially on the rectangle. Is that 2 pieces total on the rectangle or 5?
Excellent photo, too.
Chuck
|
|
theimage1
starting to shine!
Member since August 2008
Posts: 33
|
Post by theimage1 on Sept 9, 2008 21:00:19 GMT -5
The rectangle is actually 6 pieces, 5 jade one mookaite. I have a totorial on line that shows more or less how it is made: gallery.mac.com/theimage1once you get to the page look at "makecab slide show" |
|
SteveHolmes
fully equipped rock polisher
Member since July 2009
Posts: 1,900
|
Post by SteveHolmes on Sept 9, 2008 21:42:15 GMT -5
Nice tutorial! Thanks for the link. Do you use both types of epoxy???
Steve
|
|
|
|
Post by Tony W on Sept 9, 2008 22:35:31 GMT -5
Beautifully done! Tony
|
|
adrian65
Cave Dweller  Arch to golden memories and to great friends.
Member since February 2007
Posts: 10,777
|
Post by adrian65 on Sept 9, 2008 23:51:00 GMT -5
BEAUTIFUL! I also like the silver setting, very original bail.
Adrian
|
|
|
|
Post by sitnwrap on Sept 10, 2008 0:31:04 GMT -5
That is a very beautiful cab. Just the way you did everything is outstaning. Something must be wrong with my computer as I can't get in to your link. Oh nuts!
Also welcome to RTH!
|
|
|
|
Post by Tweetiepy on Sept 10, 2008 10:06:16 GMT -5
OOO I like , like, like a lot!
It looks "rich"
|
|
|
|
Post by Hard Rock Cafe on Sept 10, 2008 11:42:38 GMT -5
Wow! Thanks for the excellent tutorial!
Chuck
|
|
theimage1
starting to shine!
Member since August 2008
Posts: 33
|
Post by theimage1 on Sept 10, 2008 22:17:21 GMT -5
Yes Steve I use both types of epoxy but for slightly different purposes. The UHU epoxy sits up strong within about 4 minutes of mixing. (Especially if you are slightly high on the hardener side!) THis lets me work fast when I want to create a single stone.
The Epoxy 330 sets up in more like 15 minutes and lets me glue multiple stones at the same time. I often glue up 4 or 5 in a single setting. (I glue on on the first two ends of 4 or 5 stones, and the 330 lasts long enough for it to still be workable.) Also if I am doing a colored backing on a translucent stone I always use the 330 because it dries absolutely clear, doesn't seem to yellow over time, and provides me working time to be certain I don't trap air bubbles.
|
|
SteveHolmes
fully equipped rock polisher
Member since July 2009
Posts: 1,900
|
Post by SteveHolmes on Sept 10, 2008 23:00:32 GMT -5
Thanks for the explanations on the epoxy.
Dang...I love this place and all the knowledge and talented folks!
Steve
|
|
|
|
Post by Tonyterner on Sept 12, 2008 11:05:30 GMT -5
Those are beautiful. Did you do the silver work too?
|
|
181lizard
Cave Dweller
Still lurking :)
Member since December 2005
Posts: 2,171
|
Post by 181lizard on Sept 12, 2008 13:31:11 GMT -5
I may be the last person on earth to find this out but I'm gonna spread it around anyway!
In the latest Rock & Gem mag...there's an article about getting more red or burgandy color in the Mook by heating it on your stove. Anyone else see it? Pretty cool.
|
|
181lizard
Cave Dweller
Still lurking :)
Member since December 2005
Posts: 2,171
|
Post by 181lizard on Sept 12, 2008 13:31:34 GMT -5
PS...nice job on the cab too!
|
|
theimage1
starting to shine!
Member since August 2008
Posts: 33
|
Post by theimage1 on Sept 12, 2008 20:08:43 GMT -5
Yes I did the silver work. Kept it pretty simple as I do with most of my composite cabs. Owyhee flower jasper (aka chinese dendritic jasper) black jade frame 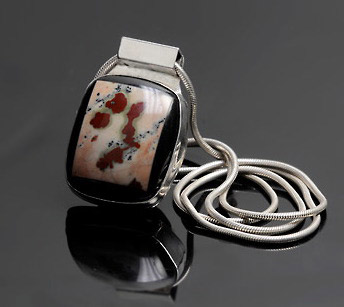 Serpentine w/ purite (Peru) black jade frame 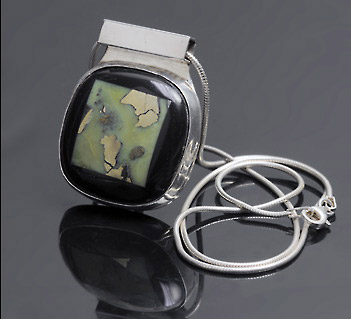 As for dying the mook, yes I saw it, but it seems to produce large read areas and not any fine structure. Maybe if you put hot nichrome wires on the surface ...? It looks like it's more of a bulk process. |
|


 Al Falfa


