bikiniduck
off to a rocking start

Member since December 2008
Posts: 6
|
Post by bikiniduck on Dec 4, 2008 15:18:11 GMT -5
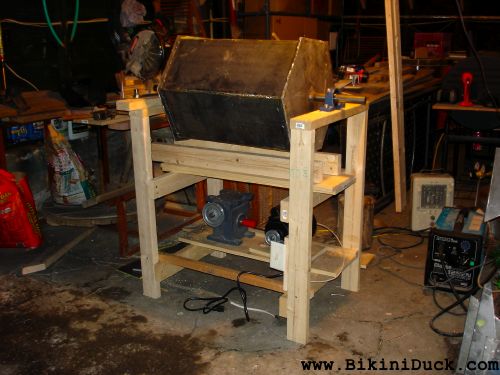 24" long, ~21" high, 3.6 cubic feet total room (27Gal), with a removable divider for 2 internal chambers. 6" and 18". Or one big 24" for extra large things. 1/4" thick steel plate. Its a heavy s.o.b too, at least 200lbs of steel there. But guaranteed to last forever. It is run by a 1hp electric motor connected to a 60 ratio geared speed reducer. Should do 17rpm once running. That was the one hardest part to find. Took a month of keeping an eye on eBay. Paid only $5 for it though (retails new for $500+) I've gone through too many rotary and vibratory tumblers over the years. I got tired of stuff breaking all the time, so I decided to make my own. But for whats its costing me to build this, its still a great bargain. I am going to use it to polish the jewelry and other items I make. However I would like to give rock polishing a try as well. I thought I would post this here as a quick example of what can be homemade for very little cost. A similarly sized "pro" tumbler goes for $2500-3000 from what I have seen. Total cost for everything right now is less than ~$300. Questions/comments welcome ;D --Martin-- |
|
|
|
Post by johnjsgems on Dec 4, 2008 17:01:49 GMT -5
That sounds like too much weight to me. I'd add two vertical 2/4s under each bearing to support the weight. 2x4s flat don't bear much weight. I'd add either diagonal braces or cover at least one end and one side with plywood to prevent racking.
|
|
bikiniduck
off to a rocking start
Member since December 2008
Posts: 6
|
Post by bikiniduck on Dec 4, 2008 17:28:40 GMT -5
Thats a good suggestion. Everything seems fine as it is now, but I am sure once I start loading it up and adding weight it might be an issue. I still have some extra wood, so it shouldnt be a problem to shore it up some more.
|
|
Saskrock
fully equipped rock polisher

Member since October 2007
Posts: 1,852
|
Post by Saskrock on Dec 4, 2008 19:31:58 GMT -5
You might want to find some rubber to line it with if you haven't already. I'm betting with steel plate and that much weight it will be really, really loud otherwise. Looks great though, should stand up really well. Good job.
|
|
rockwizz
freely admits to licking rocks

Member since May 2007
Posts: 971
|
Post by rockwizz on Dec 10, 2008 13:51:39 GMT -5
wow that's huge. What do you tumble in there? petrified dinosaurs? ;D ;D
thanks for sharing.
Ozzy
|
|
adrian65
Cave Dweller  Arch to golden memories and to great friends.
Member since February 2007
Posts: 10,777
|
Post by adrian65 on Dec 10, 2008 23:54:18 GMT -5
Impressive work, Martin!
"... I am going to use it to polish the jewelry ..." You must produce huge ammounts of jewelry if you want to use this monster for polishing them. I think you could try to polish very large rocks, too.
What inner layer do you use for cushioning the rocks? rubber carpet or?
Adrian
|
|
88pathoffroad
spending too much on rocks
 Oregon ROCKS!
Member since August 2008
Posts: 305
|
Post by 88pathoffroad on Dec 11, 2008 2:25:50 GMT -5
If you have a farm supply store nearby, you could try asking for horse stall mats, they're 3/4" thick square rubber mats that should fit in there. Trimming them's not too bad if need be.
|
|
Sabre52
Cave Dweller
Me and my gal, Rosie
Member since August 2005
Posts: 20,461
|
Post by Sabre52 on Dec 11, 2008 18:53:44 GMT -5
Man that's pretty cool. I'd also be worried about the weight because half full wouldn't that hold like 150# of rocks not counting grit and water.and the barrel weight. Boy keeping that monster in grit and polish would be a big deal too! I'd sure love to see the size of finished load it would turn out though. Now that would be a pile of pretty stones!....Mel
|
|
drjo
fully equipped rock polisher
Honduran Opal & DIY Nut
Member since May 2008
Posts: 1,581
|
Post by drjo on Dec 11, 2008 19:41:31 GMT -5
|
|
uneekarts
starting to shine!
Member since December 2008
Posts: 42
|
Post by uneekarts on Jan 1, 2009 12:38:27 GMT -5
Now that's a tumbler !!!  I grew up on a farm and my dad could make anything out of anything. I've seen him build a lot of projects over the years out of stuff that most people would call trash. It was seldom pretty but it always got the job done. I wish he was still around to help me build something like this. I have a great imagination and can design but when it comes to putting it together, I get lazy. |
|
drjo
fully equipped rock polisher
Honduran Opal & DIY Nut
Member since May 2008
Posts: 1,581
|
Post by drjo on Jan 1, 2009 15:23:31 GMT -5
Shame you aren't closer.
|
|
drjo
fully equipped rock polisher
Honduran Opal & DIY Nut
Member since May 2008
Posts: 1,581
|
Post by drjo on Jan 1, 2009 15:26:02 GMT -5
Hey bikiniduck...It's been almost a month!!! how about an update? P L E A S E !!!
|
|
bikiniduck
off to a rocking start
Member since December 2008
Posts: 6
|
Post by bikiniduck on Jan 1, 2009 22:21:37 GMT -5
Heh, sorry, been busy. Have spent hours working on www.Ringinator.comEach hobby needs its own specialized tools eh? ;P I have not tried rocks in it yet. Sadly its not waterproof yet. I need to go back and silicone all the seams. Biggest issue is that its cold here, and silicone caulk doesnt work when its -10°F outside. (Damn minnesota...) Since I first posted that pic I have beefed up the crap out of it. Used at least 10 feet of more 2x4's The inside is not lined with anything. Suckers 1/4" thick, it wont wear through anytime soon. Right now I am just using crushed walnut and corn to polish up jump rings for the stuff I make. ( www.Bikiniduck.com/catalog ). Its not loud, but I'm sure if I start using rocks it will need to be lined for the noise. And I saw that link someone posted a bit up. That is a huge tumbler. 7HP motor And here I thought mine was big. With mine, if I had to build it again it would be pretty much the same, but instead of 1/4" steel plate it would be mostly 2x4's and 1x6's, with a 1/16" or 1/32" sheet metal lining on the inside. But hey, its made now and it works, lol Let me know if you have any other questions. I check back every now and then. --Martin-- www.BikiniDuck.com |
|
drjo
fully equipped rock polisher
Honduran Opal & DIY Nut
Member since May 2008
Posts: 1,581
|
Post by drjo on Jan 3, 2009 0:00:04 GMT -5
ROFL...if someone just read your first and last post they would wonder just how many jump rings you could use!!!!!
I like your cutter too, could be converted to cutting grooves for groove wraps too.
Dr Joe
.
|
|
UtahRockHound
spending too much on rocks
Sometimes your the Windshield, sometimes your the Rock.
Member since May 2008
Posts: 301
|
Post by UtahRockHound on Jan 3, 2009 2:53:16 GMT -5
I have not tried rocks in it yet. Sadly its not waterproof yet. I need to go back and silicone all the seams. Biggest issue is that its cold here, and silicone caulk doesnt work when its -10°F outside. (Damn minnesota...) I noticed the wire feed welder you have sitting on the floor. I have one just like it. If the reason your tumbler is not water tight is because of the weld, then if the welder is capable of using gas, that would cure the problem. I was about to drop mine in the trash because I could not get a good weld out of it. Then I learned a trick from a Friend. I know that argon is very expensive, and the lease is no better. At $90 plus per refill on the tank, it adds up quick. With tank rental/purchase, you can push over $500 real quick. For aluminum, you use a pure mixture of Argon, for steel you use a Argon 75/25 Co2. With a 75/25 mix, you will not get much penetration, but it shields the weld from Oxygen and containments. Co2 is the key. You can buy a Co2 regulator from any soda drink place like Pepsi, or Coca-Cola, then put down a deposit for a Co2 tank from the same source, then refills are $20. I go through about 2 tanks per year. Because it has liquid Co2, the tanks last a long time. With Co2, you can run a perfect clean bead with little trouble. |
|
bikiniduck
off to a rocking start
Member since December 2008
Posts: 6
|
Post by bikiniduck on Jan 4, 2009 0:29:39 GMT -5
Actually for this project I did use gas. Luckily this welder had gas hookup as an option. It was $50 for a regulator and hosing for it.
Last summer I used the flux core wire to repair some stuff and absolutely hated the welds it made. So when I started on this project I bought a 40CF tank off of eBay, and had it filled locally with a 75/25 Ar/CO2 welding mix. The new tank on ebay cost me around $100 with shipping. Locally the used go for $150+. The gas itself is reasonable, only $30 to swap out an empty tank for a full one. I used about 90% of a fresh tank to weld all this together.
I thought I needed straight CO2 as well, but the guy at the gas place said that the 75/25 was a lot better for welding steel. Is straight CO2 better?
Some of the welds arent waterproof because of a few reasons. Firstly they are the first welds I did. As I progressed and got the hang of it more they got a lot nicer. This was the first time I ever welded with gas. Secondly to save some $$$ I cut all the steel using an angle grinder. Took about one $2 blade per 30" cut. The steel mill wanted something stupid like $20 a cut to shear it on their press. So because I did it by hand some sides were a little off or had small gaps.
Overall though it came out ok. Just needs caulked.
|
|
UtahRockHound
spending too much on rocks
Sometimes your the Windshield, sometimes your the Rock.
Member since May 2008
Posts: 301
|
Post by UtahRockHound on Jan 4, 2009 2:01:47 GMT -5
Yep, I know just what your saying. I been down that road.
The nice thing about wire feeds are they are perfect for filling gaps. On thicker metal like 1/8 or 1/4 which is thick for a light duty welder like ours, try pre-heating the area you will strike your first arc with a propane torch. The extra heat will make it flow right out. From there on, the metal picks up enough heat from the weld.
Another thing, use .23 wire. The lighter duty welders love it much better then the .30.
The guy selling you the refill is trying to make a living. He will always tell you it is better. The key here is ask him if he welds on a regular basis, or is only a distributer. Yes, if you can afford it, it is better. The truth is, foot for foot of welding. It is ten times as much.
The 75/25 mix is good. It does make for a cleaner bead as the gas will shield it better. I have welded with both, and much prefer the Co2 straight. Where the mix comes in best is on things like Exhaust pipe that has carbon in the pours that you can not grind out. Rust and or oil will do the same thing but not near as bad as carbon. If you grind all your welding surfaces, then weld, you will not even notice the difference. When your arc starts popping and or beads and will not blend, this is a containment in the weld. There is no substitute for cleaning/grinding the area first.
No exaggeration, with Co2, you could weld 30 or 40 of those tumblers, and still have gas left over. A mix of 75/25 is compressed gas. Co2 is like Propane. When compressed and pumped into the tank, it stays liquid. It does not expand into a gas until just before the Regulator. You get 40 times more gas from a tank half the size. Not to mention the refill only cost $20.
If you want to give it a shot, try renting a Co2 tank from Coca-Cola plant and or Pepsi. Put down your deposit and pay the $20 for the gas. After your done, take the tank back and get your deposit back. Your only out $20. I think you will be happy with the results.
|
|
bikiniduck
off to a rocking start
Member since December 2008
Posts: 6
|
Post by bikiniduck on Jan 5, 2009 17:45:10 GMT -5
Well, I already own the tank. No point in renting another one.
So once I empty out whats left in it I'll get it refilled with Co2. Thanks for all the info. Stuff like this is impossible to find online. Everyone that writes tutorials or info pages assumes everyone needs to have welds that will hold up on the space shuttle >.<
Sometimes semi-good welds are ok too. ;P
|
|
UtahRockHound
spending too much on rocks
Sometimes your the Windshield, sometimes your the Rock.
Member since May 2008
Posts: 301
|
Post by UtahRockHound on Jan 5, 2009 22:43:38 GMT -5
My one son is a certified welder. Went to school for it for two years. He is always giving me crap over my welds. And to think I taught him in the beginning.  I like to tick him off and tell him I have a Professional Weld All Tool. A grinder makes any weld look perfect. ;D |
|


 Al Falfa
