|
|
Post by bobby1 on Sept 19, 2010 22:24:19 GMT -5
I decided to continue and finish this carving this weekend. I have been working off and on on it for a couple months. It is a small vase? made from Davis Creek Obsidian. It is 1-1/2" tall. Bob  |
|
|
|
Post by FrogAndBearCreations on Sept 19, 2010 22:25:17 GMT -5
wow, that is neat!
|
|
|
|
Post by jakesrocks on Sept 19, 2010 22:35:08 GMT -5
Beautiful Job. It takes a lot of patience to do something like that.
Don
|
|
|
|
Post by NatureNut on Sept 19, 2010 23:15:03 GMT -5
Oh my! That's gotta feel good to complete. Love the detail. I'll bet people don't realize it and mistake it for blown glass.  Jo |
|
adrian65
Cave Dweller  Arch to golden memories and to great friends.
Member since February 2007
Posts: 10,790
|
Post by adrian65 on Sept 19, 2010 23:52:23 GMT -5
What a work of art! The amount of work must have been tremendous and the results are exquisite.
Adrian
|
|
|
|
Post by susand24224 on Sept 20, 2010 1:23:15 GMT -5
What an elegant little creation. I wouldn't know where to start--my hat is off to you!
Susan
|
|
|
|
Post by Donnie's Rocky Treasures on Sept 20, 2010 6:05:15 GMT -5
Very nice! I love the shape of it.
|
|
spokanetim
has rocks in the head
  
Member since October 2009
Posts: 656
|
Post by spokanetim on Sept 20, 2010 7:54:59 GMT -5
Very very cool, now you've got me wondering how you made that!
|
|
|
|
Post by tanyafrench on Sept 20, 2010 8:40:35 GMT -5
That would look so beautiful on my living room table! You did a wonderful job. I can't imagine the work that went into carving the vase.
Awesome, Tanya
|
|
|
|
Post by FrogAndBearCreations on Sept 20, 2010 8:56:00 GMT -5
now for the miniature gem tree you will put in it  |
|
|
|
Post by Toad on Sept 20, 2010 9:26:02 GMT -5
How did you do the work on the interior??
|
|
|
|
Post by bobby1 on Sept 20, 2010 14:56:41 GMT -5
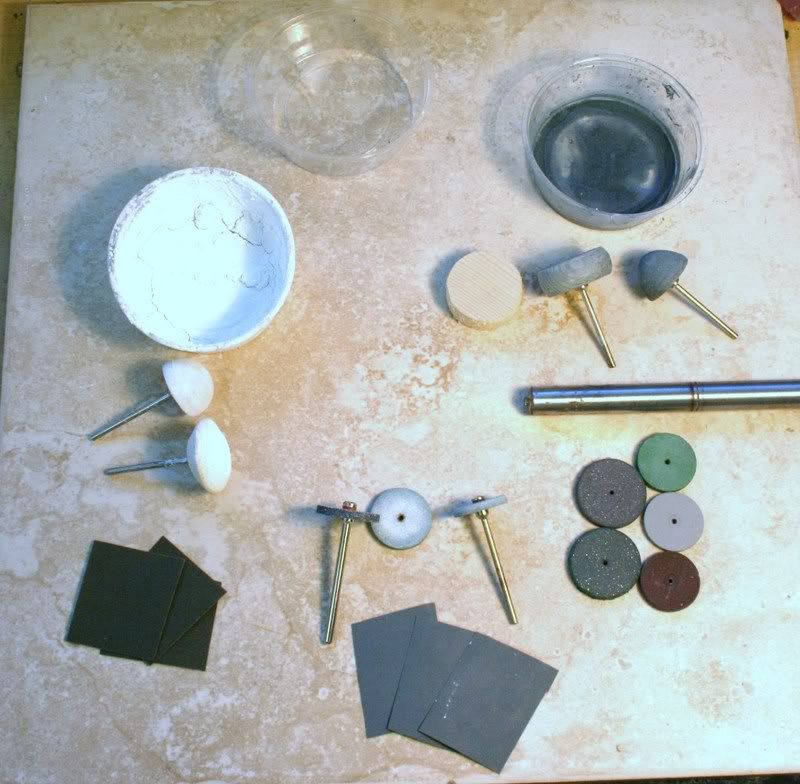
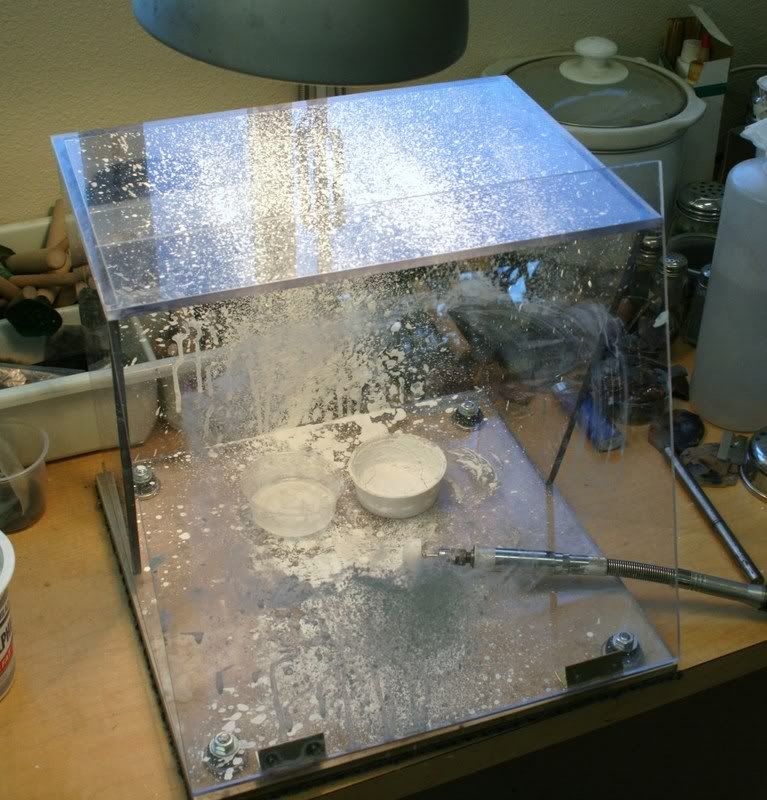
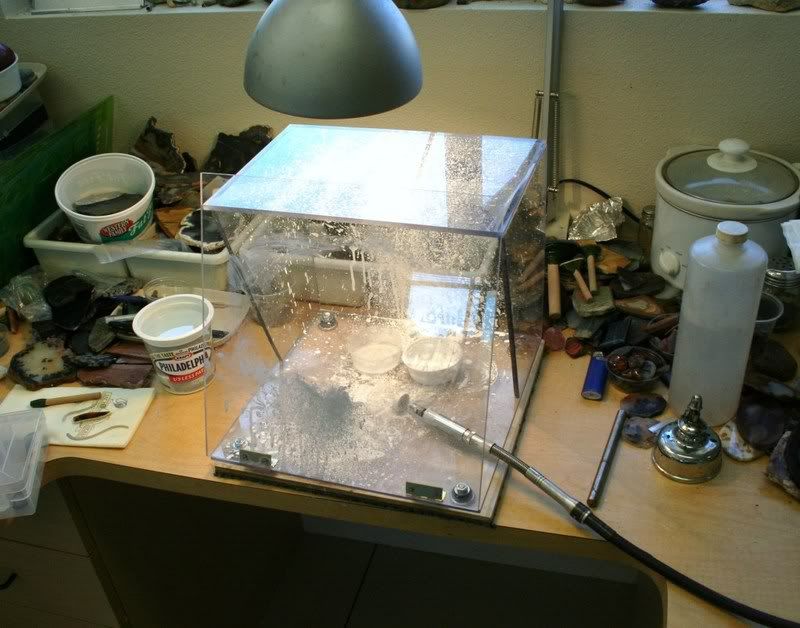
Here are some details about my carving work on this Obsidian piece: I started with a chunk of Davis Creek Obsidian (my favorite material to work) that was large enough to do the piece. I trimmed it with my 12" saw to a rectangular block. I then used my 8" trim saw to get it into roughly the shape that I wanted. I then ground it round and ground as much of the ring groove at the foot as I could with my 8" diamond grinding wheel on my cabbing unit. All the further steps were done with wheels mounted on small mandrels mounted in my Foredom handpiece. I use the duplex spring handpiece because I get much better flexibility with the movemebt of the handpiece and it has a smaller, more comfortable size. Here is a photo of the basic tools that I used:  Starting at the bottom center are the grinding wheels that I use. They are the Mizzy Heatless silicon carbide wheels. They come in two grits, coarse and fine. They are 1" in diameter and either 1/8" or 3/16" wide. They come in knife edge shapes and possibly others but I just shape them to what I want with the diamond pointed wheel dresser shown in the right center of the photo. I use them dry (they are designed to be run dry) and do most all the finish shaping with them including the ring groove at the foot, the round hollowed out center of the bowl, the vertical grooves on the outer surface of the bowl and the hollowed out bottom of the foot. These wheels grind suprisingly fast. I shape them to fit into the groove at the foot. At the right lower corner of the photo are the basic sanding wheels that I use. They are a rubberized silicon carbide wheels (Cratex is this particular brand) in various grits and they also come in various shapes, but again I just shape them to what I want with the diamond wheel dresser. For the finish sanding I use my cabbing unit with the Expando wheel and Silicon Carbide belts for the smooth outer surfaces that I can reach. Then I hand sand the grooves between the segments on the bowl and the groove above the foot with small pieces of 400 grit and 600 grit Silicon Carbide wet or dry paper shown at the bottom of the photo. Using soft wood wheels that I cut out with a hole saw and shape with a coarse file (shown in the upper right of the photo) I coat the wetted wheels with 600 grit Tumbling grit and sand inside the bowl and the groove at the foot and the concave under the foot. Finally, I use my large carpet polishing wheel to get as much as I can reach. Then I use the shaped wood wheels in the upper left with polish ( I used Rapid Polish because it was handy) to polish in the groove on the bowl and above the foot and the hollowed out center of the bowl and foot. The small dishes to hold water, tumbling grit slurry or polish slurry are some that I kept after using them to hold the hot sauces at a local Mexican restaurant. Recently, to hold down the mess from slinging grinding dust, tumbling grit slurry and polish slurry I made a carving station. Actually, making the Obsidian carving was what motivated me to build the station. It is made from 1/4" Lexan. I left a section on the sides open to allow me to reach in from both sides. The front hinges towards me so I can clean the window often And to allow me to take it outside to hose it down between grits. One thing that you might have noticed missing from my tools are small diamond grinding wheels or bits. I really don't care much for them especially where I'm not doing tiny detailed carving because they are expensive and they wear out too quickly. The Silicon Carbide Mizzy wheels have a reasonable life, are inexpensive ($0.49 each) and they are just as sharp from the begining of their life to the end. Hopefully, this will answer your questions. Bob   |
|
catskillrocks
fully equipped rock polisher
  
Member since July 2008
Posts: 1,270
|
Post by catskillrocks on Sept 21, 2010 21:04:58 GMT -5
As has been said already, really REALLY neat! Thanks for showing &
explaining how you did it.
Don
|
|
colliel82
has rocks in the head
  
Member since November 2007
Posts: 664
|
Post by colliel82 on Sept 24, 2010 12:21:40 GMT -5
One of the most beautiful pieces I've seen. Love your carving set up and explanation.
|
|
|
|
Post by frane on Sept 25, 2010 10:59:10 GMT -5
I love it!!! I love your set up too! Thanks for sharing!
Fran
|
|
dbrealityrocks
fully equipped rock polisher
  
Member since February 2010
Posts: 1,084
|
Post by dbrealityrocks on Sept 26, 2010 20:45:10 GMT -5
totally amazing
|
|