amyk
fully equipped rock polisher
 I'm a slabber, I'm a cabber, I'm a midnight wrapper.
Member since January 2010
Posts: 1,331
|
Post by amyk on Jan 17, 2014 19:31:59 GMT -5
I finally had success with a bezel. Thank you all for all your help and suggestions. I purchased a charcoal block. This helped immensely. I also purchased some pickle and pickle pot. I used that to clean everything before soldering. After that I was able to solder pretty easily with a micro torch. The same solder and metal I was using before, but now it worked.  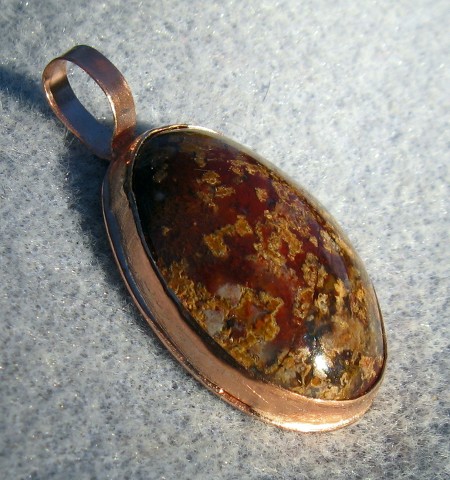 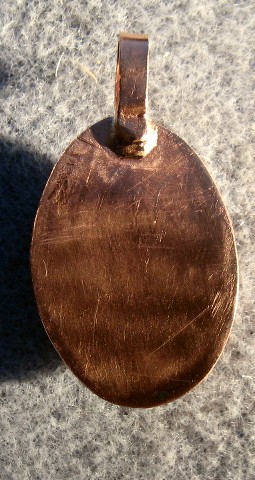 I still need to do a little more work with the dremel on the sides and be more careful with the file on the back. But the solder worked. I see a couple small gaps in the solder connection and my bail moved when it got hot, but I am stoked. Thanks again for helping. Now I don't need to throw my torch in the trash. Amy |
|
|
|
Post by radio on Jan 17, 2014 19:43:02 GMT -5
Yaaaay! Congrats on success at last! get some straight pins and use 4 of them to hold the bezel cup stationary while soldering. You can also use two or three more to hold the bail in position.After a few of them you will get the feel for it and they become easier.
I can't tell from the pic, is your bail double thickness on the back of the bezel cup?
|
|
amyk
fully equipped rock polisher
I'm a slabber, I'm a cabber, I'm a midnight wrapper.
Member since January 2010
Posts: 1,331
|
Post by amyk on Jan 17, 2014 19:46:37 GMT -5
Yes the bail is double thick on the back. I soldered it together and then soldered it to the back of bezel cup.
I used a piece of bezel wire to make the bail. It is kinda weak though. i need to find some thicker wire for bails.
Experiments and practice are half the fun right?
|
|
jamesp
Cave Dweller 
Member since October 2012
Posts: 36,471
|
Post by jamesp on Jan 17, 2014 19:54:21 GMT -5
Great work. Or should i say fun. Really. Bails are tedious.
|
|
Fossilman
Cave Dweller
Member since January 2009
Posts: 20,698 
|
Post by Fossilman on Jan 17, 2014 20:20:04 GMT -5
Thats awesome!
|
|
|
|
Post by radio on Jan 17, 2014 21:10:48 GMT -5
Yes the bail is double thick on the back. I soldered it together and then soldered it to the back of bezel cup. I used a piece of bezel wire to make the bail. It is kinda weak though. i need to find some thicker wire for bails. Experiments and practice are half the fun right? Do you have a pair of looping pliers, Rosary pliers or pliers of some type with round jaws so you can form a circular or slightly oval loop? You can make a very nice bail with two pieces of 14 to 18 ga copper wire about 30mm long each. At about the 5mm mark, bend each wire very slightly, just enough so the long portions of the wire don't touch when the 5 mm sections are placed together and forming a "Y" shape. Solder the two 5mm legs together then use your round nosed pliers to form a loop in the longer legs so they touch at the top of the 5 mm section. You should end up with a "P" shaped piece of double wire. Using a dull knife or something similar, force it down between the loop and spread them apart however far you think looks good. You can spread the front and back equally, or spread only the front part of the loop for an interesting effect. You will need to do some tweaking and filing and test fitting to the bezel cup for a clean fit. Using 4 straight pins, pin around the edges of the bezel cup on the charcoal block so it doesn't wiggle around. Flux the short legs of the bail and place under the bezel cup and so the ends of the looped wire touch the bezel. Using tweezers, place a couple of solder snippets where the bail meets the bezel and solder. You will likely have to turn the piece over and solder the 5 mm legs to the back of the bezel cup if the solder doesn't flow under there. Clean up the rough edges of the 5mm legs with a small file It sounds intimidating, but is easier than it sounds  This way you only have one thickness of wire on the back of the bezel cup and it looks more professional. You can also tweak the angle and opening of the double wire bail after the soldering is done |
|
|
|
Post by rockjunquie on Jan 18, 2014 8:22:48 GMT -5
YAY!!!!!  Congratulations! Good job sticking in there. Your piece looks really good, too! |
|
|
|
Post by Rockhobbit on Jan 18, 2014 9:43:40 GMT -5
Great job!
Sheri
|
|
|
|
Post by connrock on Jan 18, 2014 11:20:43 GMT -5
Glad to see you stuck with it and made your first soldered pendant!
The worst is over now and you'll only get better with every piece you do!
Congratulations on a job well done!
connrock
|
|
|
|
Post by pghram on Jan 19, 2014 22:58:20 GMT -5
That's a nice pendant, especially for your first one.
Rich
|
|
aimeesrockworks
spending too much on rocks
 I really do look like my avatar... it kinda freaks me out.
Member since December 2010
Posts: 458
|
Post by aimeesrockworks on Jan 20, 2014 13:46:33 GMT -5
Lovely pendant... and a lovely stone to boot!
|
|
Tom
fully equipped rock polisher
My dad Tom suddenly passed away yesterday, Just wanted his "rock" family to know.
Member since January 2013
Posts: 1,557
|
Post by Tom on Jan 20, 2014 18:49:49 GMT -5
Congrats on finally getting things to work for you:)
|
|
amyk
fully equipped rock polisher
I'm a slabber, I'm a cabber, I'm a midnight wrapper.
Member since January 2010
Posts: 1,331
|
Post by amyk on Jan 21, 2014 18:01:45 GMT -5
Thanks everyone. I couldn't have done it without you.
Now to find time for another one.
|
|


 This way you only have one thickness of wire on the back of the bezel cup and it looks more professional. You can also tweak the angle and opening of the double wire bail after the soldering is done

 Congratulations!


 You're down here in the bilges with the wharf rats. You will get more mileage above on the upper decks.