|
|
Post by 1dave on Jun 29, 2014 14:43:29 GMT -5
Several years ago I bought a couple of 8" expanding drums from zarguy to add to my lever lock "thump-bumpers." After rockpowell helped me finally get my weeds beat down I decided it was time to do it to it. I'm using an old Lortone arbor I've had in storage for 40-50 years and an even older motor I think I got from my grandfather.  Deciding where to place stuff and things. I started building a splash pan with galvanized sheet from rockpowell . The drums are 3" wide, a 4" wide splash plan will be plenty . . . until I looked at it up close and personal. Do I want to try to get a lost cab out of there? NO! Redesign time!  Four carriage bolts secured the arbor, but the motor needs to swing up and down to adjust belt tension, so I drilled out a door hinge to match the front holes of the motor, screwed it in place, then bolted it to the motor. A 3/8" long carriage bolt allows tilt/height adjustment. Major components bolted in place, I began wiring . . . 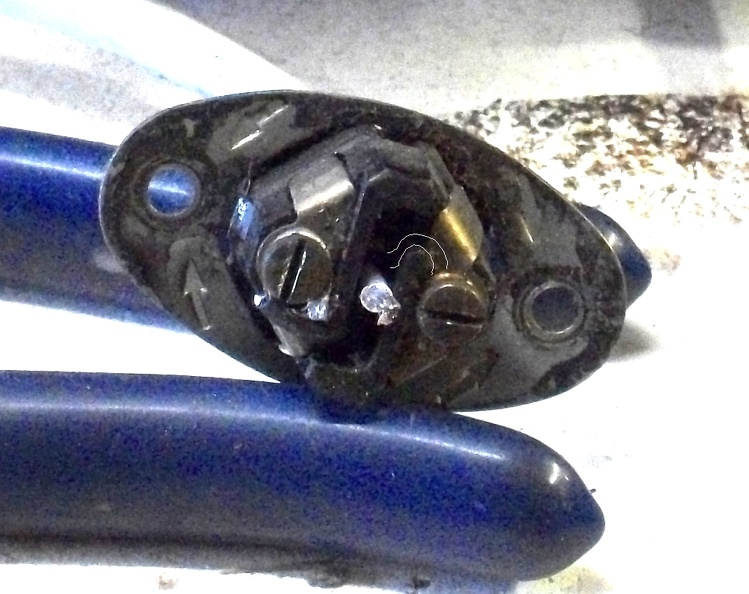 The Sheetrock tabs need to be broken off from switches and outlets IF you are going to be using curved metal handy box covers. That was when I noticed I had a problem with the ancient cord from the motor. Crumbling, HAD to be replaced! Nightmare? I removed the two screws holding the cable in and to my delight those old guys were SMART! 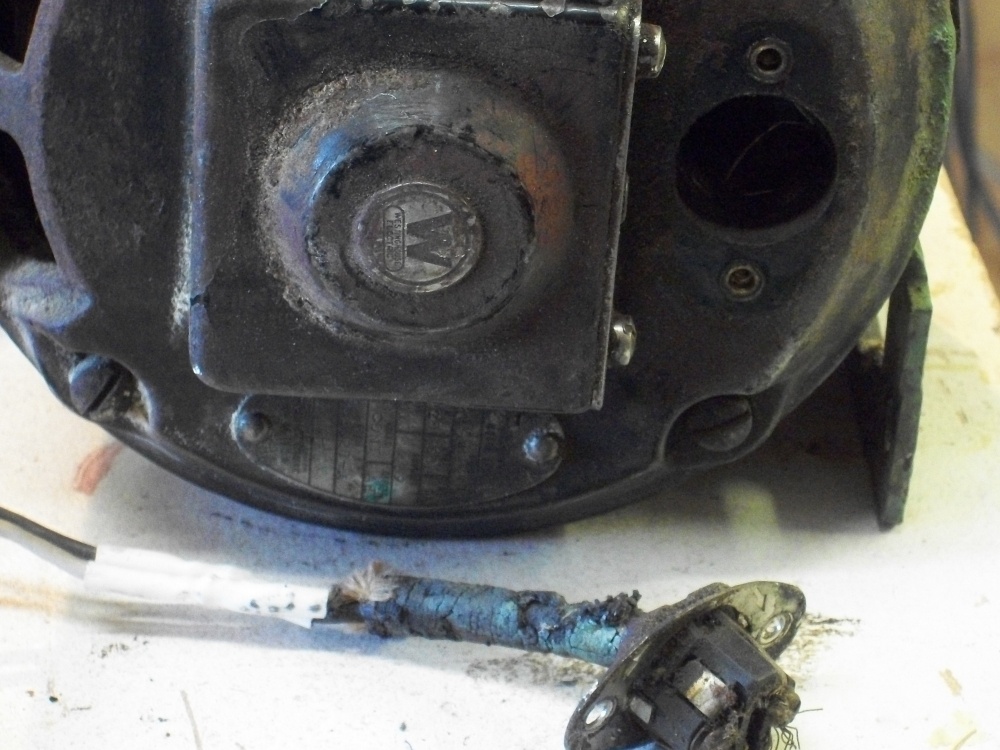 Loosen the two screws and remove the old cable, replace with a new one. I soldered the stranded wire so it wouldn't spread all over the place like the original had. FUN! with my shaking hands getting the soldering tip, solder, and wire close to each other at about 88 beats per minute it finally happened! The round cable entry hole reduces to a slot on the other side so only the two wires can protrude. It is hard to see, so I outlined the new black wire twisted around and into place on the brass screw. The soldered white wire is still sticking straight up. You can see the slot where it is supposed to wrap around and onto the silver screw. To reverse the motor (which was made to mount upside down!) just take this out and rotate it 180 degrees!Our modern manufacturers could learn from them! Now to finish wiring and build two splash pans. So far my only sheet metal tools are a pair of straight snips, a piece of angle iron, a couple of clamps and a hammer. Some tips from Don, jakesrocks would be appreciated. |
|
|
|
Post by jakesrocks on Jun 29, 2014 15:08:17 GMT -5
Dave, I think I have you beat in the ancient motor department. I'll have to dig it out and get a pic.
For the hoods and pans, add a drop shear, finger brake and Pittsburg lock seam machines to your inventory, and build real professional looking hoods. (I wish I still had access to those machines). Or build aluminum hoods & pans, and add a TIG welder to the tool inventory.
I have half a sheet of 1/8" aluminum in my shed, so when I start building my hoods & pans, I'll cut them out and take them to my local welding shop.
I hope you added a ground wire to that motor. Instead of using a light switch, you might look into using a toggle switch with water proof boot over the switch, and make sure the box cover is sealed real good. Also water tight strain reliefs where the wires come out of the box. Gonna cost a few more bucks, but I've always gone a bit overboard in the safety department. Especially around electricity.
Now, what can I attempt to help you with ?
|
|
|
|
Post by 1dave on Jun 30, 2014 6:26:05 GMT -5
Dave, I think I have you beat in the ancient motor department. I'll have to dig it out and get a pic. For the hoods and pans, add a drop shear, finger brake and Pittsburg lock seam machines to your inventory, and build real professional looking hoods. (I wish I still had access to those machines). Or build aluminum hoods & pans, and add a TIG welder to the tool inventory. I have half a sheet of 1/8" aluminum in my shed, so when I start building my hoods & pans, I'll cut them out and take them to my local welding shop. I hope you added a ground wire to that motor. Instead of using a light switch, you might look into using a toggle switch with water proof boot over the switch, and make sure the box cover is sealed real good. Also water tight strain reliefs where the wires come out of the box. Gonna cost a few more bucks, but I've always gone a bit overboard in the safety department. Especially around electricity. Now, what can I attempt to help you with ? Just general hood design. How deep or shallow should the pan be? Do I need this much curve as posted by juzwuz, or will 45's be good enough in your opinion? I'd love to see your old motors. They were invented by Tesla who sold the rights to them to Westinghouse in 1888. Those old timers had a lot of wonderful design ideas! |
|
|
|
Post by jakesrocks on Jun 30, 2014 8:01:59 GMT -5
I'd have the pans at least 1" deep. Take a look at Lortones hoods & pans. www.kingsleynorth.com/skshop/product.php?id=46609&catID=106445 degree bends in the hood will work. I'd attach a spreader across the front. A sponge, piece of stiff rubber or leather would work. Before I can get pics of that motor, I have to mow down 3' high weeds around my shed door. The tall grass & weeds are loaded with tics this year. Can't remember what brand the motor is. May be an old Edison Electric. 1/4 HP. Very heavy cast iron frame. Thing weighs a bunch. I only keep it because it's part of a vintage rock tumbler that I'm restoring. |
|
|
|
Post by 1dave on Jun 30, 2014 10:50:39 GMT -5
I'd have the pans at least 1" deep. Take a look at Lortones hoods & pans. www.kingsleynorth.com/skshop/product.php?id=46609&catID=106445 degree bends in the hood will work. I'd attach a spreader across the front. A sponge, piece of stiff rubber or leather would work. Before I can get pics of that motor, I have to mow down 3' high weeds around my shed door. The tall grass & weeds are loaded with tics this year. Can't remember what brand the motor is. May be an old Edison Electric. 1/4 HP. Very heavy cast iron frame. Thing weighs a bunch. I only keep it because it's part of a vintage rock tumbler that I'm restoring. I only want the pan 3/4" deep for cab retrieval so plan deep drainage. I'll cover the pan edges with 3/8" tubing. Thanks for agreeing on the 45's. I have built water spreaders out of AARP (I hate them!) and old credit cards (after magnetically wiping them. I'm in the weed war too! Kochia is among the worst. Clear an area, and a week later new seedlings are already a foot high. They eagerly get over six feet! |
|
|
|
Post by jakesrocks on Jun 30, 2014 11:03:49 GMT -5
See you have a Covington belt sander. I bought one at an estate sale years ago, and its been collecting dust ever since. I may have to get it running and get some use out of it before I croak.
Got plenty of credit cards. I get them and membership cards in the mail all the time. I cut them to needed shapes for cleaning hard to get at places in my saws. Great for scooping rock snot out.
|
|
deserthound
spending too much on rocks

Member since December 2013
Posts: 390 
|
Post by deserthound on Jun 30, 2014 14:23:31 GMT -5
like the way it all came together..i like old motors also  |
|
|
|
Post by johnjsgems on Jun 30, 2014 15:15:16 GMT -5
As cute as old vintage motors are they are almost never t6hermally protected. Every one on my dad's old equipment burned up on me when something went wrong. Motor smoked before breaker tripped. Fpr a display (like Don's vontage tumbler they would look great. I would not run it unattended though. Don't forget to use a GFCI receptacle as well as adding a ground wire. I can't remember when Lortone used the green paint but it was before the gold color they replaced with baby blue.
|
|
|
|
Post by jakesrocks on Jun 30, 2014 15:39:50 GMT -5
LOL. John, nothing cute about the old motor I have. That thing's ugly as sin. Weighs more than the new 3/4 HP motor I have too.
|
|
|
|
Post by 1dave on Jul 1, 2014 16:05:34 GMT -5
CAUTION: I am not a "tin knocker" so take my advise with a grain of salt. Luckily, YOU have jakesrocks to adjudicate my blunders. I laid this out to be 8" wide - 6" pan with 1" sides. The front is 1 1/2" long because it will be tipped up on an angle. The bottom is 11" long (was going to be 12", but that was getting too close to the motor and I don't want to replace the belt) and it is to be 11" tall. I want the corners to be on a 45 0 angle, 4" long. From Trigonometry, multiply that by 0.707 = 2.828" less than 10" before making the top bend, so that back is about 8.172" tall (anything between 8 1/8 and 8 1/4 will be close enough) before the 45 0 is bent, then the 4", then a 4" top, another 4" and cut the down plate at whatever looks good. On second thought, I added another bend on the end to contain the water. Layout complete, cut the side joints, 90 0 on the front that will be angled, 90 0 cuts on the 90 0 bends, 45 on the 45 0 bends - cut so the drips will be angled down into the pan. It is far easier to make short bends than long ones! Clamp it to the angle iron and start bending. The piece of 1" C channel shown above by the motor is handy to clamp for bending the other side. A small chisel is helpful to direct the joints to bend in the way you want them. a block of wood helps bend the joints. And now to put it all together. A pair of vice-grips Holds the joint on the angle you want. I'm using 1/4" pop rivets, so I need a 3/16" bit to make the holes. Calk in the joint, then pop rivet it together and on to the next. |
|
|
|
Post by jakesrocks on Jul 1, 2014 16:44:52 GMT -5
Dang Dave, who needs an old tin knocker around, when you have trigonometry on your side ? Never did master trig.
|
|
|
|
Post by 1dave on Jul 1, 2014 17:23:54 GMT -5
Dang Dave, who needs an old tin knocker around, when you have trigonometry on your side ? Never did master trig. Trig is simple IF someone hasn't told you it is hard. Make a triangle with sides 3, 4, and 5 dimensions long and you ALWAYS get a right angle. Add up the angles on any triangle and they ALWAYS add up to 180 0. Know 3 things about any triangle and you can easily figure out the rest. So I haven't screwed up too bad so far? |
|
|
|
Post by jakesrocks on Jul 1, 2014 18:15:37 GMT -5
No, not really. What you have there should work good. Just be sure to cover the sharp edges with split hose or something.
As an old tin knocker, I would have done it different, but I won't try to confuse your build. Since I no longer have access to the proper sheet metal equipment, when I start setting up my Poly arbors, I think I'll just go ahead and buy the Lortone hoods & pans. Save me a lot of headaches and bloody knuckles.
|
|
|
|
Post by 1dave on Jul 1, 2014 18:22:04 GMT -5
No, not really. What you have there should work good. Just be sure to cover the sharp edges with split hose or something. As an old tin knocker, I would have done it different, but I won't try to confuse your build. Since I no longer have access to the proper sheet metal equipment, when I start setting up my Poly arbors, I think I'll just go ahead and buy the Lortone hoods & pans. Save me a lot of headaches and bloody knuckles. There are a lot of others thinking about building splash pans that would LOVE to see your tin knocker way of doing it ! |
|
|
|
Post by jakesrocks on Jul 1, 2014 20:05:47 GMT -5
I'll see if I can draw up some plans.
|
|
|
|
Post by nowyo on Jul 12, 2014 1:35:27 GMT -5
Not so much a question about the pans or the metal work, I can figure that out close enough. I haven't used the expando wheels yet and was wondering if they are directional? Have a little project in mind.
Russ
|
|
|
|
Post by 1dave on Jul 13, 2014 21:15:56 GMT -5
Not so much a question about the pans or the metal work, I can figure that out close enough. I haven't used the expando wheels yet and was wondering if they are directional? Have a little project in mind. Russ Yes they are directional. Usually there is an arrow showing which way they should turn. Spinning that direction, they expand, gripping the sanding belt. I put a few dabs of rubber cement in the middle to keep them from drifting from side to side. Spin them the opposite direction and the belts will loosen and come off. |
|
|
|
Post by nowyo on Jul 14, 2014 22:15:32 GMT -5
That's what I was expecting. Thanks, Dave.
Russ
|
|


 Al Falfa