|
|
Post by captbob on Nov 30, 2014 16:29:28 GMT -5
yeah... so what did you do all afternoon? slacker

|
|
|
|
Post by captbob on Nov 30, 2014 17:01:05 GMT -5
5+ foot weld plus the outer reinforcements = a LOT of grinding and welding (+ cutting the plate) - you've been busy! Wondering why you didn't make your access door before welding the plate to the bowl. The access going to be a pipe?
You sure have all the fun toys!
|
|
jamesp
Cave Dweller 
Member since October 2012
Posts: 36,155
|
Post by jamesp on Nov 30, 2014 19:46:56 GMT -5
A long weld is tedious. I think i did OK. Will water test it. Will test that barrel right on the table before finishing the frame/drive. By filling it with rocks and water to see if it has slipping or jamming issues by spinning it by hand. The shaft is keyed, so other barrels could be slid onto it if a keyed pipe was welded to the barrels, would have to cut the welded shaft off the barrel in photos. If I had welded(or even cut the hole) for the pipe access it would have warped the flat plate and made the long weld difficult. Gotta cater to the long weld. Will weld a 6 inch diameter shorty pipe and use one of these: farm9.staticflickr.com/8187/8137402876_c1b5cd7ca9_z.jpg |
|
Deleted
Deleted Member
Member since January 1970
Posts: 0
|
Post by Deleted on Nov 30, 2014 22:45:42 GMT -5
For a second, I thought you were making a fuel tank for your motorcycle. A tumbler?
The box is inside.
|
|
Deleted
Deleted Member
Member since January 1970
Posts: 0
|
Post by Deleted on Nov 30, 2014 22:46:15 GMT -5
BTW
Nice weld!!
|
|
jamesp
Cave Dweller
Member since October 2012
Posts: 36,155
|
Post by jamesp on Dec 1, 2014 1:02:02 GMT -5
Edge welds like that will keep you on you toes. Thanks for noticing Scott. Hoping this thing will do better job. |
|
|
|
Post by rockpickerforever on Dec 1, 2014 5:17:07 GMT -5
yeah... so what did you do all afternoon? slacker
The guy just don't quit, does he? jamesp is the EverReady bunny - he keeps going, and going and going... This will be an interesting diversion. Nice work, BTW. |
|
jamesp
Cave Dweller
Member since October 2012
Posts: 36,155
|
Post by jamesp on Dec 1, 2014 7:00:20 GMT -5
Thanks rockpickerforever and captbob. I think there is 4 hours over 2 days time. Small beans for average mo welder with the right tools. Had the materials laying around, half of them were cluttering my work area. Maybe a better way of tumbling will come out of this. Who knows ? Thinking a vibration generator needs to be mounted on that flat plate-a rotary vibe ha |
|
jamesp
Cave Dweller
Member since October 2012
Posts: 36,155
|
Post by jamesp on Dec 1, 2014 18:22:17 GMT -5
Used a Hytrol 30 to 1 reducer. This one from junkyard, but can be bought on E-bay used for $100-120. Bulletproof box. Motor is 1725 RPM 1/4 HP. Shooting for barrel to turn at 6-10 RPM Legs and pulleys/sprockets left to do. 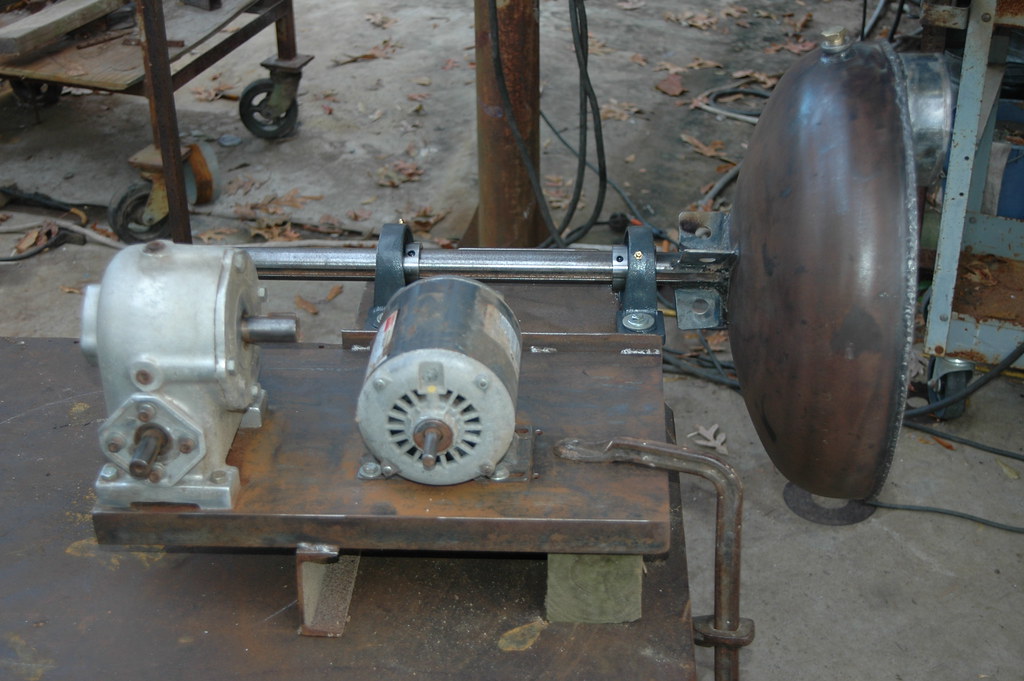  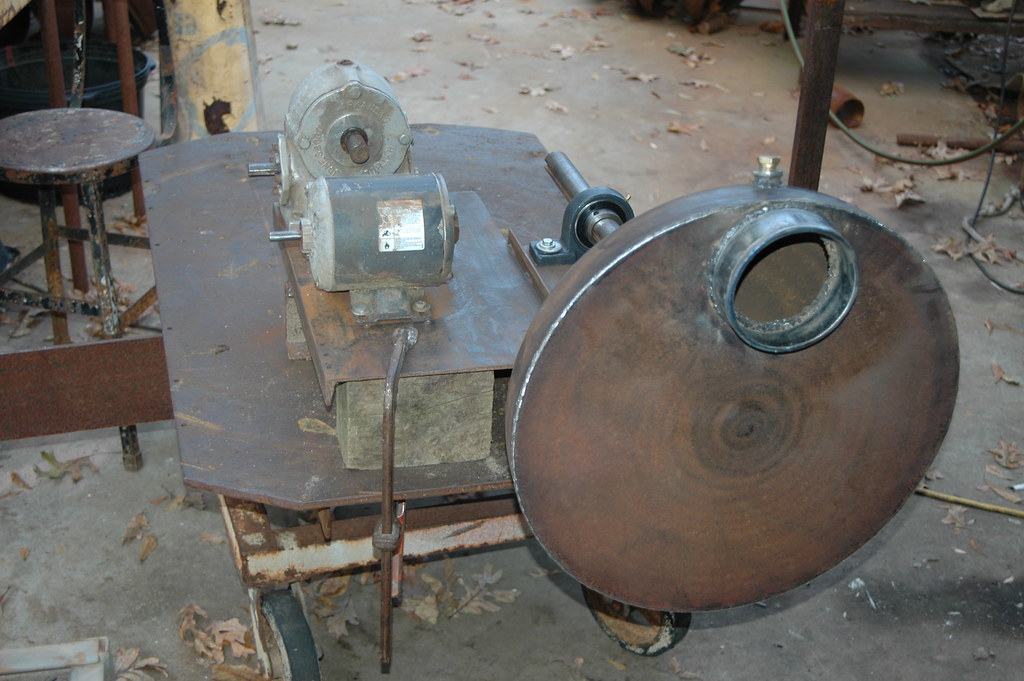 Used 5 inch opening and 1/2 inch drain 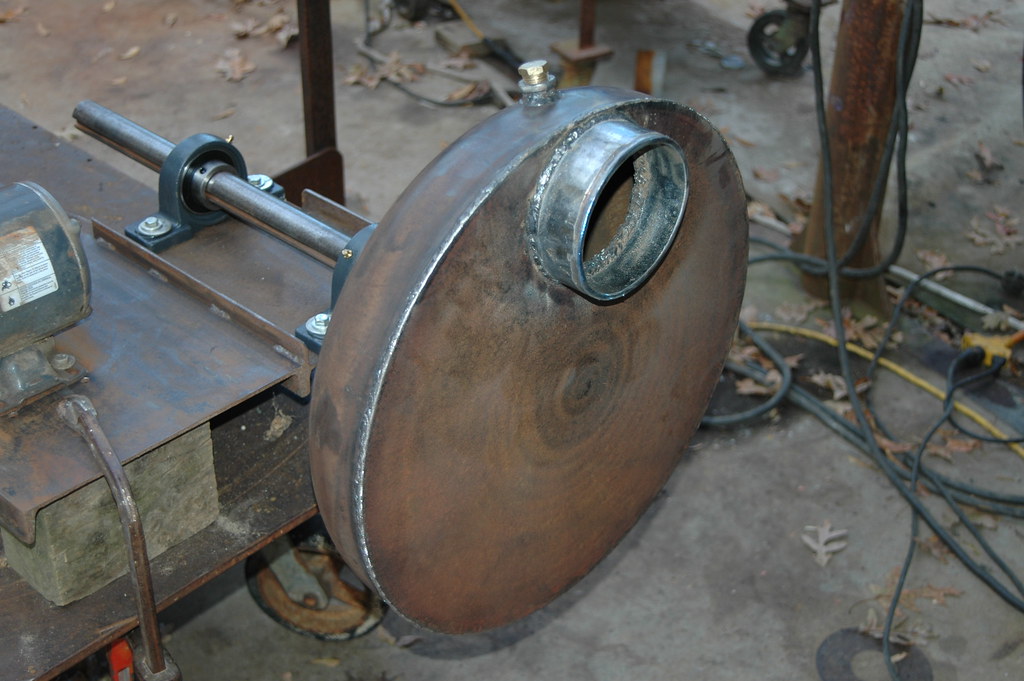 |
|
Deleted
Deleted Member
Member since January 1970
Posts: 0
|
Post by Deleted on Dec 1, 2014 19:08:58 GMT -5
How do you seal the opening? To me it looks like a alien death cruiser. The 5" opening is the warp drive exhaust. I can see the guys from inside the bus station lockers from men in black using that for transport. These guys  |
|
Deleted
Deleted Member
Member since January 1970
Posts: 0
|
Post by Deleted on Dec 1, 2014 19:13:29 GMT -5
to seal leaks in long welds like that, paint the weld with "loctite". The loctite will not harden in air, but will wick into the leaks, then and only then, in the absence of air and in the presence of iron, it will harden and seal the leak. The next day wipe away uncured loctite with a wet rag. It's saccharin!
|
|
jamesp
Cave Dweller
Member since October 2012
Posts: 36,155
|
Post by jamesp on Dec 1, 2014 20:13:03 GMT -5
to seal leaks in long welds like that, paint the weld with "loctite". The loctite will not harden in air, but will wick into the leaks, then and only then, in the absence of air and in the presence of iron, will harden and seal the leak. The next day wipe away uncured loctite with a wet rage. It's saccharin! Locktite makes some cool stuff. Interesting trick Scott. Seal, will probably stick tight fitting foam disc in the pipe to fill the volume: 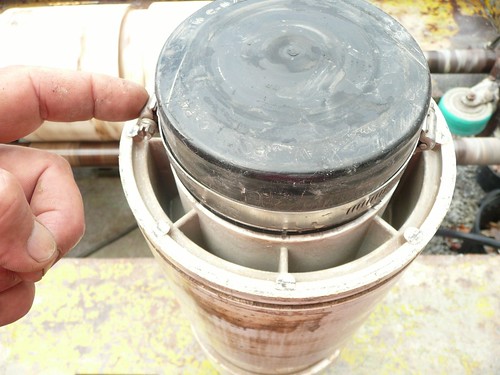 |
|
Deleted
Deleted Member
Member since January 1970
Posts: 0
|
Post by Deleted on Dec 1, 2014 20:28:12 GMT -5
I got a 60 minute training on adhesives and a bunch of time was spent on loctite clones. That weld fixing trick was my best takeaway.
Never made a sale, but, I learned a lot!
I didn't know they had 5" rubber cleanout covers. Nice.
|
|
jamesp
Cave Dweller
Member since October 2012
Posts: 36,155
|
Post by jamesp on Dec 1, 2014 21:26:51 GMT -5
I got a 60 minute training on adhesives and a bunch of time was spent on loctite clones. That weld fixing trick was my best takeaway. Never made a sale, but, I learned a lot! I didn't know they had 5" rubber cleanout covers. Nice. I could not find a steel pipe to fit a 6 inch cap. So the 5 inch pipe, and found this rubber cap. Hope they still make it: www.grainger.com/product/FERNCO-Flexible-Cap-3HDA9?functionCode=P2IDP2PCP |
|
quartz
Cave Dweller
breakin' rocks in the hot sun
Member since February 2010
Posts: 3,341
|
Post by quartz on Dec 1, 2014 23:38:37 GMT -5
Clones, clones, everywhere a clone.
|
|
jamesp
Cave Dweller
Member since October 2012
Posts: 36,155
|
Post by jamesp on Dec 2, 2014 5:14:06 GMT -5
Clones, clones, everywhere a clone. Well how fast should that thing turn Larry ? If that container does not work, another 1 inch shaft can be slipped into the bearings. With some other barrel welded to it. Was not too fond of turning a gearbox full time. But it was neat and clean. Looking at a 2 inch motor pulley and a 12 inch gearbox input pulley. 1 to 1 chain and sprocket from gearbox output to 1 inch shaft. Do the most reducing before the worm gear that way. Gearbox is 1:30 and 2 inch and 12 inch is 1:6 so 1725/180 = 9.5 RPM. Seem close ?? What about 16 grit sintered diamond blocks brazed to the inside of the container ? Medieval rock torture chamber. I imported a box of 30 grit sintered diamond blocks. About 100 of them. They are 3/8 X 5/8 X 1 inch. I think they cost $70. They are for the teeth on a 6 foot quarry saw. Getting tired of using so much 30/60 grit. As this thing tumbles wear will occur probably at the center area of the bowl and flat plate where the most rolling action occurs. Why not stick those diamond blocks on the bowl and plate cover and give those rocks a diamond massage. I suppose a half dozen loads could be run in it. Then cut the plate off and measure it's thickness w/a micrometer. To find where the most wear occurred. Attach diamond segments at wear area on bowl and plate, and sew her back up. Check out the variety of shapes, they are getting cheaper. 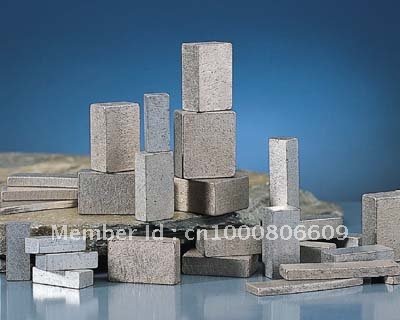 @shotgunner @shotgunner , remember our girlfriend Elin ?? Sent her an email asking for 8 or 16 grit diamond segments.  |
|
jamesp
Cave Dweller
Member since October 2012
Posts: 36,155
|
Post by jamesp on Dec 2, 2014 8:05:20 GMT -5
MrP-Shaft is 1.5 inches, I think I said 1 inch earlier.
|
|
jamesp
Cave Dweller
Member since October 2012
Posts: 36,155
|
Post by jamesp on Dec 2, 2014 8:31:37 GMT -5
Holy cow. Went through the junk pile and found sprockets and a pulley to get 12.5 RPM. #40 chain sprockets. So ratios will be about 2.5" @ motor, 5" @ gear box input, 13 teeth @ gearbox out put, and 30 teeth on final drive. 1:2, 13:30 and 1:30(gearbox)- 1/2 X 13/30 X 1/30 X 1725 = 12.5 RPM 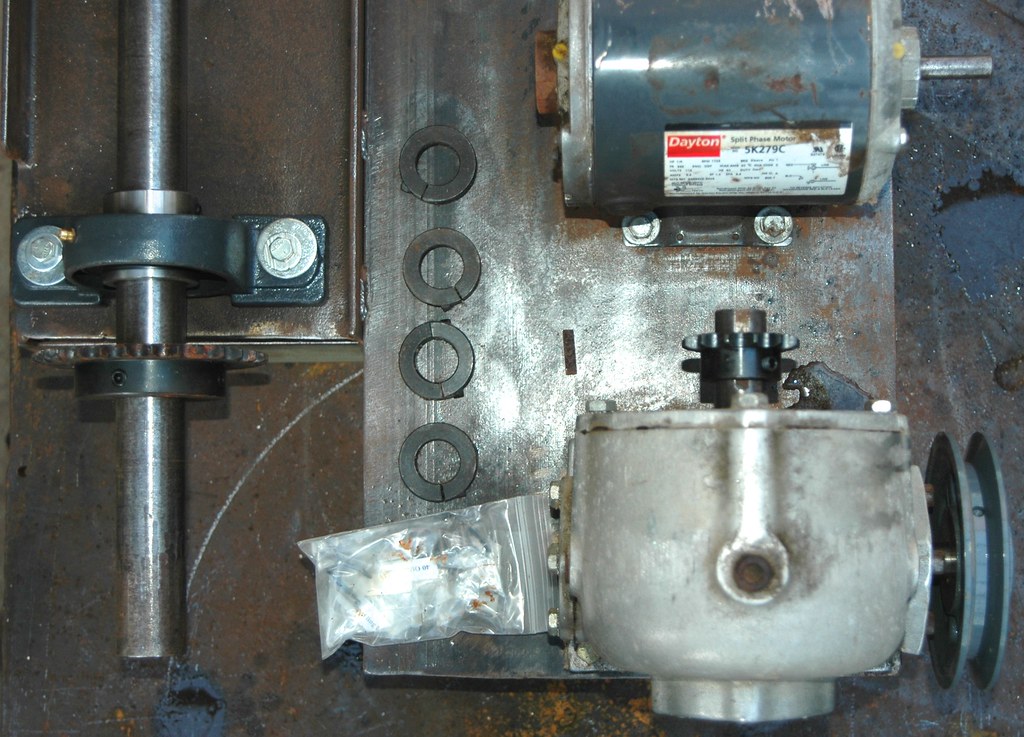 |
|
Deleted
Deleted Member
Member since January 1970
Posts: 0
|
Post by Deleted on Dec 2, 2014 10:27:03 GMT -5
I've been thinking about Ellin myself. Thinking about making my own core drills, need aggressive segments to weld to pipes, that are designed for very hard stones. It seems industry lacks this configuration.
What's holding me back is centering the nut on the attachment end. How did you center your shaft? Do you have a "method" for doing so?
...and BTW why didn't you put a large nut there instead and thread the shaft, making it possible to interchange barrels?
|
|
jamesp
Cave Dweller
Member since October 2012
Posts: 36,155
|
Post by jamesp on Dec 2, 2014 11:31:44 GMT -5
I've been thinking about Ellin myself. Thinking about making my own core drills, need aggressive segments to weld to pipes, that are designed for very hard stones. It seems industry lacks this configuration. What's holding me back is centering the nut on the attachment end. How did you center your shaft? Do you have a "method" for doing so? ...and BTW why didn't you put a large nut there instead and thread the shaft, making it possible to interchange barrels? I understand that problem. To center the shaft before welding. Welding a nut on and not only getting it centered but flat with a long core drill is an issue. Wobble on a tumbler barrel does not matter, but a cutting bit, albeit slow, is a problem. The longer the bit the worse. That is a job for a metal lathe. Weld it all and then chase the threads. If you are feeling lucky: If you set the core drill on a lazy susan, spin it, put a pointer next to it, get it dead center by rotating it, then place the nut on the closed end of the core drill with a 1-2 foot shaft threaded into it, spin it again and watch for wobble at the top of the shaft Remove wobble with shims and tack weld., better w/a pointer up high so you can see relative wobble. I would put a 1/32 shim that is smaller than the nut, under the nut, paper works, between nut and top of core drill, so when you tack it, you can manipulate it a bit by bending the weld. May have to start over and do again. It can be done. I have welded 20 foot I-beams dead plumb using that technique.(tack it close and hammer screw divers as wedges until plumb and then sick it. The table that contraption is sitting on is a 4 foot lazy susan with a bridge over it. to find center. It can be done if you take your time. |
|


 Al Falfa


