Getta Grip
noticing nice landscape pebbles

Member since November 2016
Posts: 81 
|
Post by Getta Grip on Dec 8, 2019 22:17:28 GMT -5
This is a good write up. You seem like you know what you are talking about but I wanted to mention it anyway. You did check to make sure the arbor/pillow block bearings are not worn. Grab the shaft and see if there is any movement vertically or horizontally in the shaft. There shouldn’t be any movement. Of course the arbor also needs to be bolted down very securely. My carriage on my 18” always has a very little movement if you grab it but presumably the force is constant pushing back during a cut. The rails obviously shouldn’t. Yea, that was my first concern, but after Rockoonz and I pulled this thing from it's home in a mud puddle, I cleaned it up and replaced the spindle bearings. They only have a couple hundred hours on them. I did check them though and they are fine. If these modifications don't eliminate the issue, the next step will be to ad some two inch, thick wall, square tubing to the side of the box to reduce any flexing around the spindle mount. But I'm hoping my current efforts will tighten it up. |
|
Getta Grip
noticing nice landscape pebbles
Member since November 2016
Posts: 81
|
Post by Getta Grip on Dec 8, 2019 22:09:00 GMT -5
A local machine shop is closing and I went to their equipment sale. I picked up this Ultra-Vibe 18 for $5. Can't hardly beat that.  whole unit whole unit by Glen Ray, on Flickr  Lable Lable by Glen Ray, on Flickr It was full of media. It looks mostly unused. Is there a lapidary use for this stuff?  media media by Glen Ray, on Flickr  top off top off by Glen Ray, on Flickr There is some wear on the center hole, on the tower, but I believe I can do something with that. It was being used to de-burr metal parts and the guy had water piped in and drained out. I don't see a need for that in lapidary. I plugged it in and it works great. |
|
Getta Grip
noticing nice landscape pebbles
Member since November 2016
Posts: 81
|
Post by Getta Grip on Dec 8, 2019 0:18:29 GMT -5
Progress pictures. I removed the carriage. Notice that the guide bars are bolted to 1" x 2" 1/8" x 18" channel iron with the legs to the walls. I don't like it. There is too much flexibility in that channel.  Carriage assembly removed Carriage assembly removed by Glen Ray, on Flickr I'm replacing the mount rails with solid 1" x 2" Cold rolled steel. In this picture, I have begun the process of laying out all the holes. Notice the mounting holes in the original are more or less, randomly located. I am going to keep the heights of the guide rods and the clearance hole for the drive screw, but I'm going to put the mounting holes on the same center line as the guide rods and 1-1/2" on each side of the guide rods. One other point here is that with the channel iron the guide rod bolt heads were inside the legs. I am going to use 1/2-13 flat head screws with allen drive. I believe there are star type lock washers made especially for flat head screws. I am going to attempt to find them. In the Portland metro area, the best chance of finding odd hardware is at the Parkrose Hardware stores. They have the best on-hand selection, I have ever found.  Front mount rails new and old Front mount rails new and old by Glen Ray, on Flickr The next picture shows where one of the guide rods was seated. I hit the face of the channel iron with a couple file strokes and revealed that the mounting face was not flat. As you can see, the area around the bolt was high. I believe this fact and the fact that the other guide rod mounting hole had been .... stretched a bit. ( probably with a rat tailed hole stretcher.) are probably part of the reason my saw wouldn't stay in alignment.  Guide Rod front left mounting hole Guide Rod front left mounting hole by Glen Ray, on Flickr Here is a picture of the other hole. You can see it is also high in the middle and not quite round.  Guide Rod front right mounting hole Guide Rod front right mounting hole by Glen Ray, on Flickr Well that's enough for tonight. I'll keep you posted on my progress. |
|
Getta Grip
noticing nice landscape pebbles
Member since November 2016
Posts: 81
|
Post by Getta Grip on Nov 30, 2019 23:46:47 GMT -5
I don't know if you figured out what you needed to know, but here's a little bit of information.
To find your blade RPM, divide the motor RPM by (driven pulley diameter divided by the drive pulley diameter) for example;
the motor is 1740 RPM
The driven pulley is 10"
The Drive pulley is 4.5"
So 1740/(10/4.5)=783 RPM
To calculate surface feet per minute, multiply PI times the blade diameter times the driven shaft RPM divided by 12.
For example;
a 20" blade times PI (3.14) times the driven shaft RPM = (20 x 3.14 x 783) /12 = 4097.7 sfpm
A great source for inexpensive pulleys and belts is Surpluscenter.com. The have an online catalog and will mail you a free hard copy catalog if you want one.
|
|
Getta Grip
noticing nice landscape pebbles
Member since November 2016
Posts: 81
|
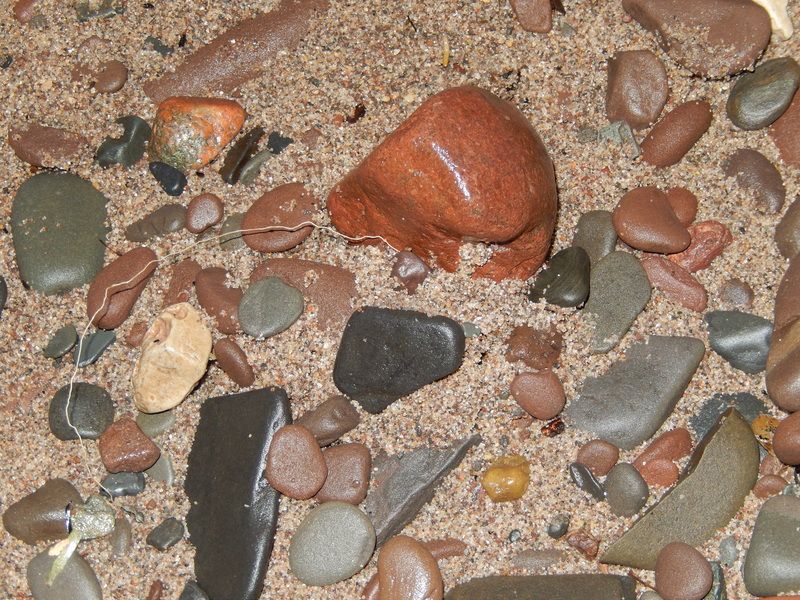
Post by Getta Grip on Nov 29, 2019 23:10:29 GMT -5
Greetings all, Here's a picture of saw marks, I'm getting on my 20" saw. I have found my alignment continually moves. I zero it, make a cut, and find it's once again .020" out of alignment. To align it, I make a mark towards the edge of the blade. I set up my indicator on the mark and zero it. I move the indicator across the blade and rotate the blade to a point that the indicator can measure on the same mark. I can get about 18" across the blade. My saw uses a spindle unit, that bolts into the side of the saw box. I added three adjustment screws to the spindle flange to make adjustment easier. I had been using shims. I discovered some looseness in the carriage guide rods. If I put side force on them, I can alter the indicator 5 to 10 thousanths. I am going to be pulling the whole carriage assembly and tightening the rod ends. I'm a little concerned about getting the carriage and rods to slide smoothly when I'm done, but I'll address that when I get to it. Here's a few pictures of my saw and my saw marks.  Marks on slab 2 Marks on slab 2 by Glen Ray, on Flickr  marks on slab marks on slab by Glen Ray, on Flickr  My saw 3 My saw 3 by Glen Ray, on Flickr |
|
Getta Grip
noticing nice landscape pebbles
Member since November 2016
Posts: 81
|
Post by Getta Grip on Sept 9, 2017 13:35:32 GMT -5
OOPS!  I made a mistake! The file I attached was an old version that had an error in the Belt formula. I edited the top post and changed out the old file for a correct one. I made a mistake! The file I attached was an old version that had an error in the Belt formula. I edited the top post and changed out the old file for a correct one.
Sorry everyone, I guess I'm getting grey hair between my ears.
|
|
Getta Grip
noticing nice landscape pebbles
Member since November 2016
Posts: 81
|
Post by Getta Grip on Sept 9, 2017 10:55:18 GMT -5
I should also mention that this file is protected, but not with a password. If you want to make any modifications, you can go to the "REVIEW" tab and select "UNPROTECT" . I protect it because, it's real easy to mess up the formulas. The belt length formula is a bit complex and ANY change to it can cause problems with it.
But if you see a better way to get good results by all means feel free to fix it. Let me know what you do so I can fix mine too.
Thanks
Glen
|
|
Getta Grip
noticing nice landscape pebbles
Member since November 2016
Posts: 81
|
Post by Getta Grip on Sept 9, 2017 10:48:22 GMT -5
|
|
Getta Grip
noticing nice landscape pebbles
Member since November 2016
Posts: 81
|
Post by Getta Grip on Sept 8, 2017 17:14:51 GMT -5
|
|
Getta Grip
noticing nice landscape pebbles
Member since November 2016
Posts: 81
|
Post by Getta Grip on Sept 2, 2017 15:54:40 GMT -5
Greetings Everyone, I just got a Foredom BL-15 Bench Lathe Kit for $40
It appears to be unused. Do any of you have any experience with these tools? Is it a keeper  or a creeper? or a creeper? 
Thanks Glen
|
|
Getta Grip
noticing nice landscape pebbles
Member since November 2016
Posts: 81
|
Post by Getta Grip on May 25, 2017 15:27:58 GMT -5
I recognize it. That's meatloaf. You're just messing with us aren't you
|
|
Getta Grip
noticing nice landscape pebbles
Member since November 2016
Posts: 81
|
Post by Getta Grip on May 25, 2017 10:03:09 GMT -5
I mostly like it.....however after many years in industry and industrial safety/hygiene, would you please have your talented husband fabricate a guard for the pulley on the buffer? Then he would also need to make another one for the saw (which never had one when new.) One advantage of using stuff you built is you instinctively know what is and what isn't going to happen if you pay attention and use it properly. I'm an industrial mechanic. I've been around rotating equipment for 50 years. What you said is true. You do know your equipment. However...... Things can happen in milliseconds that can have lasting effects. If you get distracted for a second and a finger gets into a pulley, you're going to have a really bad day. I doesn't mean you were particularly careless or inattentive. it can happen in an instant and when it does you will look back at your reasoning for not having proper guards and you will look at your mangled appendage and your reasons just won't make much sense. What may be worse is to have a friend or relative get caught in your pulley. It's one thing to hurt yourself and quite another to hurt a friend or maybe a grandchild. It takes a little work, but guards can be built in your garage. Here's a link showing how I made a guard for my 20" saw.. forum.rocktumblinghobby.com/thread/78024/started-fabrication-belt-guardJust to emphasize what we are talking about, this is a picture of what can happen in a split second 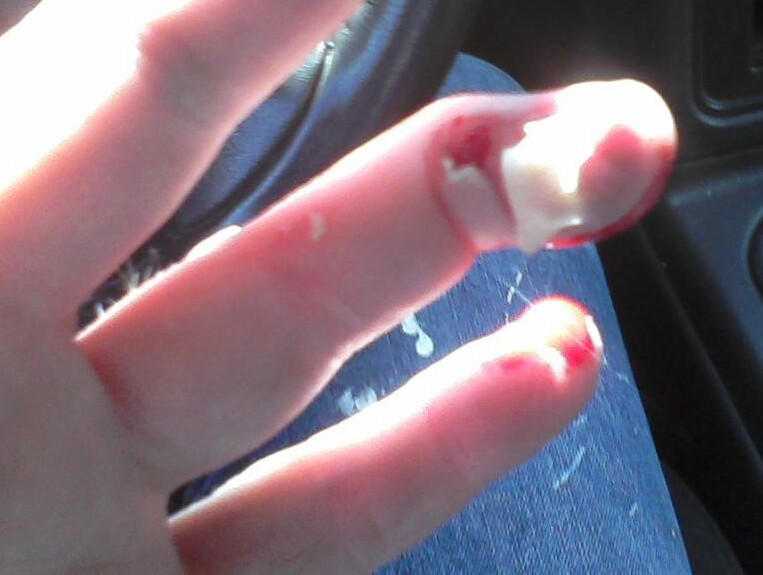 finger finger by Glen Ray, on Flickr |
|
Getta Grip
noticing nice landscape pebbles
Member since November 2016
Posts: 81
|
Post by Getta Grip on May 18, 2017 16:47:07 GMT -5
Greetings Everyone,
I am restoring an old HP B-12 grinder. The buffing wheel and shroud (right hand side) are missing.
I'm trying to decide if I will put one or two Expando wheels on that end of the shaft or should I put a leather polishing wheel back on there.
Here's one concern. My shaft is going to be spinning 1740 RPM. That's pretty fast for a polishing wheel.
I have a 12" leather bull wheel I can put on there but I'm not convinced that's the best use of the space.
I would appreciate any thoughts you may have on this.
Currently I have the following wheels.
180 gt.... Red/brown Cratex rubber 120gt (Acts like a 360 gt) ..... 600 gt ..... 1200 gt.
I have a separate 12" leather bull wheel unit that I can use for polishing. I also have just a 12" wheel (sanding disk from a Shopsmith) that I can easily turn into a bull wheel.
|
|
Getta Grip
noticing nice landscape pebbles
Member since November 2016
Posts: 81
|
Post by Getta Grip on May 12, 2017 16:48:27 GMT -5
Do you have any more information regarding "Johngems"? |
|
Getta Grip
noticing nice landscape pebbles
Member since November 2016
Posts: 81
|
Post by Getta Grip on May 12, 2017 15:56:16 GMT -5
Greetings All,
Anytime anyone asks " What blade should I buy?" It seems the answer is always "Buy a MK 301".
Awesome! Now the next question is.......... Where can I get the best deal on a 18" or 20" MK 301 blade?
Do we have any Good Deal Dealers on this forum?
|
|
Getta Grip
noticing nice landscape pebbles
Member since November 2016
Posts: 81
|
Post by Getta Grip on Apr 25, 2017 7:32:14 GMT -5
Great deal for $50. Diamond Pacific may sell a vise for the saw. Kingsley North has strips of silicon carbide sanding paper for the thumper wheel, but you may want to replace it with an expando drum. That will cost more than what you paid for the while unit! Lynn Yea I think Expando is the way to go. This looks like a good place to ask about grit.
I have the following grit 8" wheels. What grit do you think would be useful on the expando? 80, 180, 600, 1200
|
|
Getta Grip
noticing nice landscape pebbles
Member since November 2016
Posts: 81
|
Post by Getta Grip on Apr 25, 2017 7:28:31 GMT -5
If I was at home I could send you a photo of the vice and how I used a Lortone hood and tray to replace the one you are missing and yes with an expando on that end. Pictures could be helpful. Does yours also have the buffer on the end? I'm probably going to fold up some sheetmetal to make trays and shrouds. There just doesn't seem to be a lot of them out there.
Do you use the vise on that saw? I'm guessing the downward force from the blade keeps the vise and stone down on the table.
|
|
Getta Grip
noticing nice landscape pebbles
Member since November 2016
Posts: 81
|
Post by Getta Grip on Apr 24, 2017 13:47:08 GMT -5
Sounds like a CW song doesn't it? I bought this for $50 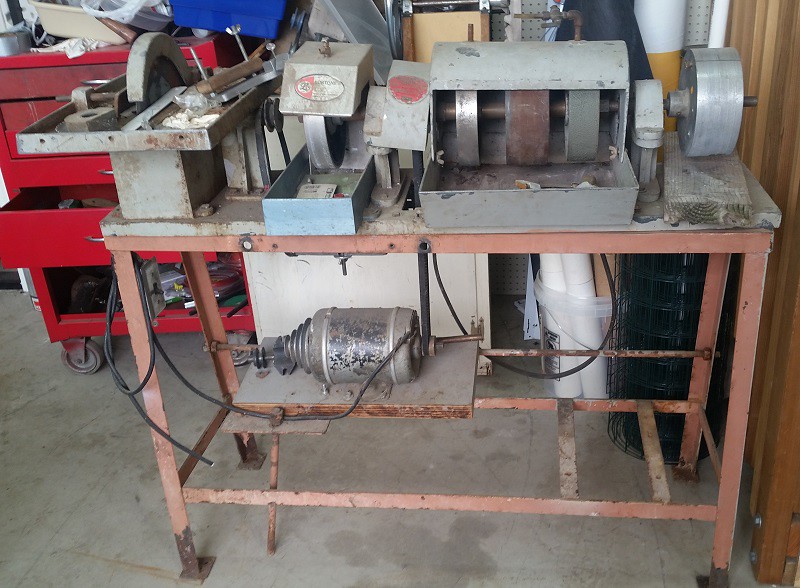 As purchased As purchased by Glen Ray, on Flickr Notice some lortone parts on this HP B12? Notice the thumper wheel on the right and the missing buffer and shroud? I've been looking around the internet for parts for this thing, but I'm not having much luck. Anyone have parts or know someone who may have parts? I'm looking for trays and shrouds. I have another HP cabber that is going to need parts also. but this one will be for my shop. I am also looking for vise parts for this saw. This is a 10" saw that is part of the HP b12. I see a guide slot and a pulley for a vise assembly but I don't have any of the parts. Anyone have parts or suggestions? 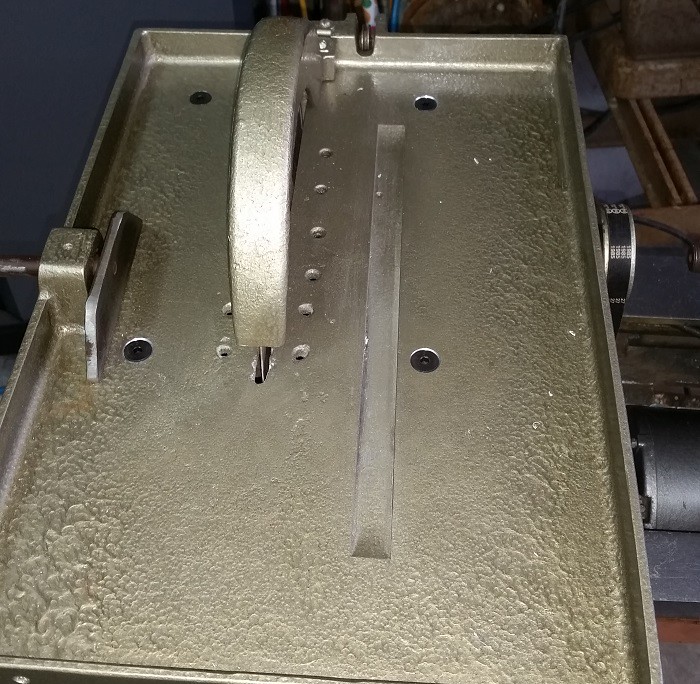 10 inch saw 10 inch saw by Glen Ray, on Flickr Thanks Glen |
|
Getta Grip
noticing nice landscape pebbles
Member since November 2016
Posts: 81
|
Post by Getta Grip on Apr 19, 2017 9:06:45 GMT -5
Hello Andy and welcome to the forum. I suspect I have talked to you before. Are you affiliated with Sphereheaven.com?
I was going to talk to a local lumber mill and see if I could get a spent band saw blade. The idea would be to use Anthon diamond brazing rod to add diamond pads to the blade edge. I have not followed up on that yet. I did find some of the blades are about .08" thick. I could imagine brazing 1/2" long 3/16" square steel pads to the edge and then coating the pads with diamond. a rock cutting giant band saw would take quite a bit of engineering but I believe it could work.
Glen
|
|
Getta Grip
noticing nice landscape pebbles
Member since November 2016
Posts: 81
|
Post by Getta Grip on Apr 6, 2017 13:49:01 GMT -5
HOLD IT! RIGHT THERE! I don't think the law allows you to have THAT MUCH fun. Better stop enjoying that new toy so much. You may get in trouble! 8^) I know right!!! I probably spend 10 hours a day in my shop. Glad my hubby has a need to watch the news (I DO NOT) after work to unwind! You're lucky. My wife likes TV also but 10 hours per day would certainly (and has gotten) me in trouble. That's OK though. She is softer, nicer and smells better than my rocks and equipment. My 20" saw cuts 6 minutes per inch so if I put a 10" wide rock in there, I've got a one hour commitment. While I'm cutting, I work on the restoration of my Highland Park B12 cabber and 10" trim saw. There's no problem figuring out how to fill the time. |
|


 I made a mistake! The file I attached was an old version that had an error in the Belt formula. I edited the top post and changed out the old file for a correct one.
 or a creeper?